How to block ads on Android without rooting the device
This article will show you how to use the free, open source application to block all ads on Android without harming the battery.
If you use Android, you'll see ads appear everywhere. Not only are they annoying, they also monitor users or even carry malicious code. If you no longer want to see ads on your phone, follow the simple steps in the tutorial below.
Previously, if you wanted to block ads on Android, you would have to root the device, which would be very complicated. But now with just a few steps, you can help your Android device run faster and still avoid being bothered by ads.
This article will show you how to use the free, open source application to block all ads on Android without harming the battery.
Blokada is a free application on the F-Droid Repository, you can download it if you install the F-Droid application on your phone. If not, download and install the APK from the F-Droid website.
Note: Please choose to allow the installation of applications from unknown sources in the Settings section before installing this APK file.
Blokada uses Android's VPN system to block ads similar to AdGuard, but instead of filtering all traffic data, it only filters DNS traffic. This is how Blokada blocks ads.
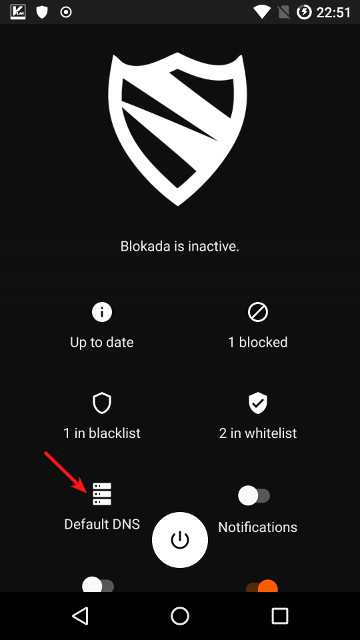
Step 1 - Blokada doesn't have many installation options. After installing and opening the application, select the Power button under the screen.

Select the Power button below the screen
Step 2 - A message will appear asking to confirm the VPN settings on the device, select OK.
Connected status
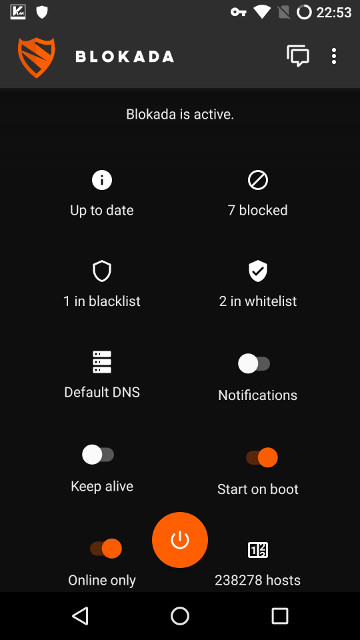
Step 3 - Blokada's icon will turn orange, a small key icon on the status bar shows that the VPN session is active, meaning Blokada has started blocking ads.
The default DNS is blocked
Step 4 - By default the app will have a notification when blocking 1 ad but you can turn it off from the home page. Alternatively, choose Keep alive to avoid deactive machines.
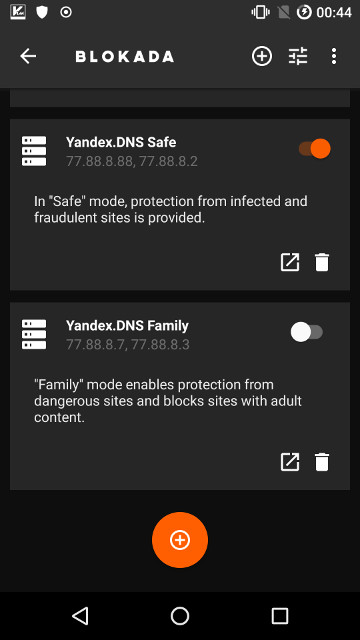
List of editable DNS users
Step 5 - Although Blokada doesn't need to set up much settings, you can still adjust. On the home page, select Default DNS to see the list of DNS servers that Blokada blocks. If you want, you can turn on or enter the DNS server address you want.
See more:
- How to block pop-up ads on Android devices
- Google Chrome blocks ads with tools available from February 15
- Samsung's browser appears on all Android phones, with an ad blocking tool
Was this article helpful?
Your feedback helps us improve.
Related Articles
 Not only Netflix, other App Developers can also block Android from being rooted to download applications4 minutes read
 What is rooting malware? What can you do to protect yourself?7 minutes read
 Does Rooting Android Lose Data? Important Information5 minutes read
 Instructions to root Android easily and quickly10 minutes read
 How to Root an Android Device Without a PC Using Framaroot4 minutes read
 How to Unjailbreak an Android Device5 minutes read
Reader Comments 0
Sign in with email or Google to join the discussion.