Good tips and tricks in Windows 7 (Part 1)
Windows 7 is a great operating system, it will be even better when you have the tips and tips below. Let's explore it.
- 20 best tips for the Start menu and Taskbar in Windows 7
- 9 useful tips with the Registry in Windows 7
1. Launch the website directly from the taskbar
If you are a Web user all day long, regularly visiting the site while performing other tasks, you will see the opening of its browser or launcher icon (which can be buried between a bunch of windows being open), zoom in, enter the address into an address to search very time consuming.
Fortunately, Windows 7 can save you some tasks by allowing you to install a minimized address bar right in the taskbar. When you enter an address, it launches a browser window and goes straight to that page. In addition, with the shortcut Crtl + Enter, you do not need to write the full web name to access. For example, if you want to access www.quantangang.com, just type quantrimang in this mini address bar, then press Ctrl + Enter. The browser will automatically fill in "www." and ".com" are the same as in your main browser window.
The address bar in the taskbar does not work by default. To set it up, right-click the taskbar and select Properties to launch the Taskbar and Start Menu Properties dialog box. In the Toolbars tab, select Address , then click OK .

You should now see the address bar shrink in the taskbar.

Entering a Web address and Windows 7 will launch a browser window, by default Internet Explorer 8 when you install IE8 as the default browser. If you want to use the address window with another browser, you will have to set it as the default browser.
2. Display Windows screen without minimizing the window
We still know that accessing Windows Desktop with the Windows + D key or hovering over or clicking the lower right corner of the screen. But there is still another way for you to quickly access from the taskbar without minimizing all windows.
To do this, right-click on the taskbar and select Properties , to open the Taskbar and Start Menu Properties dialog box, then select the Toolbars tab and select Desktop .
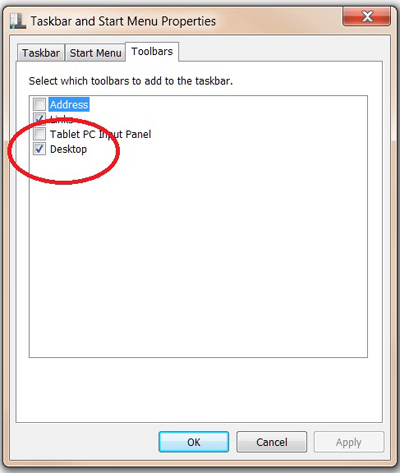
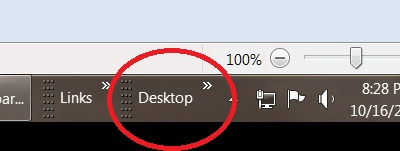
Click OK and a small menu called "Desktop" will appear in the taskbar in two curly braces (>>). Click on it, you will see all the items on Windows Desktop. Computer entries in this menu allow you to browse the entire drive and folder partitions of the computer from here (including network drives).
3. Open Docx file without conversion software or Office 2007
If you are using Word 2003 and do not want to update your computer to Word 2007 or higher because you are used to it, then you will not be able to open the docx extension files.
Instead of using Microsoft's Compatibility Pack software, you can use the WordPad version of Windows 7 to open the DOCX. To open WordPad, from the Start menu, go to All Programs > Accessories > WordPad . After opening Wordpad, use the Open command to open a DOCX file.

In addition, you can save DOCX documents into a usable file format (including the old DOC format for Word files) but the format in the file will be changed.
4. Preview the open window with full size
If you're a Windows Vista user, you're familiar with hovering over an item in the taskbar and seeing a scaled-down version of the program window. In Windows 7, you can view the full-size preview of the window without clicking on it. This way, you can quickly check information on a window.
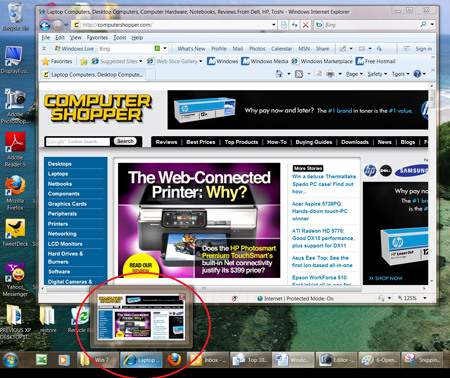
The method is relatively simple, first move the mouse pointer over the program's icon in the taskbar. Then, move the mouse pointer over the preview, so that the window will show up in full size and all other things will fade into the background. When you move the cursor out of the thumbnail preview, it all returns to the previous state. Windows 7 also allows you to close the program window right from the thumbnail, click on the red "x" in the upper right.
5. Restore old Windows applications with Windows Live Essentials
If you are a Windows XP user who has just moved to Windows 7, you will notice some old 'friends' are missing, notably the mail application (Outlook Express) and Windows Movie Maker. And if you're using Vista, you'll notice Windows Mail, Movie Maker, and Photo Gallery apps in Windows 7.
In Windows 7, Microsoft moved programs out of the operating system and made them part of an application package called "Windows Live Essentials".
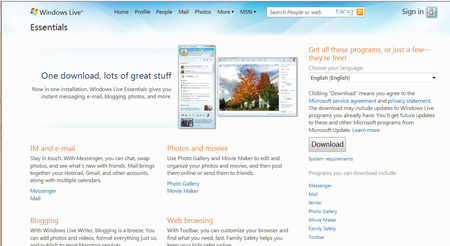
The applications here have been edited and added many new functions. Please own this app just familiar and strange.
6. Expand Column views in Windows Live Mail
Many people find that it is impossible to browse through the sender in the "Sent items" section of Live Mail, because the columns in the default view do not display columns for "To:".
It's easy to display the " To :" section. You just need to press Alt , go to the View menu, select the Columns item and wait a minute, you'll see the Columns menu option is not available. All you need to do is restore this column.
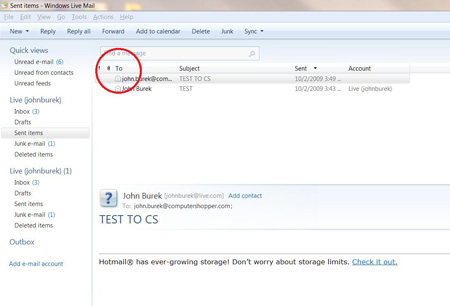
In the Sent Mail interface, press Alt to open the menu bar, click View> Layout and in the Layout dialog box change the Reading pane (Mail) entry to At the bottom of the message list . (You can also uncheck the Show the reading pane box if you want to remove this entire box.) Click OK and now you can access the Columns section in the View menu to refine the displayed columns.
7. Allow Windows to adjust the LCD screen to easily read the text
The new Windows 7 operating system includes an LCD screen tweak wizard that allows you to improve the text on the screen. It is called ClearType Text Tuner (CTTT).
Access CTTT from Windows Control Panel, click on Display and in the resulting dialog box, click Adjust ClearType text to run the wizard . Make sure on the first screen, the box next to Turn on ClearType is selected and follow the instructions. Windows 7 will first check the original resolution of the screen. After that, it will give you some comparisons to choose from.
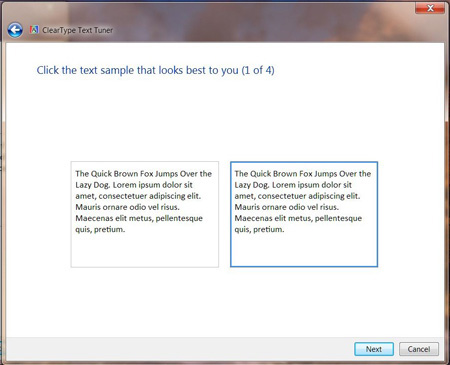
If you go back to the Display Control Panel and want to tweak the size of the Windows document to default, select Sm aller to Medium or Larger below the subheading. Make it easier to read what's on your screen .
8. Convert application easily with Windows + T key combination
Alt + Tab shortcut is the classic Windows standby mode to switch between applications. And Windows Vista users (on personal computers with the enhanced Aero interface) use Aero Flip to switch tasks, while the Windows + Tab key lets you rotate windows open through three-dimensional flat textures.
The old Aero Flip and Alt + Tab continue to work in Windows 7. However, this operating system introduces another way to switch tasks, it's different because it allows you to switch not only through all Open applications but also see the windows inside each application. All will be done with the Windows + T. keyboard shortcut .

Press repeatedly to combine this shortcut to see the different applications that are open, turn on the thumbnail preview above the icon of each program in the taskbar. If you open multiple windows for a certain application, you will see all windows grouped as a collection of thumbnails. Release the key when going to a specific application, you will see that the program is not running but only in the preview, you need to click on it or press Enter to reopen the program.

9. Minimize the maximum window with the Aero Shake feature
If you hold the title bar of a certain window, then move the mouse quickly while keeping the left mouse button pressed, you can minimize all windows except the mouse holding door. This feature is called Aero Shake.
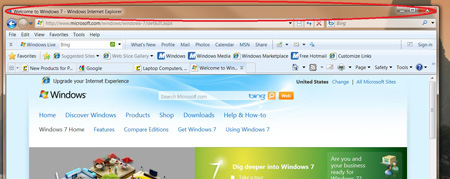
Aero Shake is useful for avoiding clutter on your computer screen. You can also use this feature on touch computers or other touch-sensitive computers. If you can't use your finger or mouse, you can do so by pressing the Windows + Home key .
To restore the original arrangement, simply repeat the action: Shake the title bar again (or press the Windows + Home key).
10. Use Windows 7 Compatibility mode to run the old application
Every time a new operating system appears, some old programs will be removed and no longer compatible with the new operating system. Windows 7 is no exception, but you don't need to give up your apps or wait for a compatible version of the software to appear. Microsoft claims that most Vista-compatible software will work without problems with Windows 7.
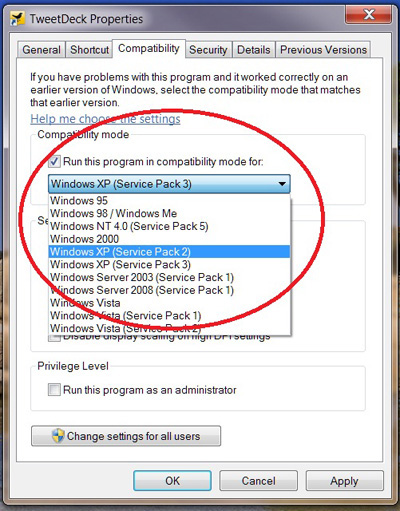
Windows Compatibility mode is a tool to "deal" with old software, it allows you to run a certain application as if it was running in a previous version of Windows.
To enable Compatibility mode, right-click on the program's icon, then click the Properties in the menu that appears. In the Properties window, select the Compatibility tab. In the resulting dialog box, select the Run this program in compatibility mode box , then select the version of Windows that the application can operate normally.
- Good tips and tricks in Windows 7 (Part 2)