Good tips and tricks in Windows 7 (Part 2)
(Next)
- Good tips and tricks in Windows 7 (Part 1)
- Features not yet known in Windows 7
11. Set up external display or projector for laptop
If you are a frequent speaker and annoyed with configuring an external display device or projector to let your laptop work in an unfamiliar environment, the following tip will definitely help you. . If you are running Windows 7 on a laptop, keep in mind this shortcut: Windows + P key.

Press this shortcut key when the screen or projector is attached to the video output of the laptop and you will receive a new checkbox to help you configure the external display device.
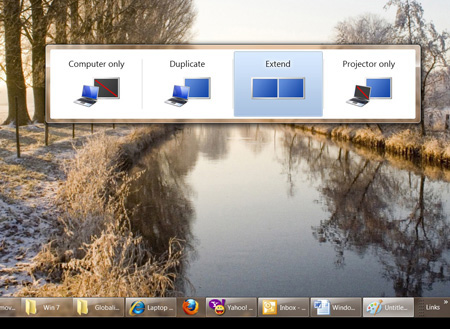
You will see four options, from left to right.Computer only allows you to return to video settings using only the laptop's LCD monitor. Duplicate allows you to simultaneously display an image on a laptop screen and an image on the external display. Extend lets you drag Windows Desktop on a laptop screen to an external display. And Projector only transfers video output to external display device, not shown on laptop screen.
12. Switch taskbar vertically to the screen
In previous versions of Windows, you could reorient the Windows taskbar vertically. Unlike Windows XP and Vista, all icons and programs attached to the taskbar automatically line up in Windows 7 if you redirect this bar vertically.
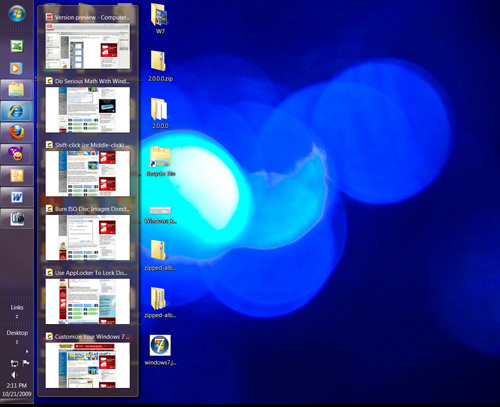
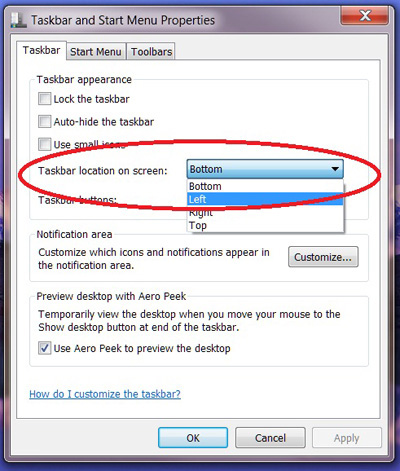
To move the taskbar to the side of the screen, just right-click any space on the bar and click Properties . In the Properties box that pops up, you'll see a line labeled Taskbar location on screen , choose Bottom , Left , Right or Top .
13. Perform complex calculations with the Advanced Calculator of Windows 7
Windows 7 has upgraded the Calculator, instead of performing only standard and scientific functions, it can program and perform statistical functions, as well as perform some real tasks. such as calculating mortgage amounts, hourly wages and emissions etc.
The Calculator is located in the Start menu (If you don't see it, you can access Accessories .) Use the View menu to switch between Standard, Scientific, Statistics and Programmer modes (Only the first two versions are available in Windows. XP and Vista).
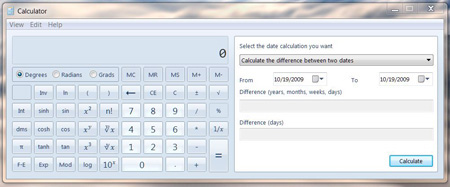
The last option in the menu, Worksheets contains some additional calculation templates.
14. Burn ISO image file directly from Windows 7
Previously, Windows did not provide any tools to write IOS files to CDs or DVDs. Users must use free or paid software programs to burn ISO, while users of other operating systems have been able to do so without software support for many years.
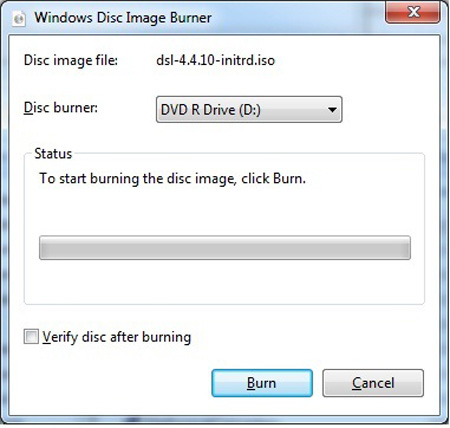
But with Windows 7, you can directly record IOS file right on the operating system without any software support and the implementation is very simple. To burn an ISO image in Windows 7, all you need to do is double-click the file, select the optical drive (preloaded with an appropriate blank disk) and click Burn.
15. Customize Windows 7 login screen image
Are you tired of looking at the same boring blue screen when logging in to the PC in Windows 7? You can easily turn the login screen into a cat image, favorite vacation place or what you want by using a free application, Windows 7 Logon Screen Rotator 2.0 that allows you to change the wallpaper.
To add an image to the login screen background image list, right-click on the Images tab and select Add Image . Then, navigate to the image and click Open . To set up an image as your login background, just right-click on the image and select Change To This Image . The message appears confirming that you have changed successfully.
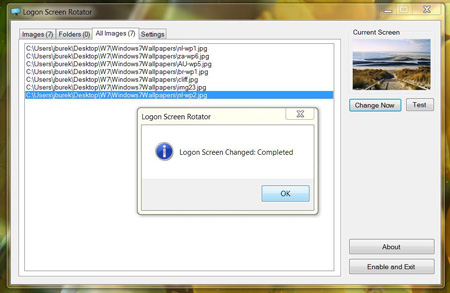
In addition, you can change the wallpaper every time you log in, every day or every time you lock your computer. Add the entire picture folder by clicking on the Folders tab and follow the instructions above.
You can also select an image by right-clicking on the image or image folder and selecting Remove Image or removing the entire list by selecting Remove All Images . And if you finally decide that the old Windows blue screen is faster, you can easily bring it back by clicking Revert back to default Windows logon screen in the Settings tab .
16. Link different default printers to different networks
In Windows 7, you can specify different default printers depending on the connected network. The operating system will automatically detect the network you have connected to and select the printer and the appropriate settings.
Go to the Start menu, and select Devices and Printers . You will see a screen with all installed printers. In the second menu bar, click Manage default printers (need to select a printer to appear this option). In the resulting dialog select Change my default printer when I change networks .
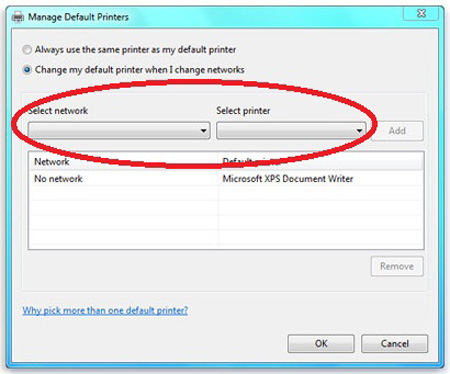
You can then use the Select network and Select printer drop-down menu to combine the default printer with each network you connected to before and then click OK . Next time you just need to select the network without having to reset the printer.
17. View the Send To expand menu in Windows Explorer
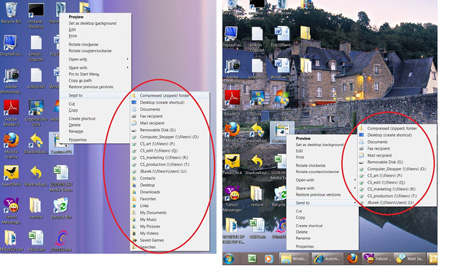
Many of us are familiar with the Send To command in Windows Explorer. If you right-click a file in Windows Explorer, you will see the Send To option appear, which allows you to move the file to certain locations, such as the compressed folder or to a drive on the computer. / network drive. But in Windows 7, you can view the extensive list of Send To with a shortcut.
Before right-clicking on the file, hold down the Shift key. When the menu pops up, release Shift and left click on Send To as usual. Depending on your computer, you'll see that the number of Send To items has increased significantly before you hold Shift. See the illustration below to see the difference.
18. Create and download phone ringtones in Windows 7
Windows 7 lets you create your own ringtones. To get started, you first need to check that your device has Device Stage support for Windows 7. With your phone connected to the computer, start from the Start menu, click Devices and Printers , then Double click on your device. Here you will see whether Device Stage may appear or not depending on your device manufacturer. If your device supports creating ringtones, you will see Set ringtones option .
When you have clicked Set ringtones , you can select the ringtone that is available on the Choose a ringtone page . Here, you can also choose to assign the ringtone to a specific contact or to make the default ringtone for everyone. If you want to create your own ringtone, select Create new ringtone on the Choose a ringtone page . You can select an audio file on your computer or record an audio file by connecting the microphone to the computer.
19. Speed up the shutdown of Windows 7 computers
Many times you feel that Windows shutdown process is very slow and you want to speed it up. So the following way will definitely help you. To speed up the shutdown you will have to change some settings in the Windows Registry. But be sure to back up your data files and Registry before proceeding. You can do this through the regedit command: Type regedit in the Start menu search box, then select File> Export from the Registry Editor window , select All in Export range .
Next after you've backed up the data, in the Start menu, type regedit in the search box and press Enter . To launch Registry Editor. In the left pane, navigate to HKEY_LOCAL_MACHINE> SYSTEM > CurrentControlSet > Control. Then select WaitToKillServiceTimeout , change the value in this Registry entry by right-clicking on it and selecting Modify to appear in the Edit String box:
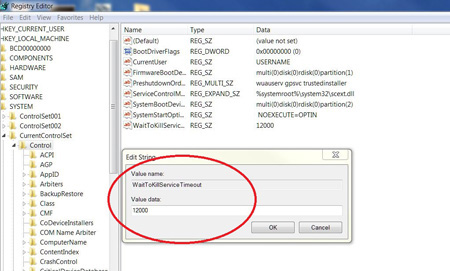
Change the value you want, but not too low. You should leave it at 10,000 milliseconds.
- 50 Registry tricks to help you become a true Windows 7 / Vista "hacker" (Part 1)
20. Setting up laptop control with Windows Mobility Center
Mobility Center allows you to extend laptop battery life. The easiest way to access the Mobility Center is to press the Windows + X key combination. You can also do a quick search with the phrase "Windows Mobility Center".

Mobility Center allows you to view the slider that displays brightness, controls volume, remaining battery life, power settings, and wireless connection status at the same time. In the next row, you will see Screen Orientation , which allows you to rotate the screen; External Display makes it easy to connect to the second monitor; and Sync Settings allows you to add new devices and control sync settings.
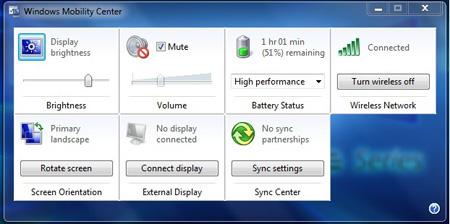
Customize these settings will affect how long the system uses the battery.