20 best tips for the Start menu and Taskbar in Windows 7
The Start menu and the Taskbar in Windows 7 are a complete "makeover" improvement compared to Windows XP.Users will be interested and familiar with its sleek interface.However, the Start menu in Windows 7 not only improves on appearance but also many other new features that not all users know.Here we will introduce you to the collection of 20 best tips for the Start menu and Taskbar of Windows 7.
Trick with the Start menu:
1. Add My Dropbox to the Start menu in Windows 7:
- Download Dropbox for free for Windows
If you are a Dropbox fan, the following tip will help you easily access this service by "hacking" the Libraries feature to rename Recorded TV to another name.

First right-click Start Menu> select Properties . At Recorded TV , make sure the ' Display as a link ' option is enabled.
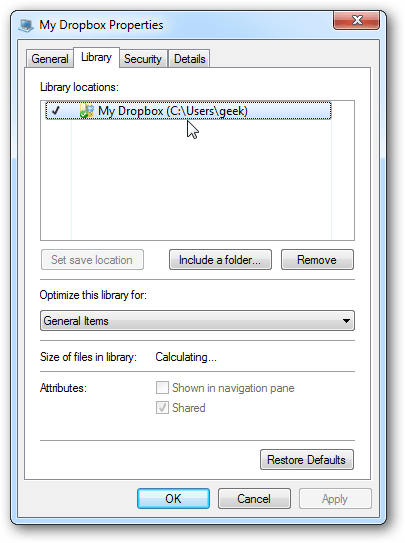
Next right-click on the Recorded TV area> select Rename and change the name to My Dropbox . Then right-click the newly renamed item> Properties . Here you will see the location of this folder in the Library locations list. Now remove the default path and click Include a folder to select a new folder ( Dropbox ).
In addition, you are recommended to select the ' General Items ' mode under ' Optimize this library for ' to open this folder as quickly as possible.
2. Return to Classic display for the Start and Explorer menus in Windows 7:
If you're not interested in the new Start menu display in Windows 7, you can use the ClassicShell tool to return to the previous classic version of Windows XP as follows:

- Download Classic Shell software to your computer.
During the installation process, you can choose either Classic Start Menu mode , Classic Explorer or both.
During use, if you want to change some display settings, right-click the Start menu> Settings . Then select / deselect the available options and click OK to save the changes.
3. Add the Recycle Bin to the Start menu:
- See the tutorial on adding "trash" to the Start Menu
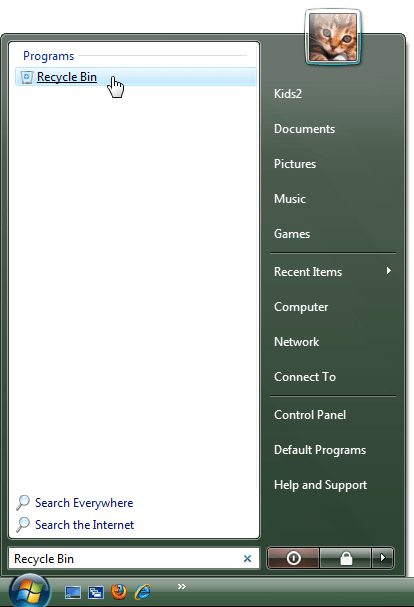
By default Recycle Bin is not integrated in the Start menu of Windows versions. In Windows 7, you can type ' Recycle Bin ' in the search box nor find this trash. To be able to access the Recycle Bin right at the Start menu, follow these instructions:
Open the Explorer window, enter the address line below in the address bar (note to change the username by the current username):
C: Users username AppDataRoamingMicrosoftWindowsStart Menu
Right-click a blank space in the newly opened folder, select New > Shortcut . Enter the explorer.exe shell: RecycleBinFolder line in the location box. Click Next and enter a name for the shortcut (here is Recycle Bin ). Finally, open your Start menu and you will see the Recycle Bin trash.
4. Search applications faster by using Start Menu Search:
The first time you install Windows 7 and use the search box on its Start menu to search for folders, programs . will return quick results. However, after a period of using the system, the collection of files, folders and programs keeps growing, so the Search feature will be slowed down.
There are two ways to speed up the Search feature. If you are mainly looking for applications, change the settings so that the search process bypasses document, picture, email. . Alternatively, you can clean up the locations of indexed files.
Method 1: Change search settings for the application
Right click on Taskbar> Properties > switch to tab Start Menu > Customize .
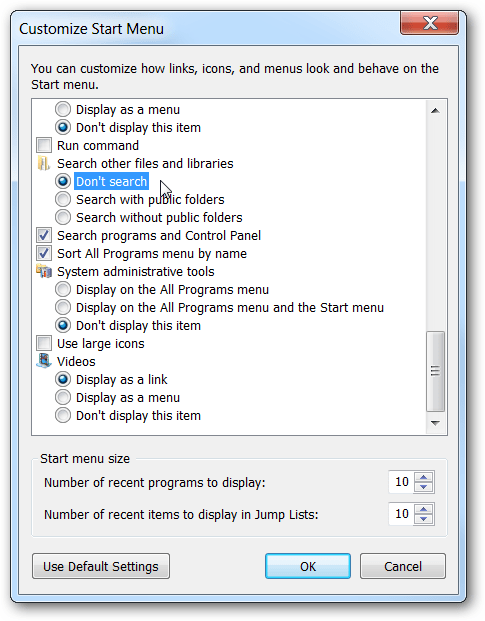
Scroll to the bottom, under ' Search other files and libraries ', check ' Don't search '.
Method 2: Speed up the search by refining Search Locations
Open Indexing Options by going to the Start menu> entering ' Indexing Options '> Enter . In this window, click Modify :
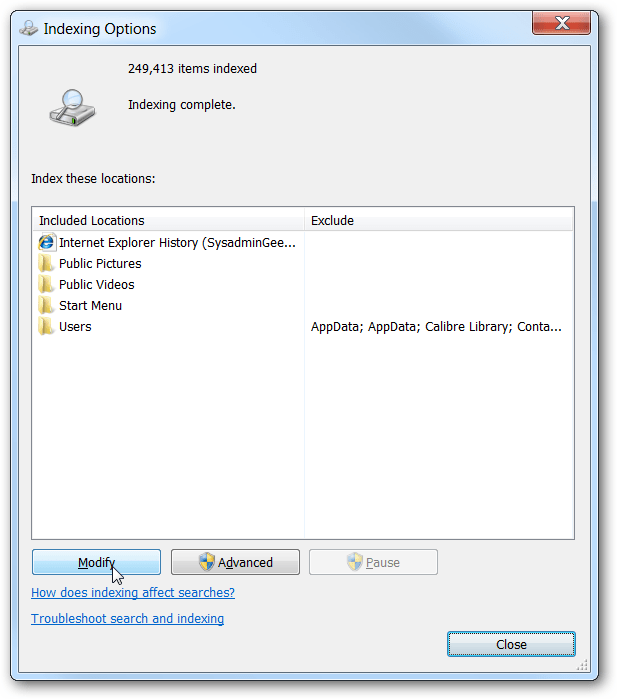
In the indexed locations dialog box uncheck the directories that don't want the search feature to ' scan ' over.
5. Change the number of items displayed in the Recent Items:
If you use the Recent Items list, there are 10 items that will be displayed in this list. If you are not satisfied with the default number, you can increase or decrease by editing the registry as follows:

Enter regedit in the search box to open Regedit Editor. Navigate to:
HKEY_CURRENT_USERSoftwareMicrosoftWindowsCurrentVersionPoliciesExplorer
or initialize it if not available.
Create a 32-bit DWORD with the name MaxRecentDocs . Double click on this key, switch to the Decimal system in Base , enter any value in the Value data field . This will be the number displayed in the Recent Items.
6. Change the default action for the Power Button button
By default, the Power button in Windows 7's Start menu is Shut down, and in Windows Vista is Sleep.
If you frequently use Restart, Sleep, Log Off, or Hibernate more, you can change this default mode by: right-clicking on Taskbar> Properties > selecting the Start Menu tab. Click the arrow button in the Power Button Action section , in the drop-down list select an action as desired.
7. Open Folder in Start Menu of Windows 7:
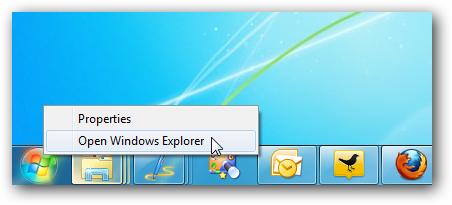
In Windows 7, when you right-click Start Orb you only have the Open Windows Explorer option to display Libraries . If you want to open the Start Menu folder you need to customize the Start menu shortcuts.
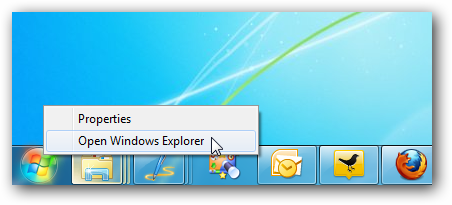
The easiest way is to click the Start button (or press the Windows key) then right-click All Programs > select Open or Open All Users to open the Start Menu folder.
You can also access this directory directly by pasting the link:
% appdata% MicrosoftWindowsStart Menu
to open the Start Menu folder of the current user, or:
C: ProgramDataMicrosoftWindowsStart Menu
to open the Start Menu folder of all users. The simpler way is to assign the above path to a shortcut (New> Shortcut). Then just click the mouse to use.
8. Add Administrative Tools to the Start menu:
If you are a person who often uses services in the Administrative Tools tool to manage the system, instead of following the steps like clicking the Start button> Control Panel > then selecting Administrative Tools , there is a way to access it quickly. more than that, it is integrated with Administrative Tools link on the Start menu.
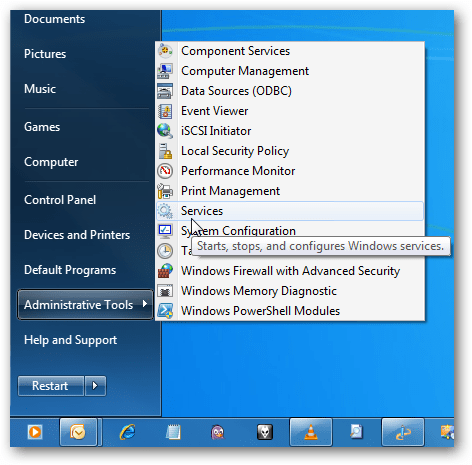
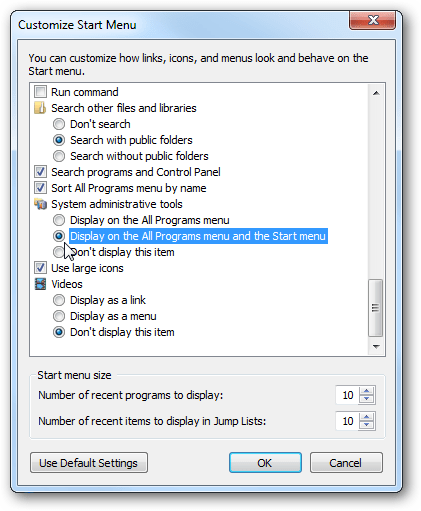
First right click on Start Menu> Properties . In the Taskbar and Start Menu Properties window click Customize , click down, the System administrative tools section select Display on the All Programs menu and the Start menu > OK .
Alternatively you can create Administrative Tools shortcut by right-clicking Administrative Tools in Control Panel> Create shortcut (or holding down the mouse and dragging it to the desktop).

9. Display the Run button on the Start menu:
Unlike the Start menu mode in Windows XP, the Run button in Windows 7 and Vista is not displayed. You can only use the Win + R keyboard shortcut to call the Run dialog box. However, it is much more convenient to integrate Run on the Start menu to access with the mouse. How to do the following:
Right-click on Taskbar> Properties > Customize . Check the Run command box of the Customize Start Menu dialog box.

10. Extended display for items in the Start menu:
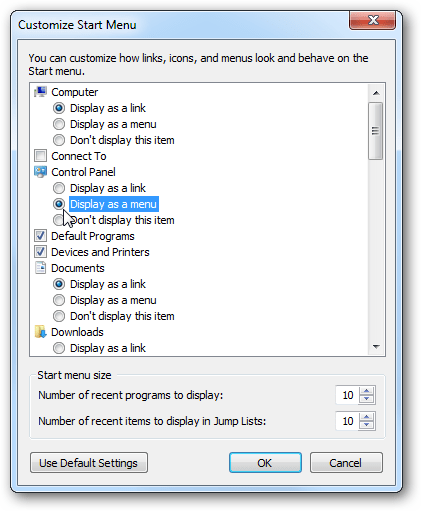
By default, links to Computer, Control Panel or Documents in the Start menu are used to open individual windows when you click on them. It is then possible to manipulate components in each window. However, displaying these subcomponents right in the Start menu will help users quickly access what they need. Just hover over each item and the list of folders / programs will appear for the user to choose.
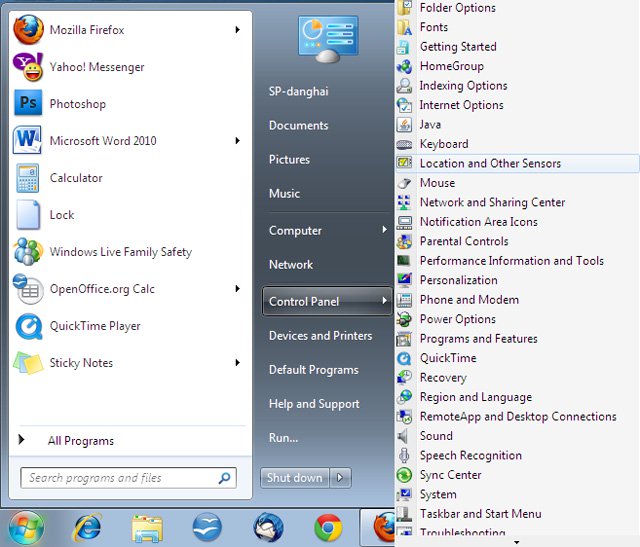
To do this, right-click on Taskbar > Properties > Customize . Here select Display as a menu in the items you want to display the expanded list like Computer, Control Panel, Documents .
Tips for the Taskbar:
11. Add Quick Launch bar to Taskbar:
Windows 7 Taskbar, or Superbar, is a combination of the usual taskbar features and Quick Launch feature by enabling dock items to the Taskbar. However, if you want to access the Quick Launch bar, you can easily add it to the Taskbar.

Right-click any area on the Taskbar select Toolbars > New Toolbar . Next enter the following path in the address bar of the opened window:
% appdata% MicrosoftInternet ExplorerQuick Launch
Then click Select Folder . Once you have added Quick Launch, uncheck Lock the Taskbar to do some things like: drag Quick Launch to the left to bring up the applications in it, only allow the icon and remove the text of the application. By right-clicking on Quick Launch and unchecking in Show Text .
12. Add Recycle Bin to the Taskbar:
In some tips on the Start menu above, we already know how to add the Recycle Bin to the Start menu. Now we will show you some ways to add Recycle Bin right into the Taskbar and Quick Launch.

First, create a New > Shortcut on the desktop. Enter the command line : explorer.exe shell: RecycleBinFolder . Name this shortcut as Recycle Bin . You can change the icon accordingly (see more at % SystemRoot% system32imageres.dll ).
Finally, right-click the newly created icon, select Pin to Taskbar . Then want to remove it from Taskbar just select Unpin . You can also move the new trash icon between Taskbar and Quick Launch.
13. Add My Computer to the Taskbar:
If you regularly access My Computer, it is helpful to add a link to it in the Taskbar. The following tutorial will help you add the Computer menu to the Taskbar to easily access your drive.
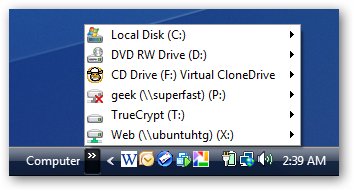
Right-click the Taskbar > Toolbars > New Toolbar . Navigate to the folder to add to the Taskbar, here is the Computer icon. Click Select Folder .
14. Make the Taskbar in Windows 7 the same as in Vista or XP:
Windows 7 Taskbar is redesigned as a Taskbar ' style dock ' with windows for each application combined into a single button on Taskbar for application groups. If you don't feel comfortable using the Taskbar 'dock style ' in Windows 7, make the Taskbar work like in Windows XP and Vista.
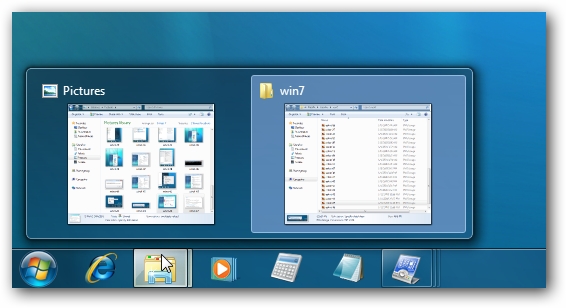
First right-click on any area on Taskbar > Properties . From the menu list of the Taskbar buttons select ' Never combine ' if you don't want to combine windows, or ' Combine when Taskbar is full ' so that the Taskbar automatically combines windows when it's empty.
15. Customize Icon for any application in Windows 7 Taskbar:
When the battery programs enter the Taskbar, the colors of the default icon can be confusing to the user. The following tutorial will help you get a set of icons on the Taskbar with the same color.

The easiest way is to right-click the icon on the Taskbar, right-click on the program name and select Properties . Click Change icon . to change the icon. However, this way will not be updated immediately, even after restarting the computer there has not been a change.
Instead, create and customize icons for the Taskbar. Open Explorer and enter the following path in the address bar:
% appdata% / Microsoft / Internet Explorer / Quick Launch / User Pinned / Taskbar
Select the entire icon, and copy them to a new folder. You can save it on the desktop because we only need to store it temporarily. Then right-click an icon> Properties > Change Icon . Select icons with .ico, .exe , or .dll extensions. You have to do this with all other icons, but when you're done you will have a set of harmonious icons on the Taskbar.
In case the application does not allow to change the icon (Change Icon button is blurry), we will instead create a new shortcut for the application. Right-click the folder or desktop, New -> Shortcut . Point to the location of the program icon, click Next to create a shortcut. Then change the icon as shown above.
16. System monitoring from Taskbar:
If you want to monitor the performance of your system resources but don't want too many icons on the desktop, then the free Taskbar Meters will help you.
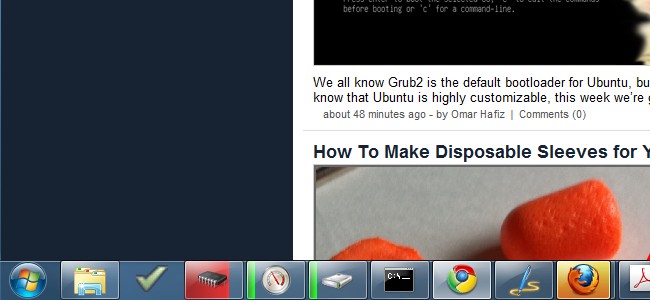
This is open source, lightweight and setup software for three applications: monitoring memory usage; Operation of CPU and hard disk . You can adjust the slider to set the update frequency and the percentage of performance from blue to yellow, red.
17. Change the color of Windows 7 Taskbar without software:
To change the colors of the Windows 7 Taskbar can be done immediately without installing any additional software.

Right-click the desktop> Personalize . Select Window Color below the window that appears. Next select the color you like, then the color of the window and the Taskbar will be changed.
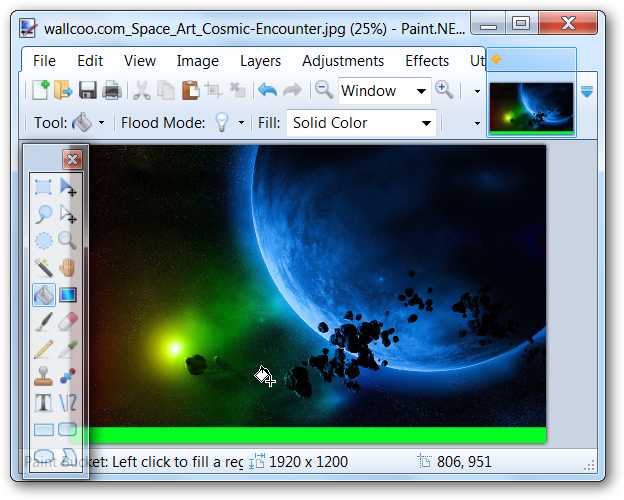
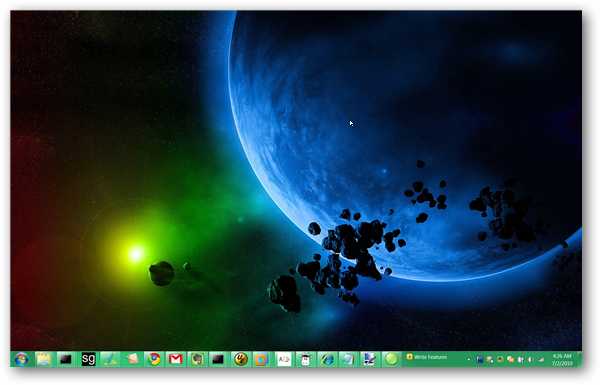
Another way is to take advantage of the transparency of the Taskbar to create a desktop wallpaper the size of the screen resolution and height of the Taskbar. You can use the Paint.Net image editor available in Windows, creating a background image as shown below.
18. Fix Windows error Taskbar when auto-hide:
If you have trouble with the Taskbar bar when auto-hide the application icon, even set up both in the Control Panel but still not effective. The following tips will help you fix this error in Windows 7, and both Windows Vista and Windows XP.
When you are using the auto-hide feature of the Windows Taskbar, they will be hidden until the application blinks or a message appears. This time the icon will appear, and just click that window to ignore the notifications to continue to hide the Taskbar.

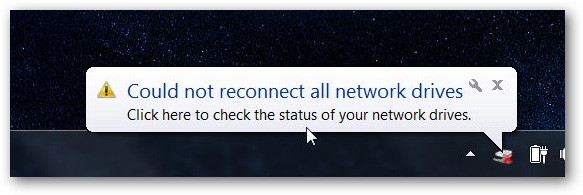
There are cases where after hiding some application, it will not hide or disappear because some applications are not written completely properly, causing conflicts and a message appears and are kept in the Taskbar. You can try to fix it by restarting the application or clicking on the icon to activate any notifications.
The next way is to press Ctrl + Shift + Esc to open Task Manager and End Process explorer.exe application. Then reboot by going to File > New Task > enter explorer > OK .
19. Rearrange programs on the Taskbar:
Although Windows 7 Taskbar gives you quick access to your favorite programs, however, it will lead to clutter that lacks organization when the battery is full of applications. Therefore it is easier to manage them if they are grouped into groups.
Since Windows 7 Taskbar allows users to pin any application or shortcut into it, we will use blank shortcuts for fake applications to organize separate programs into groups. First we need a folder to store all shortcuts and applications that you will not delete. For example, create a new folder in the Downloads folder.

In this folder create a text document or any file (not a folder or shortcut).
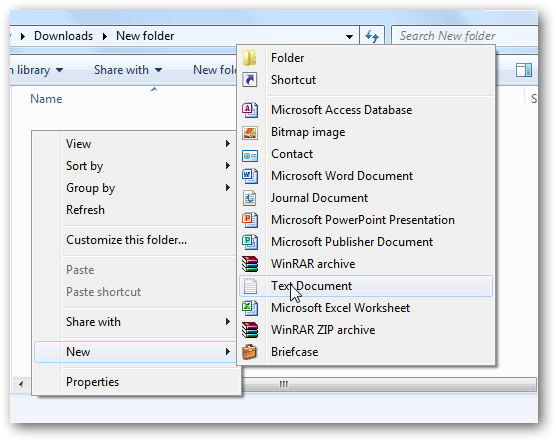
Rename this file with the extension .exe (note that you need to remove traces in Hide extensions for known file types in Windows ). Click Yes when asked.

A fake executable file is created, right-click it and select Create Shortcut . We will create shortcuts for these fake applications and change its icons to transparent (Change Icon). You create so many files in turn, then pin them to the Taskbar, now between applications there will be a transparent space separated, and the division into such groups will help you easily manage them. than.

Note: these transparent icons are actually like a normal application so you can click, but there will be an error message that it is not a valid program. So if you accidentally click, just select No when asked if you want to remove this shortcut.
20. Make the Taskbar only store the last session of the application:
Windows 7 Aero Peek feature allows you to view thumbnails of each application on the Taskbar. This is a nice feature, but what if you want to click on any program icon to access the last window opened from it? You can hold down Ctrl and click on a Taskbar button, but it will be faster if you just need one click. The following is a guide to hacking icons on the Taskbar so that they open the last active window for each application.

Open regedit and navigate to the following key:
HKEY_CURRENT_USERSoftwareMicrosoftWindowsCurrentVersionExplorerAdvanced
Next create a 32-bit DWORD value with the name LastActiveClick and set the value to it to 1 .

Then log back in to enable or disable Explorer.exe via Task Manager and then reactivate. Good luck!