Instructions on how to install macOS Sierra (clean install) 10.12 on Mac
After improving and changing some features on the Beta version, the final version (the final version) of macOS Sierra 10.12 was also released by Apple. If you want to install macOS Sierra 10.12 and experience the new features of this version on Mac, please refer to the steps in the following article of Network Administrator.
Table of Contents
After improving and changing some features on the Beta version, the final version (the final version) of macOS Sierra 10.12 was also released by Apple. If you want to install macOS Sierra 10.12 and experience the new features of this version on Mac, please refer to the steps in the following article of Network Administrator.

Part 1: Requirements
- First, make sure that the data and important files have been backed up to make sure that the data and files are not lost during execution.
- Mac supports installing macOS Sierra.
Mac list compatible with macOS Sierra:
- MacBook - late 2009 and later
- iMac - late 2009 and later
- MacBook Air - 2010 and later
- MacBook Pro - 2010 and later
- Mac Mini - 2010 and later
- Mac Pro - 2010 and later
Part 2: Install new macOS Sierra
Step 1:
First access the Mac App Store to download macOS Sierra version 10.12 Final.
If you haven't downloaded the macOS Sierra version 10.12 Final, then Mac App Store will prioritize downloading the installer file and then guide you through the steps to install. When you finish downloading the installer, make sure you exit the installer to use this installer for other purposes.

Step 2:
Once you have downloaded the installer, the next step is to use this installer to create a bootable USB drive, this bootable USB drive allows you to install macOS Sierra on the Mac.
This means installing new, not upgrading from other settings like El Capitan or Yosemite.
Refer to the steps for creating macOS Sierra 10.12 installer using USB here.

Step 3:
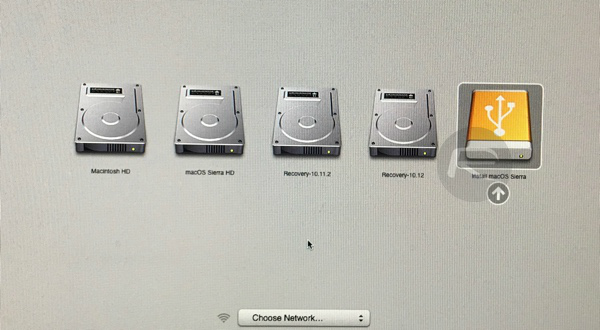
With the newly created USB Bootable drive, the next step to do is plug the USB drive into the Mac and start the Mac to appear a question from the cold start (cold start).
When the Mac restarts, make sure that you press and hold the Option key during the boot process to bring up a new menu on the screen, which gives you options to boot from. Finally, make sure you select the USB bootable drive plugged into Mac and press Enter to continue doing the following steps.
Step 4:
After the device has finished checking and running the program, the macOS Utilities menu will appear on the screen. Make sure you select Disk Utility from the options available, then select Continue to take the next steps.

Step 5:
When Disk Utility is loaded, make sure that the main hard drive on the Mac is selected in the left pane, then click the Erase button .
Make sure that the Name frame is still 'Macintosh HD' and that in the Format format box, select 'Mac OS Extended (Journaled)'. Then click the Erase button and all data will be erased.

Step 6:
The current installation will be wiped clean. Now macOS Utilities menu appears again. Your task is to select Install macOS and select Continue.

A new window appears, where you click Continue and make sure that Macintosh HD is selected, this is the hard drive platform on the Mac, then click Install.
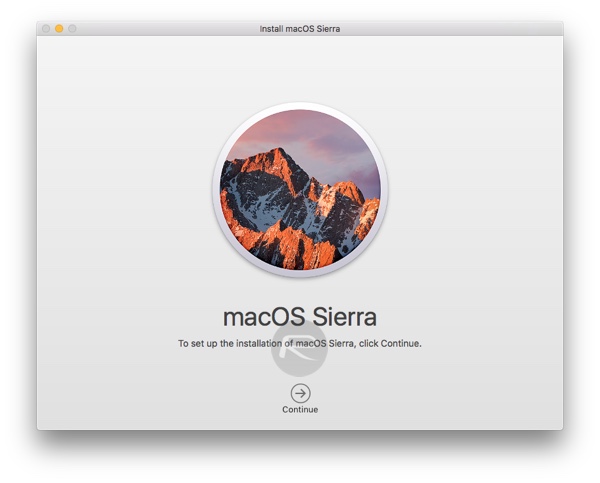
Now the new macOS Sierra installation process will begin.
Refer to some of the following articles:
- Instructions for using hidden icons on Mac keyboard
- Steps to install Windows 7 on Mac using Boot Camp
- Instructions from AZ how to install Windows 10 on Mac
Good luck!
Was this article helpful?
Your feedback helps us improve.
Related Articles
 Free space on macOS Sierra with Optimize Storage4 minutes read
 How to change the default macOS Sierra wallpaper3 minutes read
 How to fix common errors when upgrading to macOS Sierra7 minutes read
 How to Clean Install macOS Sierra6 minutes read
 How to change the shortcut to use Siri on macOS Sierra3 minutes read
 Synchronize files and folders on Desktop and Document on macOS Sierra with iCloud3 minutes read
Reader Comments 0
Sign in with email or Google to join the discussion.