Instructions for recording iPhone and iPad screen videos on the computer
There are many ways to get back to the iPhone and iPad screens, but recently, Apple has officially released a way to help you record the screen easily if you use a Mac. If you only have Windows PC, third-party applications will allow you to go back to any program on your phone screen.
This feature is designed for application developers, but anyone can use it. For example, go back to the tutorial and upload to YouTube or shoot a video of the power of a mobile game and share it with friends.
- These quality Windows screen recording software
- Instructions on how to take photos, record videos or selfie with Siri on iOS 10
- Instructions for rotating screen, video game using Bandicam software
- Instructions for setting up Live Stream feature Facebook videos on mobile and tablet
Record iPhone / iPad videos on Mac
As long as you use your iOS 8 or later version and a Mac running Yosemite or a newer version, you can record videos with built-in tools and regular USB Lightning cables. . Your iPhone or iPad must have a Lightning port, so devices with larger 30-pin sockets such as iPad 3, iPhone 4S or older devices will not be supported.
First, connect your iPhone and iPad to your Mac as usual. Use the standard Lightning USB cable if you are charging your device via a Mac or connecting to iTunes.
Unlock your iPhone or iPad and open iTunes on your Mac to make sure your Mac can see your device is connected. You can see the " Trust This Computer " warning on your iPhone or iPad. Agree to trust the Mac if you are asked.

The recording feature is part of QuickTime Player built into macOS. Apple has created QuickTime for Windows, but this feature is not included in the Windows version of QuickTime.
To record the iPhone screen, plug the phone into the Mac and press the Command + Space key to open the Spotlight search engine. Type " QuickTime " and press Enter . You can also start this program from Finder> Applications> QuickTime Player.

Click File> New Movie Recording to start recording the video.

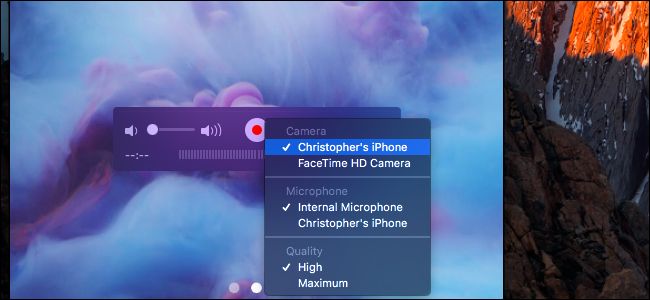
A window will pop up, displaying the Mac's webcam by default. Click the arrow next to the red Record button and select your iPad or iPhone.
You can also choose the desired microphone here. For example, you can record videos on your device screen while recording from a microphone connected to your Mac.

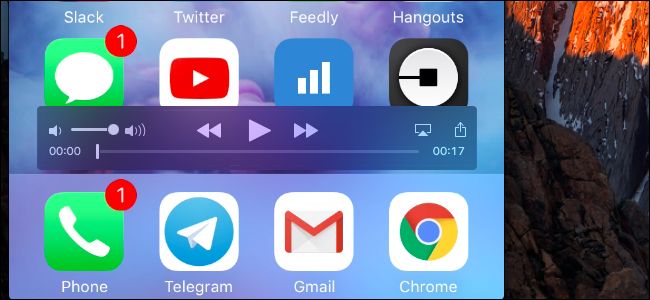
The iPhone or iPad screen will appear in the QuickTime window on the Mac. Click the Record button to start recording.
When you start, you will see the start time and file size increase as it works. To avoid disturbing user vision, the time on the device will be set at 9:41 am and the name of the mobile network will be hidden until you stop recording the video.
When finished, click the Stop button. After that, the QuickTime window will display the videos you recorded and you can click the Play button to play back.

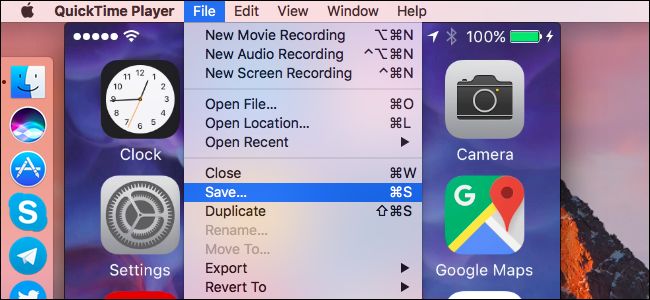
Once satisfied, you can save the video. Click File> Save and select the file name and location.

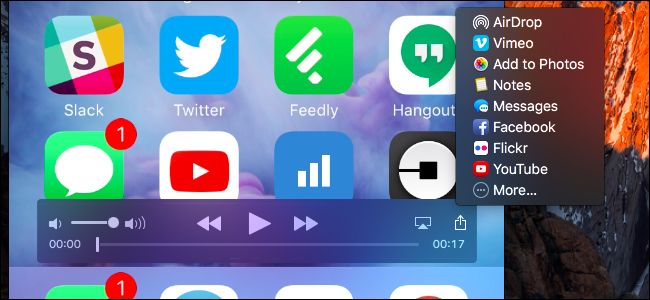
Thanks to the sharing features on macOS, you can click on the Share button in QuickTime and download videos directly to YouTube, Vimeo or other services.

QuickTime also allows you to easily record videos on your Mac screen - just select New Screen Recording instead of New Movie Recording . And, as you'd expect, you can also use QuickTime's movie recording feature to record a video from the Mac Webcam.
Record iPhone / iPad videos on Windows PC
You can also do this on Windows computers, although this operating system is not officially supported by Apple. This unofficial method involves running AirPlay software on a PC. You connect to the AirPlay server from your iPhone or iPad, and it will wirelessly transfer the device's screen content to a window on your PC - like it will use AirPlay to stream it directly to Apple TV. After that, you can record video on PC.
There are several methods to help record videos for iPhone / iPad on PC. Software programs such as X-Mirage, Reflector2 and Apowersoft iPhone / iPad Recorder all promote this feature. They combine AirPlay and a screen capture tool in a single program, but all of these programs charge a fee. If you are looking for a free app, just combine AirPlay for free with another free screen capture tool. LonelyScreen software, for example, is a simple, free AirPlay software that helps you make videos for iPhone and iPad quickly.
You can refer to the article on how to use video recording software for iPhone and iPad on Windows PC below:
- Instructions on screen presentation of iPhone and iPad on computers
- Slide, screen iPhone on your computer
Good luck!
You should read it
- ★ Instructions for video editing right on iPhone and iPad
- ★ 'Secret' video capture tips on iPhone
- ★ How to record iPhone screen video, How to record iPhone screen with sound
- ★ Improve the quality of 4K video recording on iPhone X 'substance' across DSLR cameras
- ★ Guide to making professional movies with iMovie on iPhone and iPad