How to enable / disable network location indexing in Photos app on Windows 10
This tutorial will show you how to enable or disable indexing of library collections stored on network locations in the Microsoft Photos app on Windows 10.
Table of Contents
Photos app in Windows 10
The Photos app included in Windows 10 is a universal app that lets you view, edit photos and videos, create movies and albums. You can use the video remix feature to create videos instantly from photos and videos you choose. Use the video editor to fine-tune - change filters, text, camera movements, music, etc. You can even add 3D effects like butterflies, lasers or explosion effects, to They magically appear in your videos.
Starting with the Photos application version 2020.20070.3003.0, a new indexing setting has been added, allowing you to enable or disable the indexing parts of libraries stored on network locations.
How to enable / disable network location indexing in Photos app on Windows 10
Here's how:
1. Open the Photos application.
2. Click the See more button (the 3 dot icon) in the top right corner and click on Settings.
 Click the See more button (the 3 dot icon) in the top right corner and click on Settings
3. In the Indexing section , enable (default) or disable Disable indexing parts of your library stored on Network locations , depending on what you want to do.
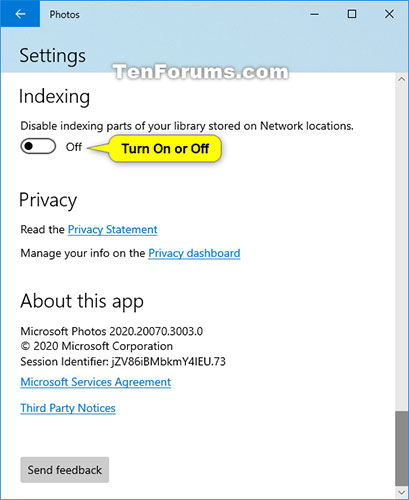 Enable or disable Disable indexing parts of your library stored on Network locations
Hope you are succesful.
Was this article helpful?
Your feedback helps us improve.
Related Articles
 Guide to configuring Windows 11 search indexing2 minutes read
 3 ways to enable or disable Network Discovery on Windows 7/8/105 minutes read
 How to enable PDF content indexing in Windows Search2 minutes read
 Steps to fix Indexing is Paused error in Windows 117 minutes read
 How to disable DHCP in Windows 104 minutes read
 How to enable / disable the Indexer Backoff feature in Windows3 minutes read
Reader Comments 0
Sign in with email or Google to join the discussion.