Learn how to use Paint to edit photos on Windows
Paint is a photo editing application built into Windows operating system. Although it is a fairly simple application, many users still do not know how to use Paint to edit photos. In the following article, the Network Administrator will guide you through the whole way to use Paint so you can manipulate the application faster..
Paint is a photo editing application built into Windows operating system. Although it is a fairly simple application, many users still do not know how to use Paint to edit photos. In the following article, the Network Administrator will guide you through the whole way to use Paint so you can manipulate the application faster.
- Instructions for using Photoshop CS5 to edit photos in full set
Recently, Microsoft is building a completely new version of the Paint application that completely replaces the old Paint version on Windows 10. The new version will be the Universal application and is available on all Windows 10 devices, including including Windows 10 Mobile. You can refer to some of this new Paint application here.
Refer to how to download and install the latest Microsoft Paint Preview application on Windows 10 here.
Part 1: Get acquainted with Paint
How to work with Paint: Understand the user interface
Before pointing out what you can do with Paint, you have to understand the basics of using it. Paint has a ribbon with toolbars similar to the toolbars in Microsoft Office. You should open this ribbon, but you can also close it to create more space for your images. You can open and close this ribbon using the arrow on the top of the toolbar, on the right. You can also double click on any of its tabs to get the same result.

Paint has two tabs:
- The Home tab includes image editing tools that you can use to modify your image.

- The second tab is View. The buttons found here change how images are displayed to assist you in making changes.

File menu is placed on the same line with buttons for Home and View tab. You can use the File menu to save your changes, using the Save option .
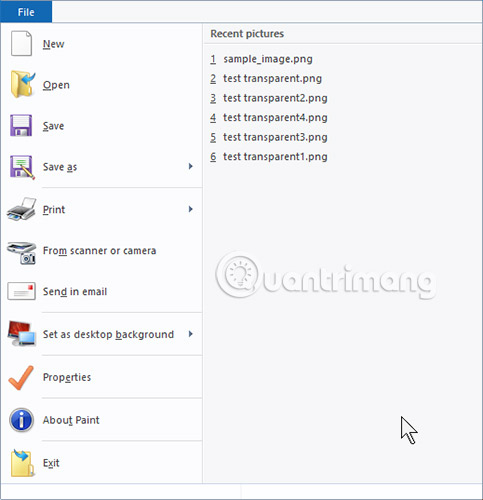
You can also use it to print photos, take photos from a scanner or digital camera, or view the properties of the image you are working on.
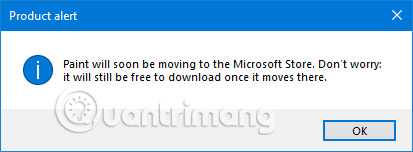
When opening Paint in Windows 10 October 2018 Update or a newer version, you will see a Product alert warning. It says that the Paint application, in the future, will not be installed with Windows 10 anymore, and you will need to find and install it from Microsoft Store.
1. Open Paint

On each version of Windows there will be different ways to open Paint:
- On Windows 8 : Point your mouse at the lower right corner of the screen, then click Search .Enter the paint keyword in the Search box, then on the search results list, click Paint.
- On Windows Vista and Windows 7 : Click the Start button, and then expand the All Programs section . Open the Accessories Menu and select Paint.
- On Windows 10: Many methods can be used to access Paint in Windows 10. Here are 5 ways to consult.
Method 1: Turn on this Paint by searching.
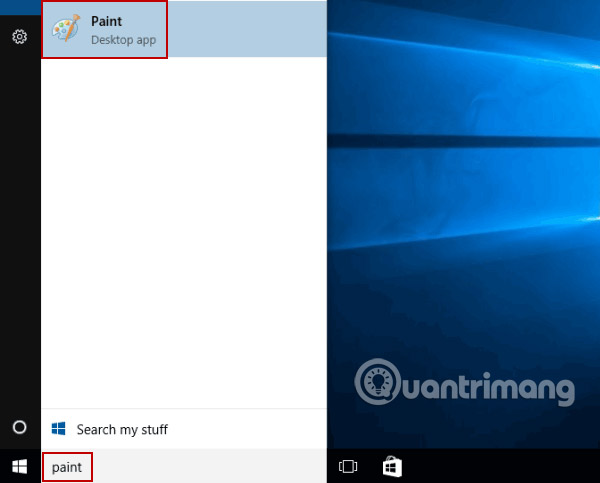
Type paint in the search box on the taskbar and click Paint in the results.
Method 2: Open Paint in the Start menu.
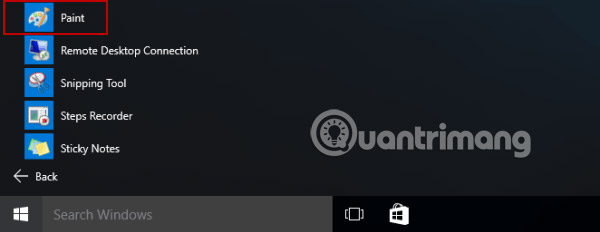
Go to the Start menu , expand All apps, open Windows Accessories and select Paint.
Method 3: Launch the application via Run.
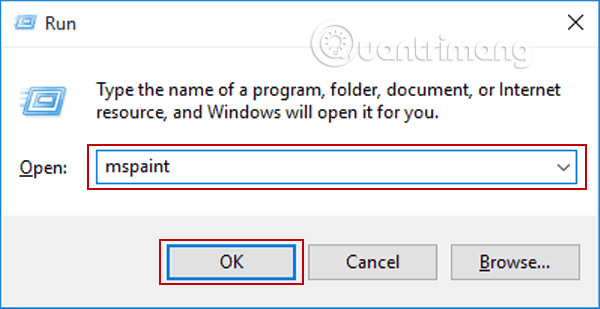
Open Run, enter mspaint and click OK.
Method 4: Access via Command Prompt.

Start with CMD, type mspaint and press Enter.
Method 5: Open Paint via Windows PowerShell.
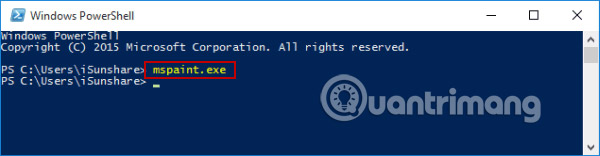
Enter Windows PowerShell, enter mspaint.exe and press Enter.
2. Open an image file in Paint
On Paint application you can open many different image formats, including * .bmp, .gif, .jpg / .jpeg, .tif / .tiff, .ico, and .png .
To open the image in Paint the easiest way is to open the file with Paint from within File Explorer. Right-click or click and hold the image file to open in File Explorer, select Open with and select Paint.

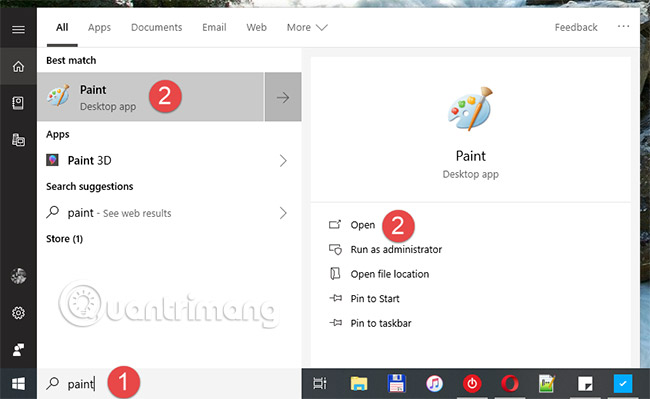
Another method is to open Paint and then open the file from within the application. To launch Paint you enter "paint" into the search box. When the search results are displayed, click Paint to open the application.
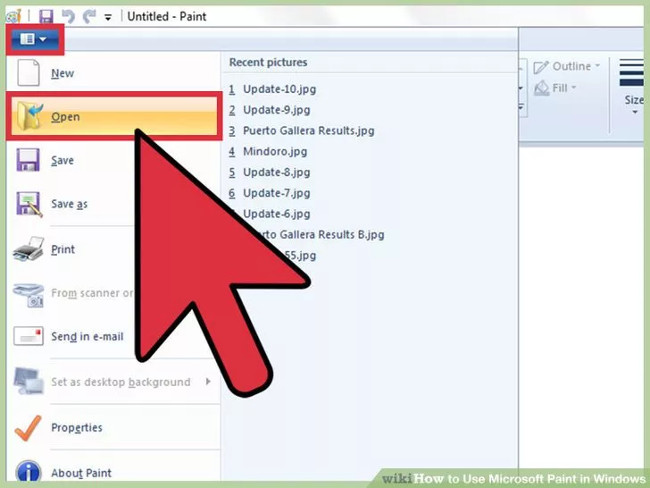
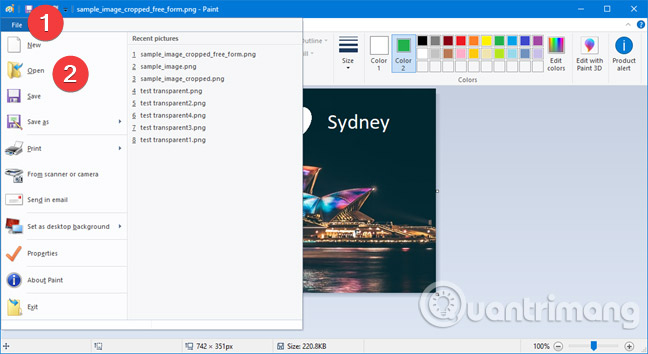
In the upper left corner, click File, then select Open or press CTRL + O on the keyboard.
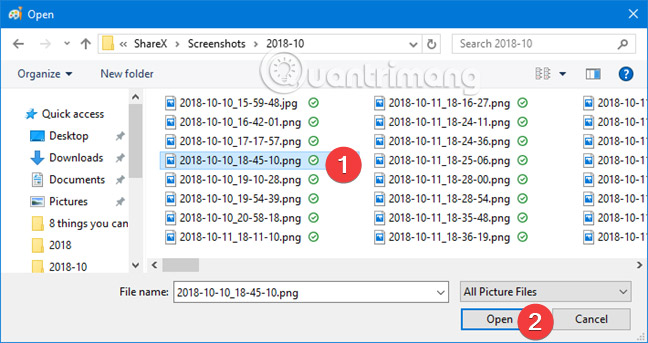
The standard Open window to open the file will appear. You need to select the file (1) and then click Open (2).
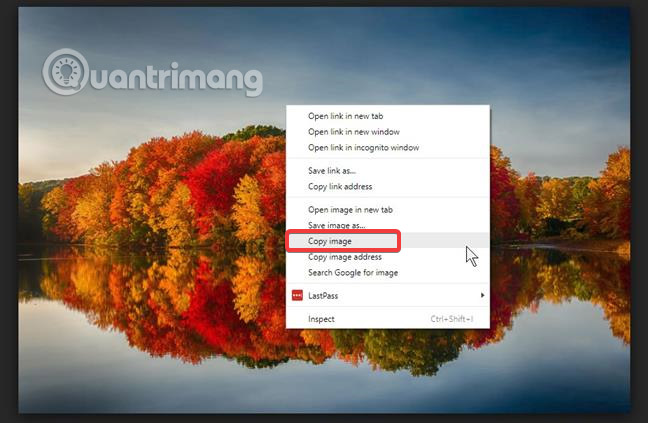
If you want to use Paint to modify an image that you have opened in another application, it is easier to use clipboard (clipboard). In this example, the author uses images from a web browser. First, copy the image to the clipboard. Right-click on the image and select Copy image.
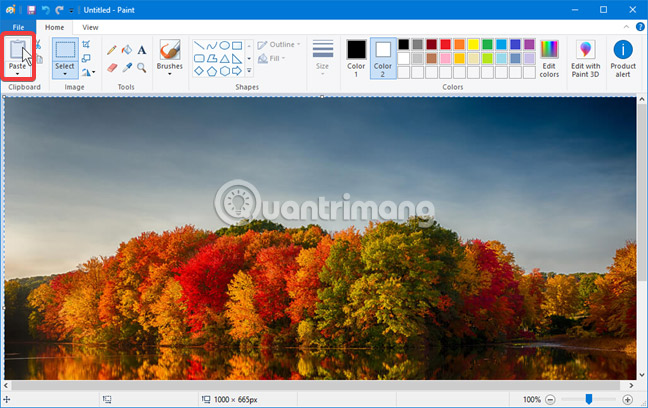
Paste it into Paint by clicking the Paste button on the ribbon or by pressing CTR + V on the keyboard.
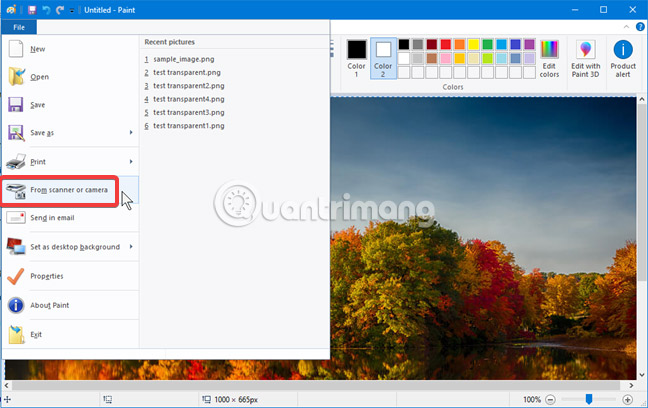
Paint can also take pictures directly from a scanner or camera connected to your computer. Open the File menu in Paint and select From scanner or camera . Paint will launch the application associated with your scanner and camera, which you use to get the image directly in Paint, ready for editing.
3. Canvas
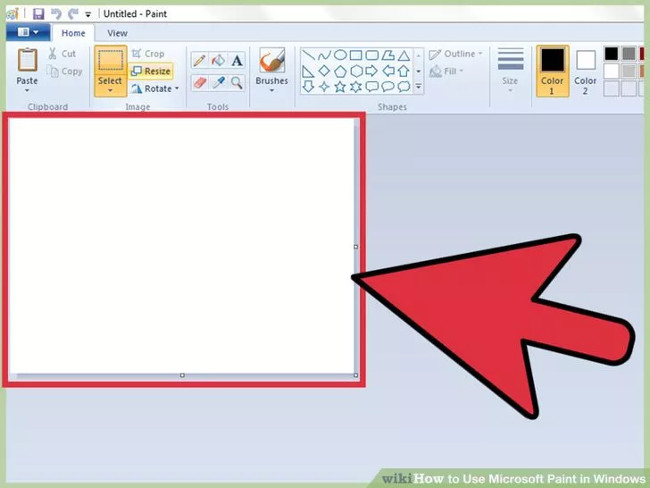
When the Paint application launches, you will see a white canvas appear on the screen.
Imagine the canvas is a piece of paper, and you can draw or write on it. You can adjust the canvas size before starting to edit the image file.
- On Windows 7 and later versions: On the Home tab , click Resize . Then select Pixels and enter the size you want in the horizontal and vertical frames.
Or if you want to adjust the size by%, select Percentage and enter% that you want to adjust to increase or decrease the current canvas size. For example, if you want to adjust the image size by 50%, enter 50 in each frame. To double the current size, enter 200 into each frame.
- Windows Vista : Click on Image , then select Attributes.Enter the canvas size you want (unit of pixels) into the Width frame and the Height frame.
4. Crop the picture in Paint
Select a part of the image you want to keep. Click or tap the Select tool from the Home toolbar , then click and drag the image to select an area. When you are satisfied with your selection, click Crop and the image will be changed (keep only the area you select).

Remember that next to the default rectangle option, there is the second option "Free-form". After you select "Free-form", click and drag the mouse pointer to draw any image you want. The shape of the selection is not limited, but the final result is still a rectangle that fits the selection. When you're done selecting the area, follow the same steps to crop the image.

5. Resize the image in Paint
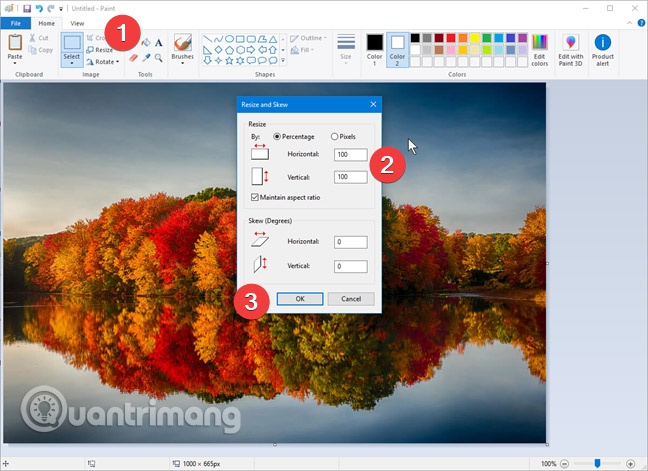
Click on the image, then select ' Resize / Skew ' (if using Windows 7 or later versions, click Resize on the Toolbar ).
Or alternatively, press Ctrl + W to open the Resize / Skew dialog box. Enter the new size you want to enter (unit is pixel or%, just like when you create a canvas) to increase or decrease the image size.
In Windows 10, to change the image size in Paint, do the following:
Click the "Resize" button from the Home tab and a pop-up box will appear along with options to resize your image. The default option for changes is Percentage. The image is reduced in size if the numbers are below 100 and expanded if you increase the number above 100. If you want the exact number of pixels, select Pixels and enter the new values you want. When you're done, click OK.
6. Rotate the image in Paint
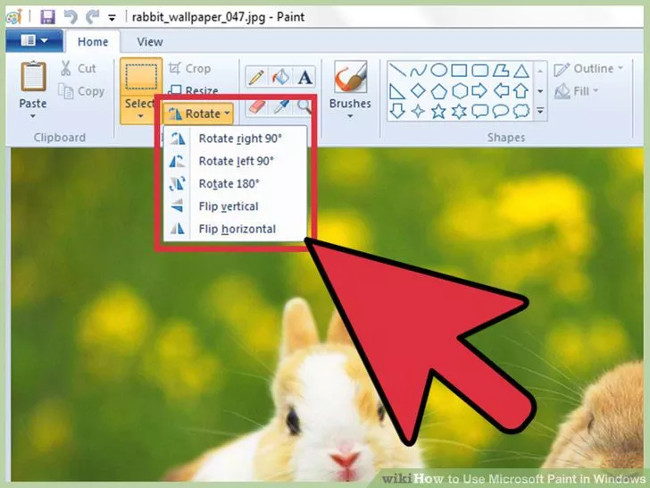
To rotate any image, use the Flip and Rotate tools.
- On Windows 7 or later version: On the Toolbar , click on ' Rotate ' then select a rotation direction on the menu.
- On Windows Vista: On the Imag menu, click "Flip / Rotate", then select the direction to rotate the image.
- Alternatively, you can press Ctrl + R to open the Rotate tool on any Windows operating system.
7. Zoom in or zoom out the image with Paint
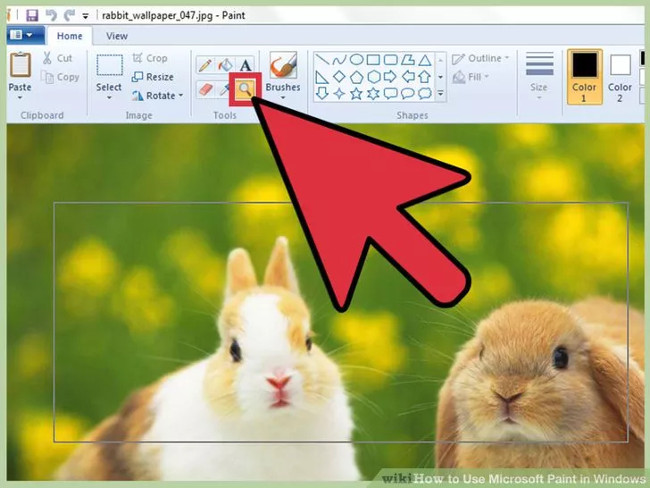
Click on the magnifying glass icon to activate the Zoom tool. To zoom in, click anywhere on the image and left click. To zoom out, click the right mouse button.
Alternatively, you can use Ctrl + PageUp ⇞ to zoom in , and Ctrl + ⇟ PageDown to zoom out .
8. Undo when there is an error
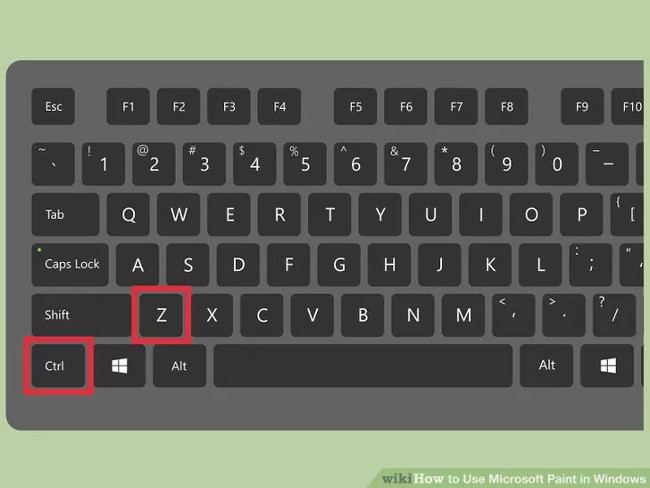
If any error occurs when using tools on Paint, you can perform Undo again by pressing Ctrl + Z.
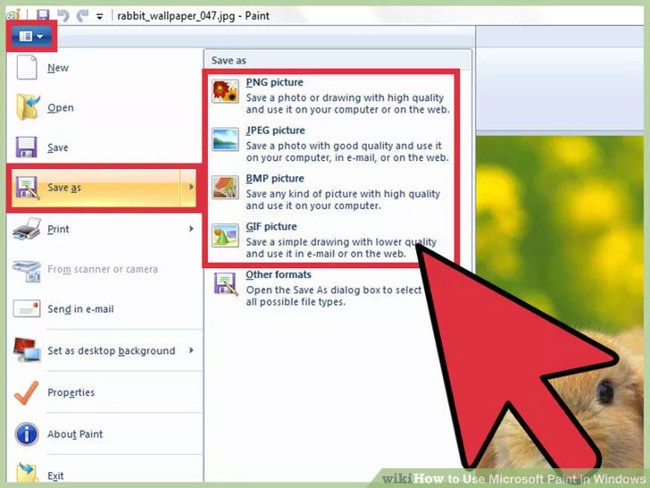
9. Save the image file after editing with Paint

Click File, then select Save As and put a name, find the location to save the file. In addition, you will see the option to select the file format. JPG is the best format, but you can also use other formats.
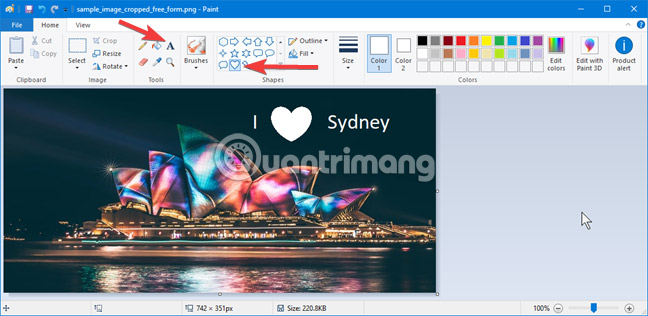
10. Enter text or draw an image in Paint
Paint provides a text input tool in the Tools section of the Home toolbar . Click it and then type the text on the image. The second change to the image is a shape selected from Paint's library. For shapes, select the image you want to insert, drag the image on the image to determine the size of the shape. For these tools, the Colors section of the Home tab determines the color used for the border and background color of the image.
Please note that when you click outside the area where the shape is being inserted or the text is entered, the changes will be applied, they are embedded in the image and you cannot select them anymore. You can only undo the changes by pressing CTRL + Z.
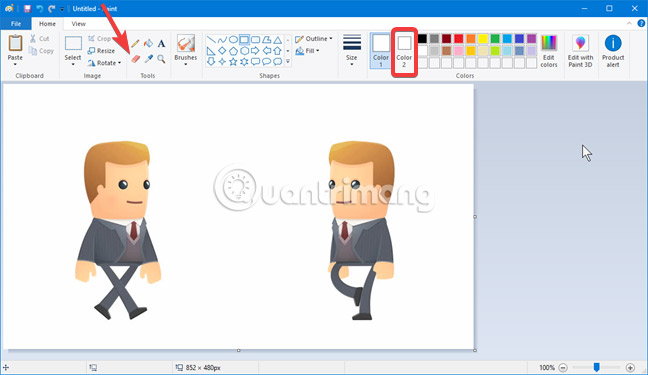
11. Reverse the color of the image in Paint
The only tool Paint does not have available in the Home toolbar is the Invert color tool . You need to right-click or click on the image to open the context menu. Invert color is the last option in the list.

When you click on it, Paint will create the correct negatives for your image. See the example below. It is not bad, is it?
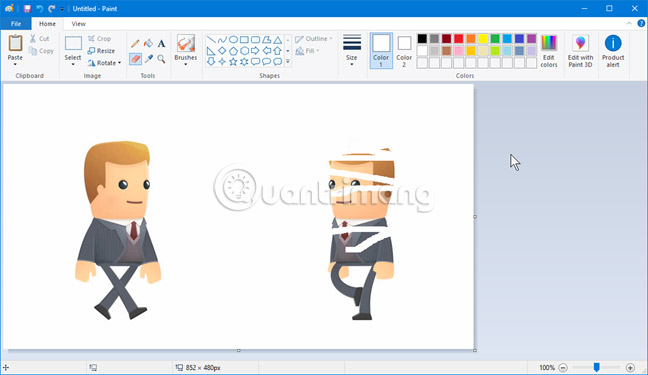
12. Delete part of the image in Paint
If you want to remove part of the image, the Eraser tool is ready to meet your needs. You can find it in the Tools section of the Home toolbar. Click to select it. To change the size of the Eraser tool, use the Size section on the toolbar. The color used for the Eraser tool is Color 2 .
The example below is in the process of deleting a character, so you can observe how it works.
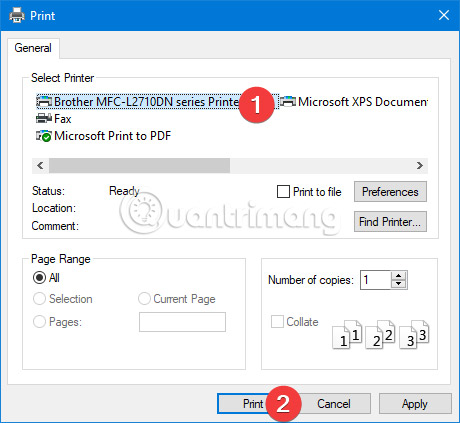
13. Print pictures with Paint
In the File menu , find the Print option . It allows you to set up pages, preview output and print images.

After you click Print, the Print dialog box will appear. You select the printer (1), and then press the Print button to send the document to the printer.
Part 2: Draw on Paint
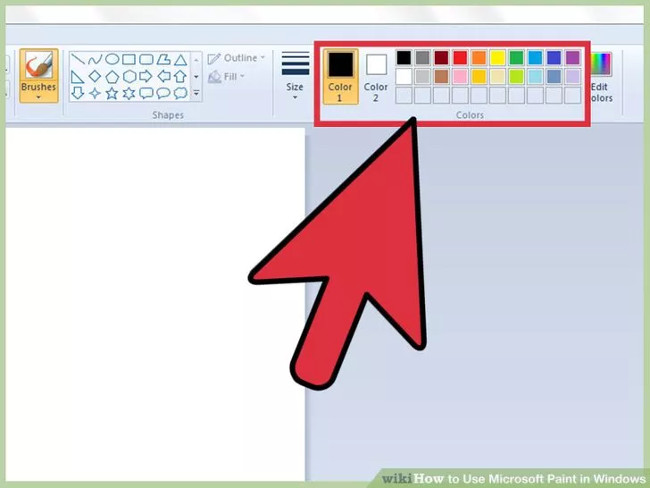
1. Color palette
The colored squares at the top of the paint window are the color palettes. Click on any color as the color to use for the tool on Paint. You can also set a background color when you start working with the shape.
- Windows 7 and later versions : the foreground color is called 'color 1 ' and the background color is called 'color 2' .To select the foreground color (foreground color), click Color 1 and select any color from the palette.To select the background color, click Color 2 and then click on any color.
- Windows Vista or earlier versions: Find two overlapping colored boxes in the left pane of the palette.The front box is the foreground color, the other is the background color.Set the background color by right-clicking on the color you choose.
2. Draw a straight or curved line
Depending on the version of Windows you use, you'll see two tools in two different lines (Line and Curve).
To draw a line, click the Straight Line tool, then select a color from the palette. Click anywhere on the canvas . At the same time, click and hold the mouse, drag the mouse in any direction you want. Once done, you can release the mouse.
To draw a curve, click on the Curve icon (scribble icon). Draw like drawing a straight line.
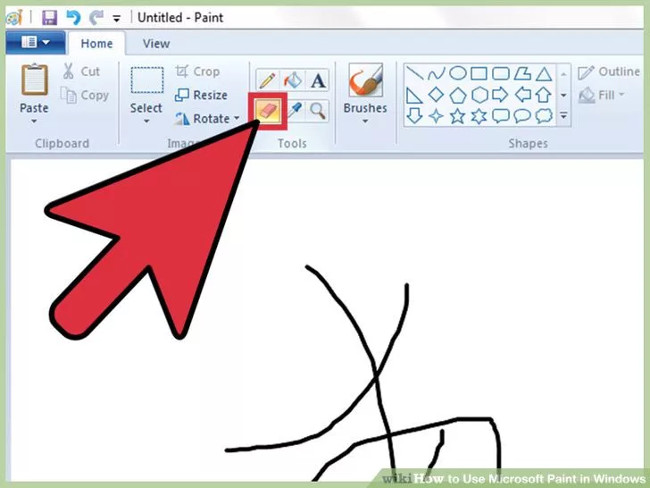
3. Draw free shapes with Pencil tool

Pencil is a free drawing tool like a real pencil. The width of the line can be adjusted by clicking on Menu Size and selecting a different width for the road. To draw, simply click on the mouse when moving the canvas mouse.
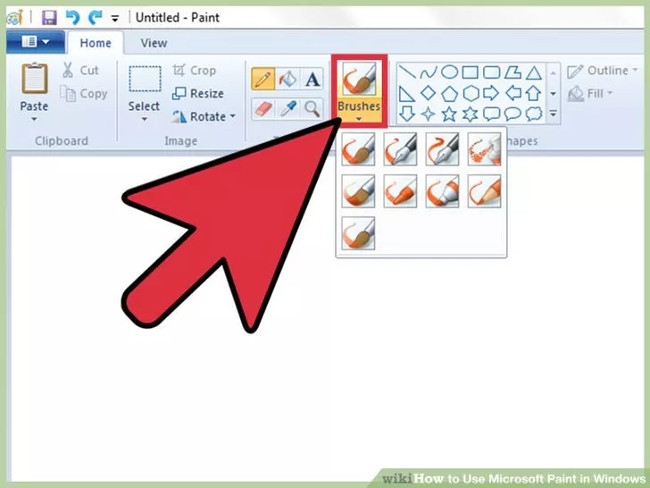
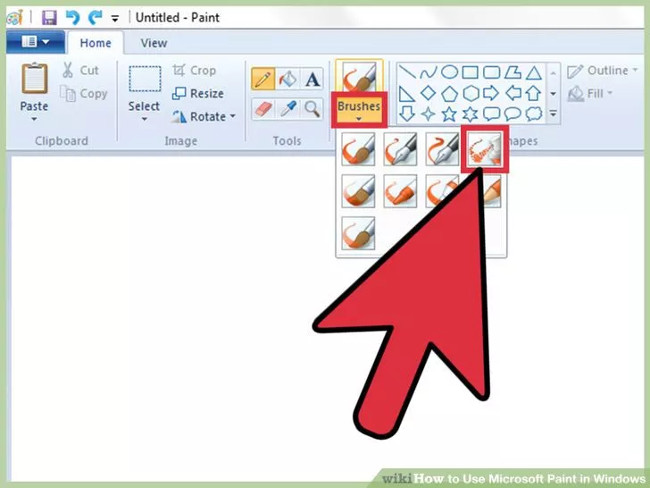
4 Draw with the Paintbrush tool
Paintbrush is more flexible tool than Pencil.
- On Windows 7 and later versions, click on the down arrow icon underBrushesand choose one of the brush tips.You can adjust the size of each brush tip by clicking on the "Size" icon.
- On Windows Vista and earlier versions, click on the Paintbrush icon, then select a brush tip.
- The image from the menu appears just below the toolbar.Select the color from the palette and drag the mouse to draw a design on the canvas.
5. Use Spraycan
This tool works similar to Paintbrush, but uses spray paint (spray paint).
- On Windows 7 and newer versions: this tool is in the Brushes Menu .
- On Vista and earlier versions: Click on the icon like a spray paint box.Draw as you paint with the Pencil or Brush tools.
6. Clear the error
To delete something that you have drawn incorrectly or error with any of the tools, click on the Eraser icon (paint eraser) and draw on the area you want to delete. Like other tools, you can adjust the width of the eraser using Menu Size.
Note that the background color ("Color 2" in Windows 7 and later versions) will appear anywhere you use the eraser tool. For example, if you are deleting a red line on a white background, make sure the background color is set to white.
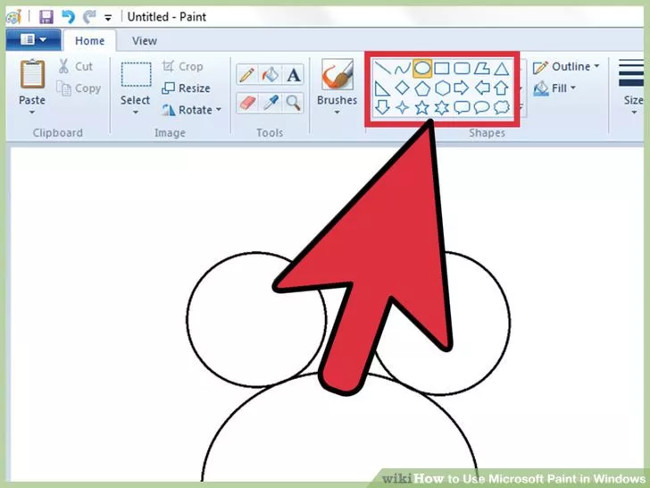
7. Create cubes
Select any image from the toolbar to draw it. After you've selected the shape, you'll see some image settings options.
- On Windows 7 or later versions, click the Outline Menu and Menu Fill to see your options.
- If you are using Windows Vista or an earlier version, you will see an outline of an image, an outline of a color image, and a solid-state shape.
Select any Outline and Fill option you want, then click on the canvas - where you want to create the image. Hold down the mouse button as you drag the mouse pointer to enlarge the image. Release the mouse button when you reach the desired shape size.
If you choose an image with an outline, the colors of the outline will be the current foreground color. If your image is solid, the color will be the background color.
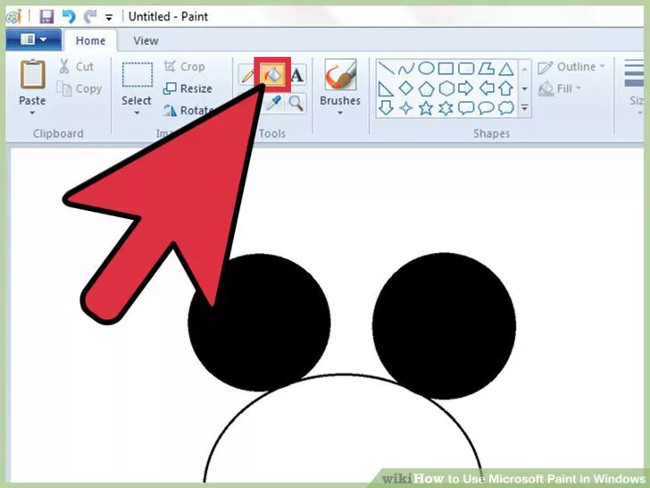
8. Fill color
Also known as " Paint Bucket ," the Fill tool fills an entire area you select with a single color.
Click the icon that looks like a paint bucket, then select a color from the palette. Now, click on the frame to fill the color you selected.
The Fill tool will 'fill' the space between all lines. You can try to create a square or circle with the shape tool with one color, then use the Fill tool to change the color of the unique image.
Part 3: Some other features
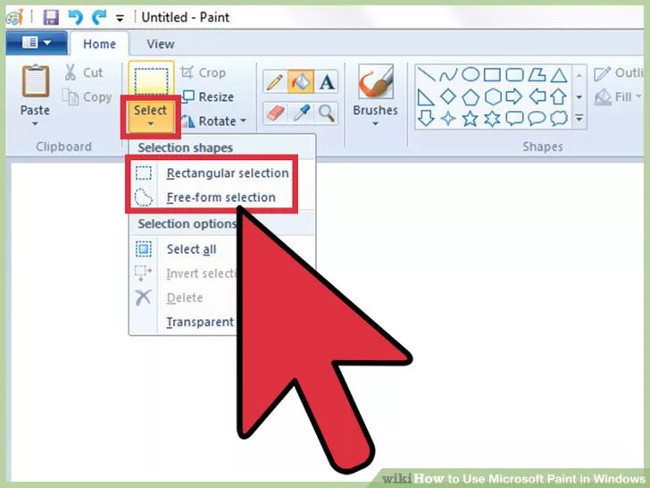
1. Select tools
There are 2 tools you can use to select parts of the image: Freeform Select and Rectangular Select. Freeform allows you to hand-draw selected lines around the image, Rectangular allows you to draw a rectangle.
- On Windows 7 and later versions: click the arrow under Select and select Rectangular or Freeform .On Windows Vista and older versions, you will see both options on the toolbar.
- To use these tools, first click on the top left corner of your image, then hold down the mouse button as you move around.The selection of Rectangular is quite simple, but you will have to be more careful with the Freeform tool.Release the mouse after you have made your selection.
2. Copy and paste the items you selected
To copy something you selected, press Ctrl + C. To paste the item you copied (in Paint or other compatible programs, such as Word, Power Point) you click on the location you want to paste, then press Ctrl + V.
If you don't want to copy and paste both of the background colors you selected, follow the steps below:
- On Windows 7 and later versions: Select Transparent Selection on Menu Select .
- On Windows Vista or earlier versions:
Find 2 icons with a colorful shape and the selection is a rectangle above. Click on it to highlight 2 icons. If you want to disable it, click again on the selection icon above.
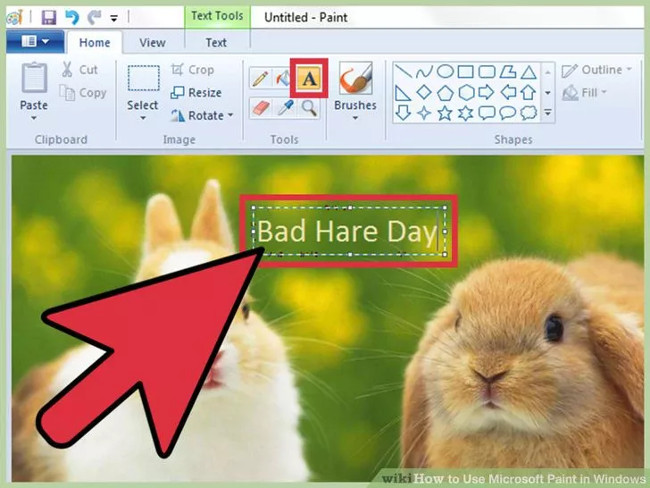
3. Add text to the image with Paint
Select the Text tool, the letter A, then double-click anywhere on the canvas to start typing.
- A text box appears on the screen for you to enter text.Enter the correct text before switching to other tools because you cannot edit the intoxicated text when closing the text frame.
- To increase the size of the text frame (to enter more text), hold the mouse button on one of the corners of the text until the pointer changes to an arrow, then drag the frame to increase the size.
- Select a font and size in the top corner of the screen and start typing text.To change the color, size or interface of the text after importing it, proceed to black out the text, then select new colors, sizes, .
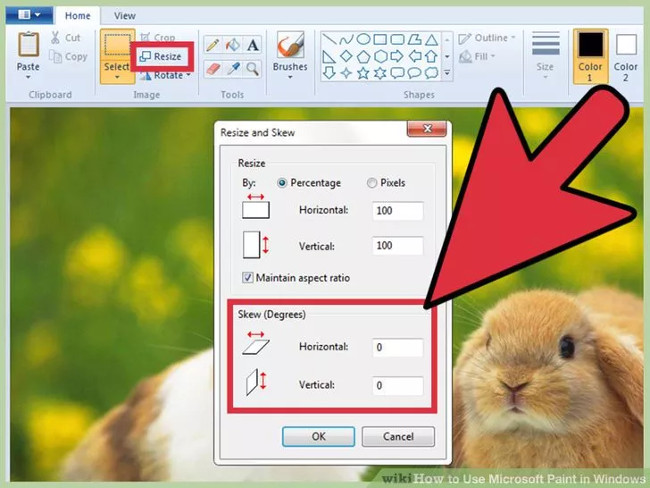
4. Distort the image
You can distort the image using the Skew feature. Click on the image, then select Resize / Skew (if using Windows 7 or later, or just click Resize on the toolbar).
To stretch / distort images in degrees, you enter any number (in degrees) and frames horizontal and vertical.
5. Color Picker
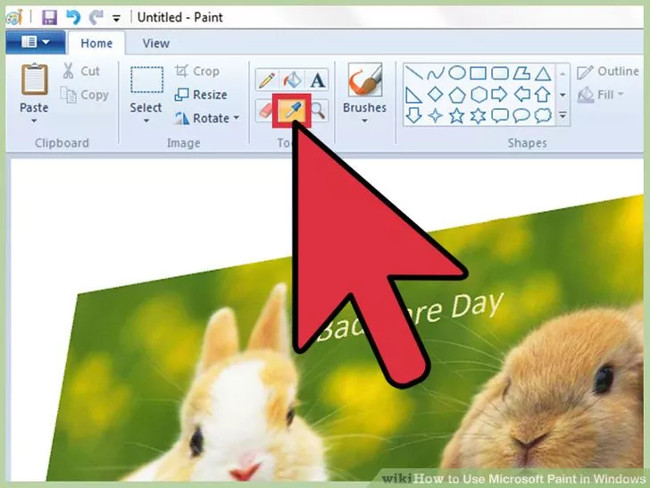
The small Eyedropper icon is the representative icon of the Color Picker tool. Click on this tool then click on any location on the drawing. The area you click will make the background color for the next tool of your choice.
6. Create your own color as you like
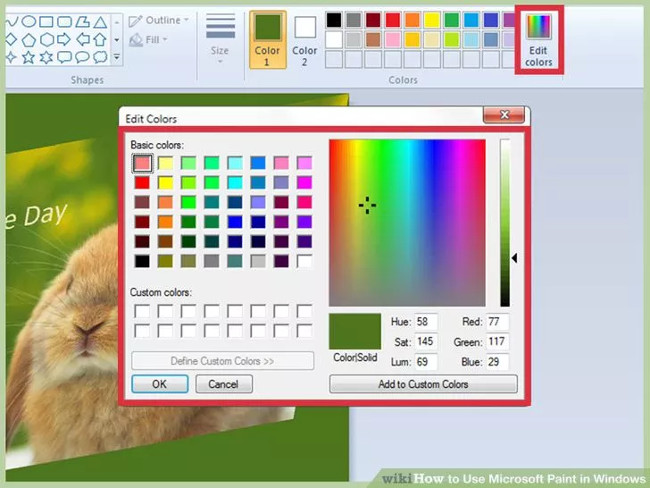
You can edit any color by adjusting brightness, color and other options on Paint. Click on Edit colors or Define custom colors to add the blend color. Once you've selected the color you want, click Add to custom colors .
7. Use the Ruler (grid) or Grid (grid)
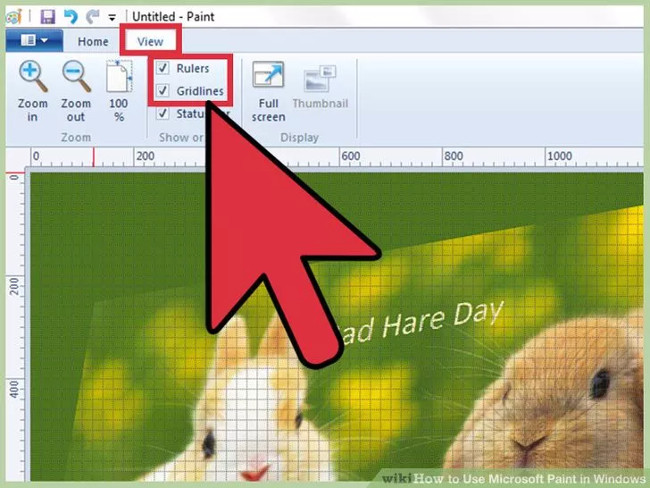
Symmetrical drawing is never easy, especially when you are using a mouse. However, if you want, you can still do it. Click on the View tab, then check the box next to Ruler to see the horizontal and vertical rulers around the canvas. Check the box next to Gridlines to create a grid on the canvas.
If you want to turn off these features, simply remove the check box next to the Ruler and Grid.
8. Shortcuts in Paint
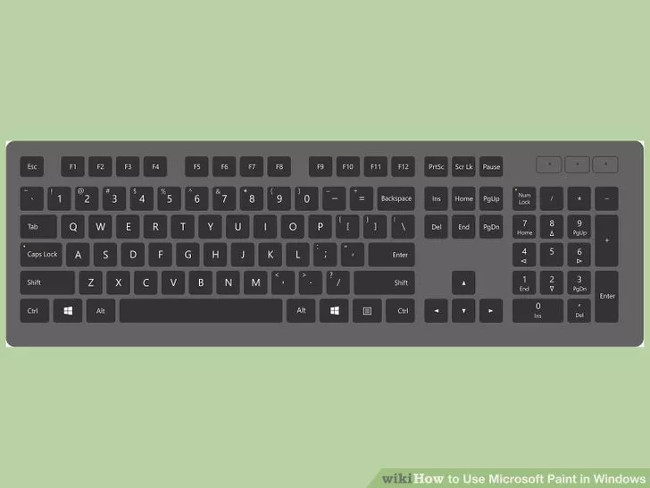
Like other applications, programs, Paint also has keyboard shortcuts for users to manipulate more easily.
- Rotate: Ctrl + R
- Create a new canvas: Ctrl + N
- Cut: Ctrl + X
- Paste: Ctrl + V
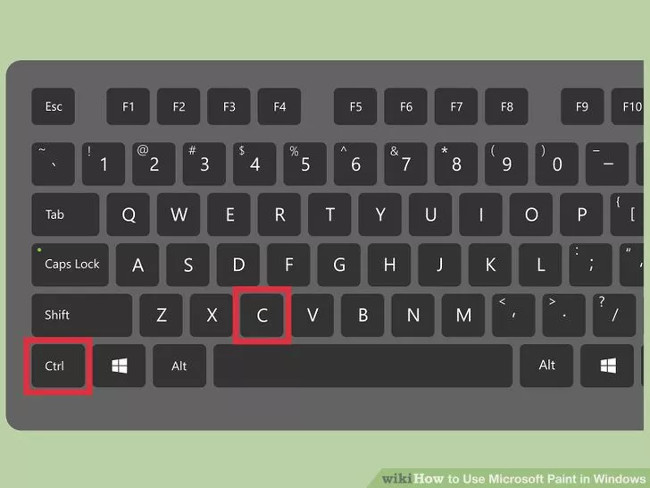
- Copy: Ctrl + C
- Save file: Ctrl + S
- Delete: Del
- Print: Ctrl + P
- Undo: Ctrl + Z
- Select all: Ctrl + A
- Redo: Ctrl + Y
- Hide toolbar: Ctrl + T
- Open the properties window: Ctrl + E
- Stretch and distort images: Ctrl + W
- Hide the color bar: Ctrl + L
Paint can be used to paint, color and edit images, including images imported from smartphones or digital cameras. Paint has overcome challenges over time, and it is still used today because it is a free and simple application that serves well for basic image editing needs. If you upgrade to today's sophisticated image editing applications, you will find that they are based on tools and interfaces developed by Paint. Learning basic image editing skills in Paint gives you a good start in using advanced editing tools.
Tell us if you like to use Paint and what your experience with this app is in the comment section below!
Refer to some of the following articles:
- No need to use software, here are 3 ways to get images from Word files fastest
- Tips for copying fast and efficient paragraph formatting in Word
Good luck!