Table of Contents
This practical guide explains how to convert 3d printed stl files into step format for cad with clear steps and useful context. It also covers common requirements, potential problems, and the details that can help you get better results.
Step 1: Export STL from Blender

Blender can export STL files natively, ideal for those looking to create models for 3D printing and CNC machining. Go to File > Export > Export as STL , select the file location and name you want to use. You can choose to export Selection Only if you want to isolate part of your Blender project.
Blender is free to download and use. Any version after Blender 2.8 will work for this tutorial.
Step 2: Import STL into Freecad

Next, it's time to import your new STL file into FreeCAD, which is one of the best CAD programs. Go to File > Import and select the STL file you created in the previous step. A mesh that resembles the 3D model will appear on the screen, giving you a chance to check for errors before continuing.
As the name implies, FreeCAD is free to download and use.
Step 3: Repair the Model's Mesh in Freecad

Some mesh problems are visible when you first load your file, but others won't be so obvious. FreeCAD is equipped with a suite of analysis tools that make it easy to ensure that your model mesh is diverse and error-free. Start by selecting the Workbench drop-down menu and selecting Mesh Design .
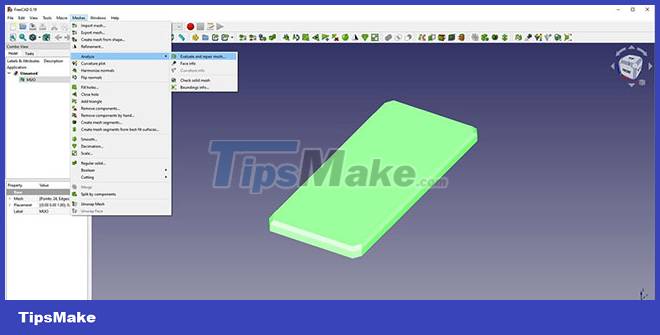
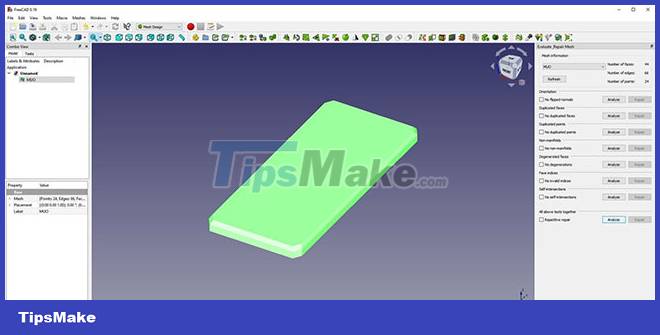
Go to Meshes > Analyze > Evaluate and repair mesh to open the mesh repair tool. You will see the All above tests together option at the bottom of the list. Select Analyze and wait for the process to complete before pressing the Repair button. You may need to go through this process several times to completely repair your model, but it's likely that your model won't need repair.
Step 4: Convert STL Mesh to a Shape in Freecad

The STL is just an outer mesh point, while the STEP file is a solid 3D object. This means you need to convert your STL mesh to a solid in FreeCAD, but this can only be done once the mesh has become a shape. Start by going to the workbench Part , followed by opening the Part drop-down menu and choosing Create shape from mesh . A pop-up window will appear where you can select Overlap Tolerance ; Leave it at 0.10 and press OK.

It will take some time to create your shape if the mesh you are using is complex.
Step 5: Convert Shape to Solid in Freecad

With the shape ready, you can create the strength you need for your STEP file. Select the shape you just created in the Model panel, then go to Part > Convert to solid . This will create a new entry in the Model panel with (Solid) next to its name.
Step 6: Export Solid Shape as CAD Compatible STEP File
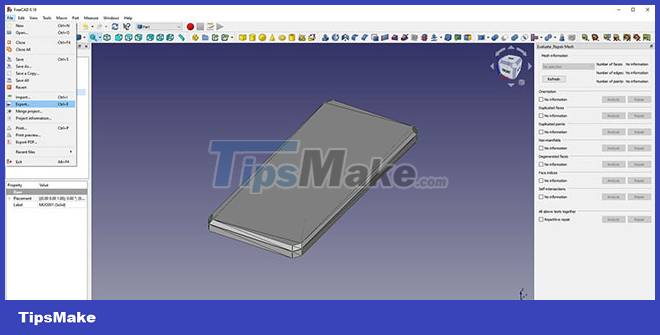
It's finally time to create your STEP file! Go to File > Export and choose a location for the STEP file you are creating. Select the Save as type drop-down menu and scroll through the list to find STEP with the color before pressing the Save button.

STEP files can be used for many different CAD applications. Many people don't have their own CNC machine or 3D printer, but you can find services online that can turn your files into real objects. The methods discussed in this article will work with any STL file, although detailed and complex models will take more time.
Conclusion
Understanding 3D Printing makes it easier to compare options, avoid common mistakes, and apply the information in this guide more effectively. Review the relevant requirements before making changes or choosing a solution.
FAQ
How do you convert 3d printed stl files into step format for cad?
Follow the steps in this guide in order, confirm the required settings or tools, and verify the result before making additional changes.
Is it safe to convert 3d printed stl files into step format for cad?
It is generally safe when you follow the recommended instructions, use trusted tools, and avoid changing settings you do not understand.
What should you do if the process does not work?
Recheck the requirements, restart the device or application when appropriate, and review each step for missed settings or compatibility issues.
Related Articles
 How to Convert JPG to PNG: Complete Guide7 minutes read
 How to Convert MOV Files to MP4 Format: Step-by-Step Guide6 minutes read
 How to Convert JPG Files to PDF Format: Step-by-Step Guide7 minutes read
 Convert Songs on Itunes to MP3 Format with 5 Easy Steps8 minutes read
 Convert CAD Files to PDF5 minutes read
 How to Convert Word Files to PDF Format: Clear Instructions8 minutes read
Reader Comments 0
Sign in with email or Google to join the discussion.