How to add photos to albums in Photos on iOS 13
Apple will usually adjust the menu and button functions for each new version of iOS to make the software interface more appropriate. The following steps explain the new process for adding photos to albums in the Photos app on iOS 13.
Apple is always looking for ways to make it easier to use iPhones and iPads. The company will usually adjust the menu and button functions for each new version of iOS to make the software interface more appropriate.
However, sometimes, these changes can make longtime users hard to reach.
In previous versions of the Apple operating system, adding some photos to the album only involved selecting (or checking) some photos in Camera Roll and clicking the Add To button at the bottom of the interface.
However, in iOS 13, Apple switched this option to Share Sheet. The following steps explain the new process for adding photos to albums in the Photos app on iOS 13.
1. Launch the Photos application on iPhone or iPad.
2. Click Select in the upper right corner of the screen, then click some photos you want to add to the album.
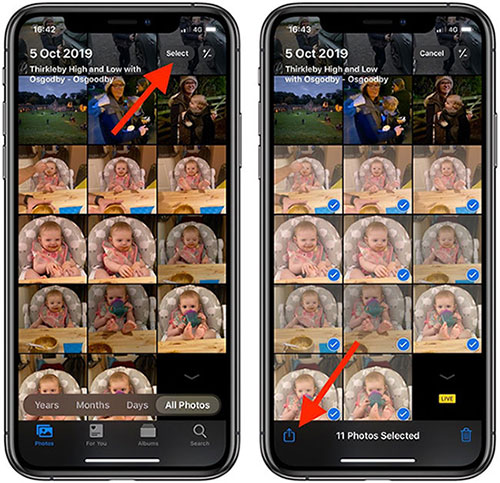
3. Touch the Share Sheet button (the square with the arrow indicated) in the lower left corner of the screen.
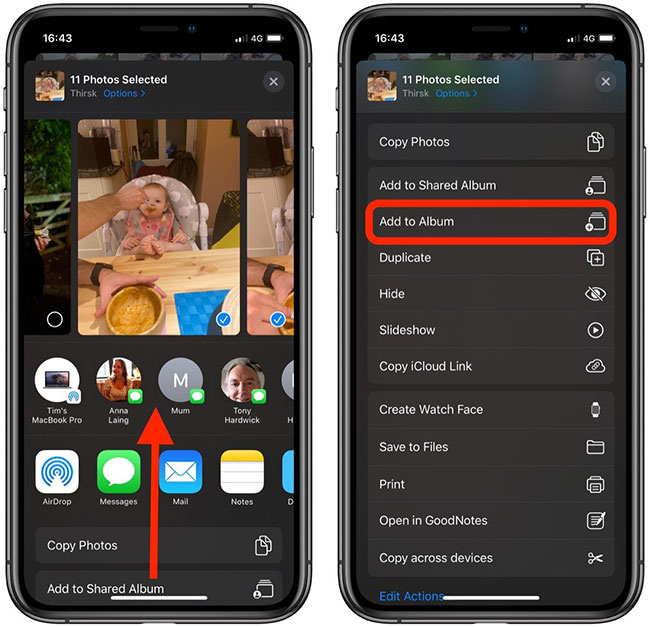
4. Swipe up on the Share Sheet to display the actions below the sharing icons.
5. Click Add to Album .
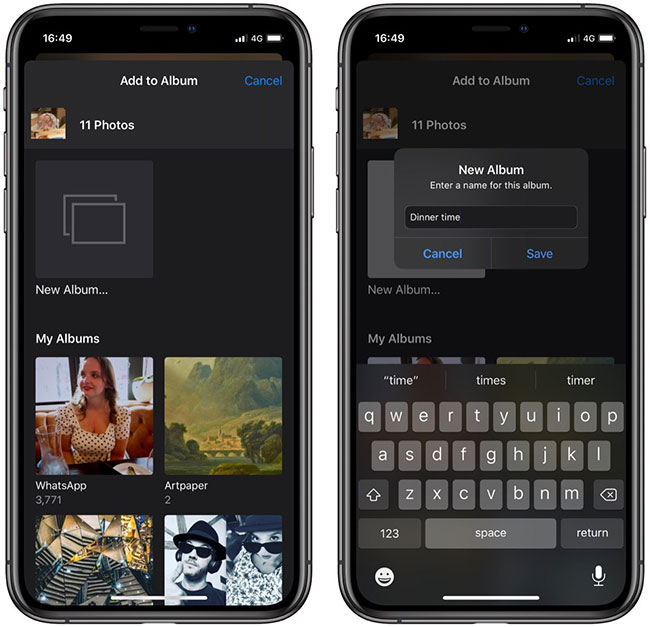
6. On the next screen, under My Albums, tap an existing album to add the photos you selected. Click the New Album option above them, name the new album, then click Save.
To be honest, it may be time for Apple to change the "Share Sheet" name to "Action Sheet", because normally, you will now see many actions, like sharing options, listed in them.
Was this article helpful?
Your feedback helps us improve.
Related Articles
 How to add photos to iPhone shared albums2 minutes read
 How to automatically add photos to albums on Google Photo2 minutes read
 How to create and manage shared albums on Google Photos6 minutes read
 How to use Live Albums on Google Home Hub4 minutes read
 Instructions to download all photo albums on Facebook6 minutes read
 Complete on Photos apps on iPhone and iPad - Part 1: Positioning and Albums3 minutes read
Reader Comments 0
Sign in with email or Google to join the discussion.