22 tips to help you master Google Photos
Google Photos may be like a simple image hosting service, but it's really quite powerful. Google Photos reduces the gap between cloud storage, photo storage and photo sharing, creating fierce competition with Flickr, iCloud, Dropbox and OneDrive.
- Instructions for using Google Photos on Windows 10
You can know that Google Photos can back up photos from your Android or iOS device, and you can access photos from the web to view your library. You may even know that Google Photos offers unlimited memory for free when you choose a high quality setting (ie, the image has a rich 16-megapixel limit and HD video up to 1080p). Any larger images will be saved to your Google Drive memory. Although most of the features and services that come with this application have been discussed for a while, here are some tricks out of the basics that you may not know.
22 tips to help you master Google Photos
1. Search for people, places and objects- 2. Group similar faces together and label them
- 3. Change backup and synchronization settings
- 4. Delete photos after uploading to Google Photos
- 5. Backup photos from other applications
- 6. Change the view mode
- 7. Select multiple photos with one click
- 8. Undo delete photos
- 9. Download photos faster with desktop
- 10. Display photos on TV with Chromecast
- 11. Download all photos at once
- 12. Google Drive and Google Photos
- 13. Send photos and videos to Gmail and YouTube
- 14. Share photos and videos with anyone
- 15. Delete location information of photos and videos taken
- 16. Use Google Photos when you are offline
- 17. Create beautiful stories, animations and images from your photos
- 18. Editing images
- 19. View a Slideshow
- 20. Scan old photos
- 21. Freeing device capacity
- 22. Disable proposed edits
1. Search for people, places and objects
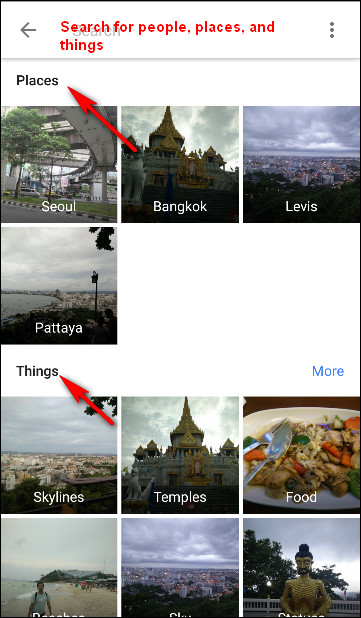
Google Photos automatically organizes uploaded images according to location and date taken. Using Google's advanced image recognition technology and large information database, it is easy to recognize the subject of your photos. Search your photos for anything: a wedding you attended last month, photos of your vacation, pictures of pets, food and more. At the bottom right, touch the search icon and from the box, enter the content you want to find like food, car or pet and touch " Enter " or " Search".
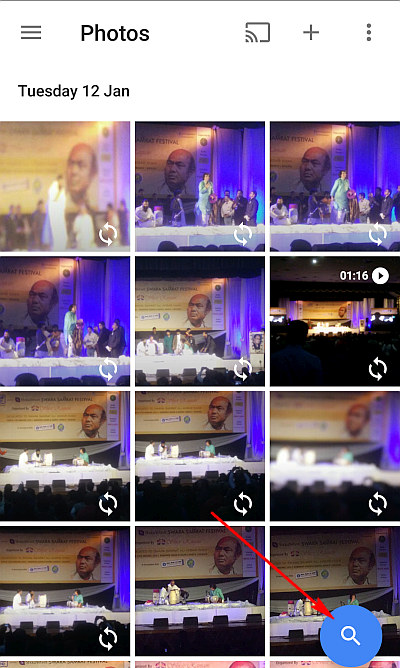
The Google Photos application uses a number of complex image processing techniques to stitch photos together. Auto-group photos are displayed in the main search interface. The categories you will see here depend on what you take pictures. These groups can be places you visit, people you know or things like food, cars, motorcycles and more.
2. Group similar faces together and label them
Google Photos creates face models in your photos to group similar faces together. That way, you can search the gallery for certain people (like "Mom" or "Dad"). Face groups and labels are private and will not appear to anyone you share photos with. To create a label for a face group, click 'Who is this?' located at the top of the group. Enter a name or nickname (or choose from suggestions). After labeling a group of faces, you can search for that label using the search box.
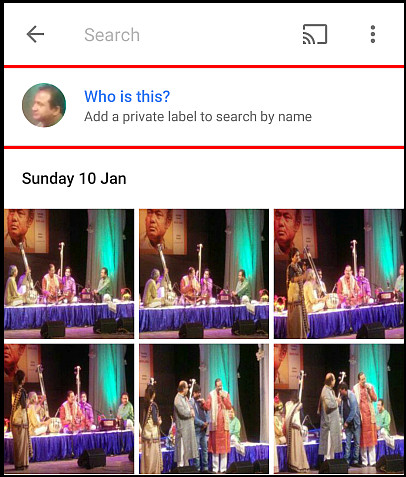
If you want to change or delete the label name, touch the " Options " menu and select 'Edit or Remove name label'.
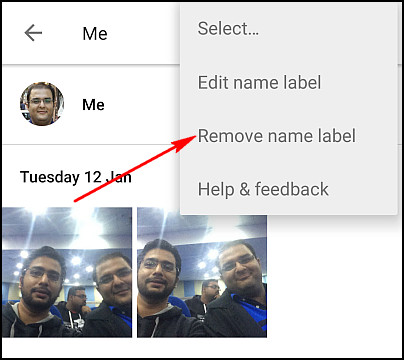
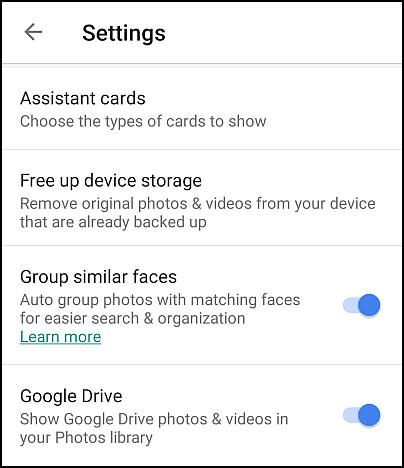
If there is more than one face group for the same person, you can merge them. Label and name a group of faces, then label other groups with the same name. When you confirm the second name, Google Photos will ask you if you want to merge these groups together. Face groups are turned on by default, but you can remove features that group similar faces together in ' Settings '. At the top left, click or click on the menu with three horizontal bars. Turn off 'Group similar faces ", the application will delete all groups of faces in your account, the face model you created for those groups and any labels created.
3. Change backup and synchronization settings
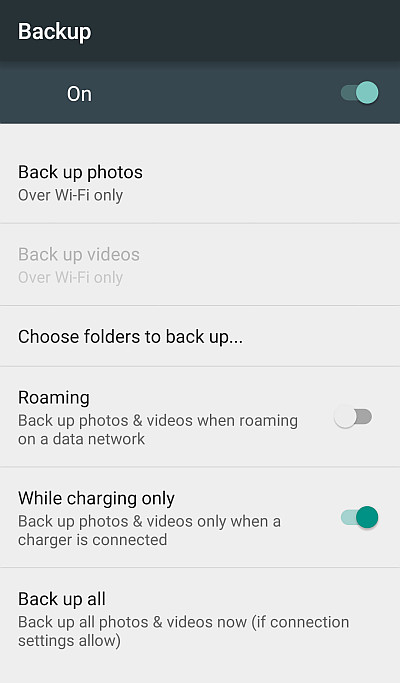
Your photos and videos are backed up to a specific Google account. However, you can change your user account, which photos to backup and many other things in Google Photos settings. At the top left, touch the three horizontal bar menu and select 'Settings> Back up and sync' .
- Active account : To change the Google account you are saving photos and videos, tap the account name to change it.
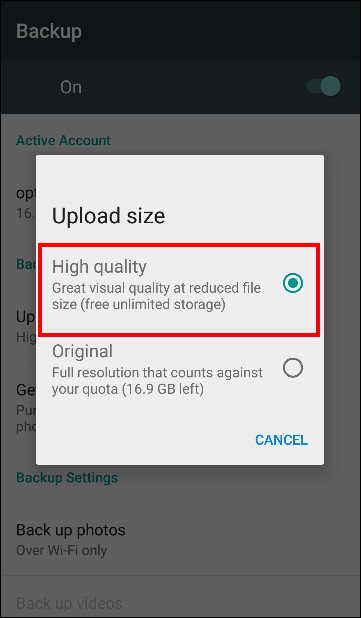
- Upload size : Here you can choose between two storage sizes 'High Quality' and 'Original'. With the 'Hight Quality' setting, you can backup unlimited photos and videos. This option is good for those who don't care much about quality, but enough to print and share. With the "Original" setting, you'll have limited memory (15 GB of free memory) but if you're interested in original quality and taking photos with a DSLR camera, this is a good option. Upload Size ' to change quality settings.
- Backup photos via Wifi or both: Choose whether you want to back up photos only on Wifi or Wifi and mobile network. You can select 'Back up all' if you want to backup your video.
- Only when charging : If you enable this option, your photos and videos will only be uploaded when your device is connected to an external power source.
4. Delete photos after uploading to Google Photos
If you plan to upload photos to the cloud, why keep them on your phone? Google Photos can automatically delete photos and videos from your phone after uploading them, removing its backup copies. Previously, this feature was only activated if you set up the 'Full original resolution' image backup application , which causes you to store on Google Drive, but now the 'High quality' option is available. Google Photos' " Assistant " feature will prompt you to remove the image from your phone when the storage space is low. If accepted, it will provide information about traffic that can be freed when deleting photos and videos on the device. suffered.
If you always turn on backup and sync, you can also delete copies of photos and videos on your device. At the top left, touch the three horizontal bar menu and select " Settings ." Tap 'Free up device storage' to delete the original image and the original video from the backup device.
5. Backup photos from other applications
The automatic backup feature of Google Photos is handy, but by default, it only backs up photos taken with the device's default Camera app. If you want to back up photos taken in Instagram, WhatsApp, Viber and other similar applications, you can do so just knowing where the application stores photos.
Open the Google Photos app on your phone and touch the three horizontal menu icon in the top left corner. Select ' Device Folders' from the menu that appears. You will notice different folders that store images from applications like Facebook, Instagram, messaging apps and screenshots. Select the folders you want to backup.
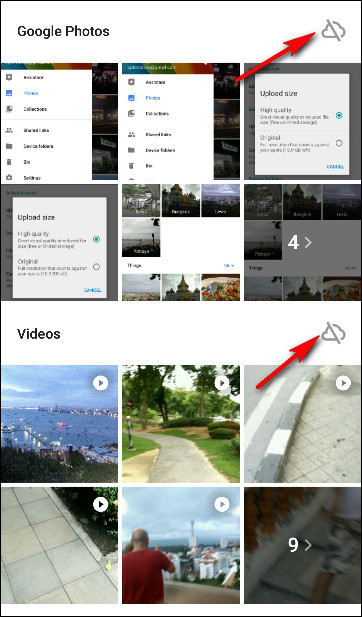
Also, go to " Settings> Back up and sync ", tap 'Choose folders to back up .' and select the folders you want to back up. Note that this setting is only available on Android devices.
- Instructions on how to put Google Photos GIF images on Instagram on Android and Android
6. Change the view mode
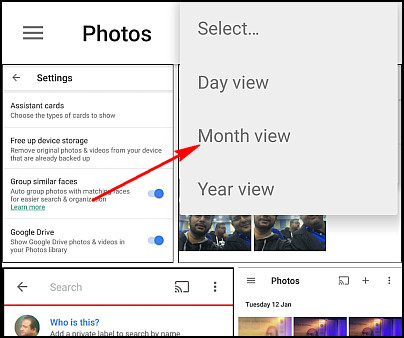
By default, the app displays your images in daily view with thumbnails arranged in chronological order, but there are a number of other options like monthly view and "comfortable mode" "makes the image in full screen mode. You can change the view mode simply by using the hand to zoom in and out on the device's screen.
7. Select multiple photos with one click
Imagine having to pick a hundred photos from your library and hit your screen a hundred times. Thankfully, Google Photos allows you to select multiple photos at once. While viewing images in the Google Photos app, press and hold on any photo to start selecting photos. After that, do not lift your finger, pull up or down. This process will allow you to quickly select a series of photos without having to lift your finger. On the web, you can do the same by holding down the Shift key.
8. Undo delete photos
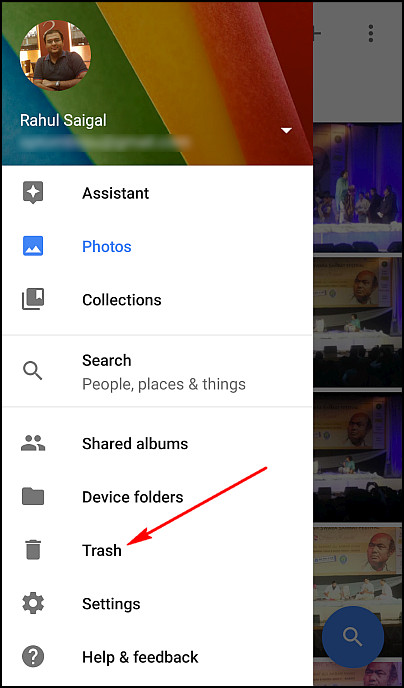
Suppose you accidentally deleted the image or changed your mind after pressing the Delete button, so what to do? Thankfully Google Photos will keep those photos for at least 60 days in the trash. All you have to do is go to the junk folder, touch and hold the photo you want to retrieve and then click the recovery arrow in the top right corner. You can also delete those images from the trash, just mark the images you want to remove and select the delete icon again.
9. Download photos faster with desktop
Google Photos automatically uploads photos from your phone, but there are also uploaders for Windows and Mac OS X desktops. You can also drag and drop folders from your desktop to photos.google. .com and they will be uploaded immediately. This is useful if you upload a large number of photos and want faster upload speeds than mobile service providers. The desktop download can also automatically download photos from digital cameras and SD cards when you plug it in, which is great if you take photos with something other than the phone.
10. Display photos on TV with Chromecast
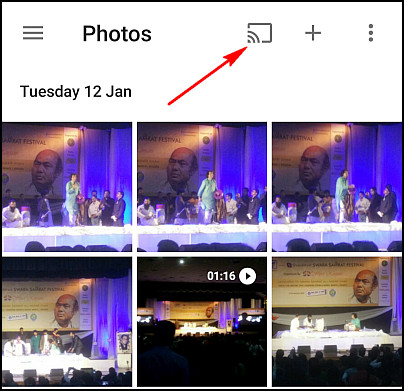
If you have a Chromecast, you can display your photos and videos on the big screen. Install the Chromecast app for Android or iOS and make sure your devices are using the same Wifi network as Chromecast. At the top right, tap 'cast icon' and select Chromecast . Open the photo or video on the device and click on "cast icon" to display it on the TV, swipe the picture and you will see the change happen on the TV If you are using a PC or Mac, you can also transfer photos and video from Chrome browser to TV Just install Google Cast extension and follow the instructions on the screen.
11. Download all photos at once
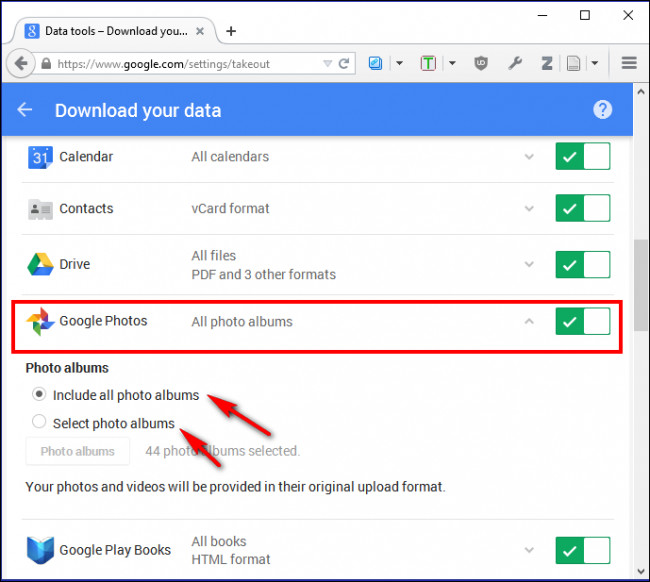
Unlike Dropbox, the Google Photos desktop uploader is a one-way application. You cannot download all your photos directly. If you want to download all your media from Google servers, you can do so with Google Takeout. Sign in to your Google account and go to Google Takeout page. Select "Google Photos" and select the album you want to download. You can now download all photos as a ZIP file without having to tediously select each image one of the Google Photos library.
12. Google Drive and Google Photos
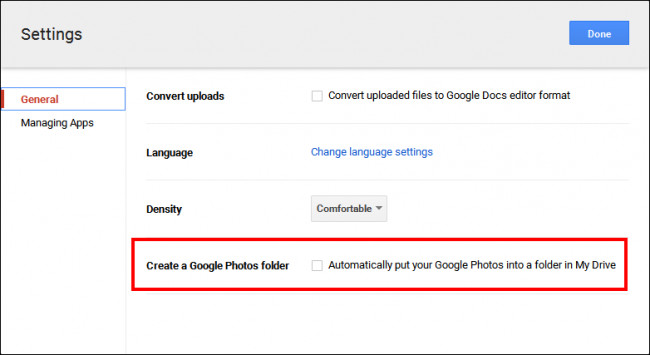
Interoperability between applications is a big issue when it comes to different cloud applications. However, Google Photos and Google Drive work in sync, and Google Photos can even be located in the root of Google Drive and works like a regular Google Drive folder. To enable this feature in Drive, navigate to install Google Drive from the browser and check the box 'Automatically put your Google Photos into a folder in My Drive'. Now all your photos and videos located in Drive in a folder called "Google Photos" can be accessed from any platform.
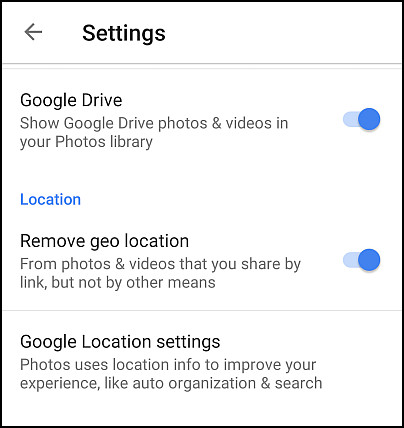
If there are photos in Google Drive that you want to view or edit with Google Photos, tap the three horizontal menu and select 'Show Google Drive photos and videos in your Photos Library'. However, remember if editing any photo in Google Photos, those changes will not be transferred to Google Drive. Also, if your Google account is managed by a company or school, you won't be able to enable this setting. An added advantage when using Google Drive with Google Photos is that you can share or add photos to Docs, Sheets and Slides.
13. Send photos and videos to Gmail and YouTube
By default, Google Photos is not accessible from Gmail. But if you've linked your photos to Google Drive as mentioned earlier, you can easily attach any of your Google Photos photos in an email. Just click on the 'Insert from Drive' option in Gmail, then navigate to the Google Photos folder.
You can also do this with YouTube. Go to the YouTube upload page and have an option to import live clips from Google Photos into your YouTube channel, where you can set titles, tag and share them on demand.
14. Share photos and videos with anyone
With Google Photos, you can easily share photos, albums, movies and stories with anyone through a link, even if they don't use the Google Photos app. Open the Google Photos app and select the photos you want to share. At the top right, touch the " Share " icon. Now you can decide how you want to share.You can choose the application or select " Get link " to send a link to someone.
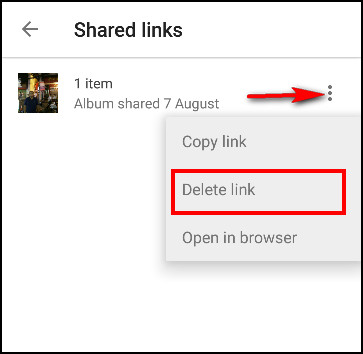
Anyone who has the link can view the selected photos, so you can review them and delete unnecessary links. At the top left, touch the three horizontal menu and select Shared links > Option and select ' Delete link .' If you share the download link or copy your image in the link, deleting the link will not delete any copies they have made.
Sharing albums is also easier with the Google Photos app. At the top right, touch the "+" icon. The screen will open from the bottom and click on 'Shared album '.
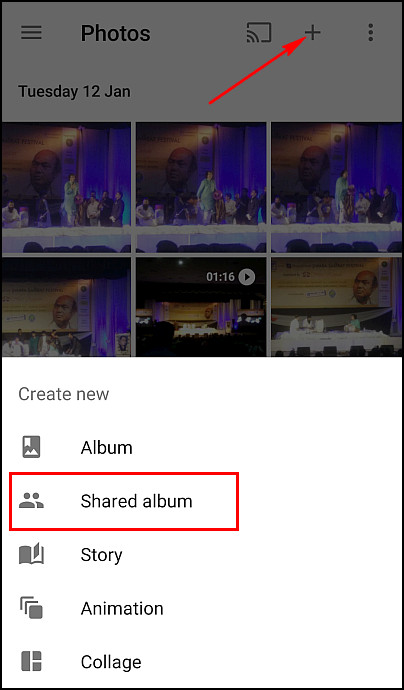
Select the photos and videos you want to include and click " Share ". Get your album link and send it to friends or family. You can also let others add photos to the album by enabling " Collaborate ". Do this, open the album you want to collaborate in. On the top right, tap or click " Options ." Select ' Sharing options ' and from the next screen, turn on the " Collaborate ' option (if you don't see it) Select this, turn on ' Share album ' first).
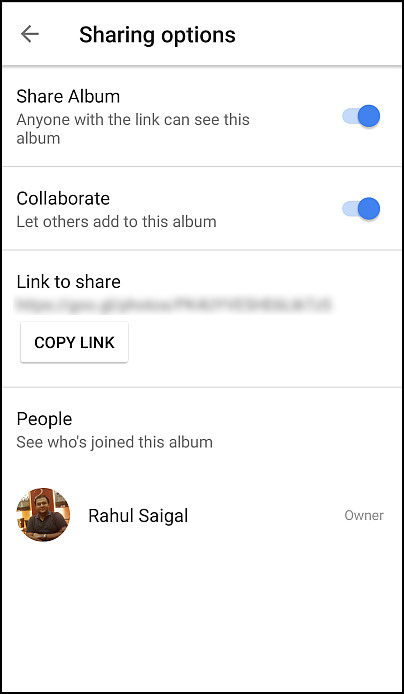
Use the created link to share the album via email, WhatsApp or any messaging application you want. If you want to see all the albums you have shared, touch the three horizontal menu and select 'Shared albums' . You can see the profile picture of the people who have shared the album. You cannot delete individual people, but can prevent people from adding their photos by turning off collaboration or sharing.
15. Delete location information of photos and videos taken
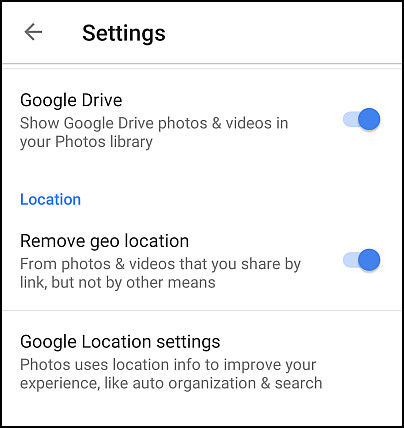
Location data stored with your photos helps Google group photos together, but if you don't want to display this data when sharing photos with others, on the left, tap the three menu. horizontal bar and select " Settings ." In the location section, select 'Remove Geo-location' , allowing you to remove geographic location information from photos and videos you share with a link.
16. Use Google Photos when you are offline
You can still use the Google Photos app if you are not connected to a Wifi or mobile network. If you have the ' Backup and sync' feature turned on, the photos and videos you make while offline will be backed up after you reconnect to a Wifi or mobile network. You will see the upload icon on the photo and the video waiting for backup and if you have not backed up the photo for a few days or weeks, the application will notify you periodically.
17. Create beautiful stories, animations and images from your photos
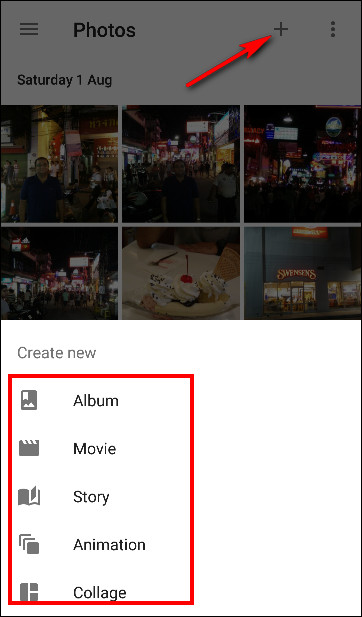
The Google Photos " Stories " feature creates a descriptive album that shows a series of images in chronological order.You can only create stories in mobile apps. Open the Google Photos app and Touch the create icon ( +) in the top right corner. Select " Story " and you can select related photos, videos, subtitles and locations, change the cover photo. You can see the story by opening Collections . At any time you can delete a story without deleting the photos inside it. You can also create collages or animations with your photos. Repeat the above steps and select ' Animation ' or ' Collage '.
18. Editing images
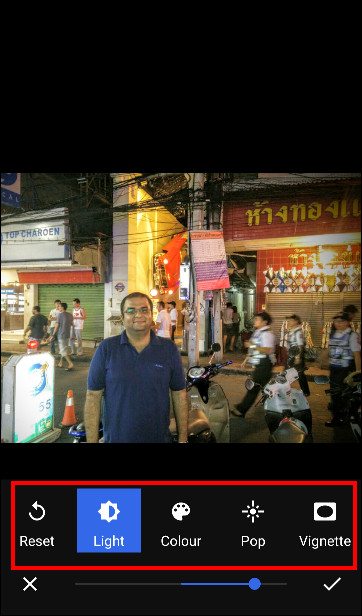
Google Photos lets you add filters, crop photos and more on mobile devices. If you have 'Backup and sync' enabled, your edits will sync with the Google Photos library. Open the Google Photos app and touch the image you want to edit.Click on the 'pencil icon ', you'll see it very You can automatically adjust color and brightness, change lighting, adjust colors manually or add effects.While editing, you can touch and hold. photos to compare your edits to the original.
When you have finished editing the image, touch the checkmark and select " Save ". Your edits will be displayed on a new photo copy. Your original, unedited photos will also be available in the Google Photos library (unless you delete it). If you don't like the edits made, you can delete the edited version.
19. View a Slideshow
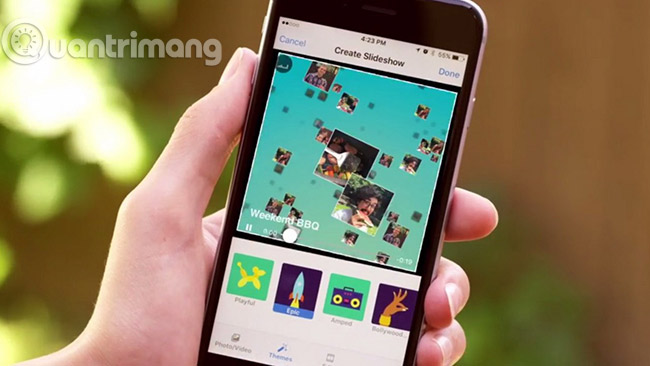
Want to see all your photos continuously? You can start the slideshow from any folder in Google Photos. Click on an image to open it, then click the three dots menu in the upper right corner. Choose Slideshow and your photos will start moving. This is perfect for quickly turning your PC into a digital photo frame, which can be shown to guests at a party.
20. Scan old photos
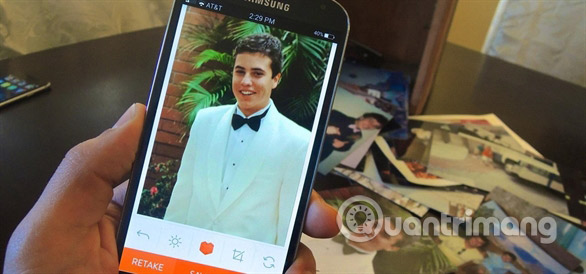
Your recent memories (hopefully) are backed up in Google Photos and safe when your hard drive has problems, but what about your old photos? Whether you want to share them online or just want a digital copy to prevent incidents, Google can help you easily do this with a special application.
Download PhotoScan for Android or PhotoScan for iOS to start digitizing your old photos. You can spend a lot of time to restore them manually, but PhotoScan can automatically detect the edges of the image, eliminate glare and enhance them.
21. Freeing device capacity
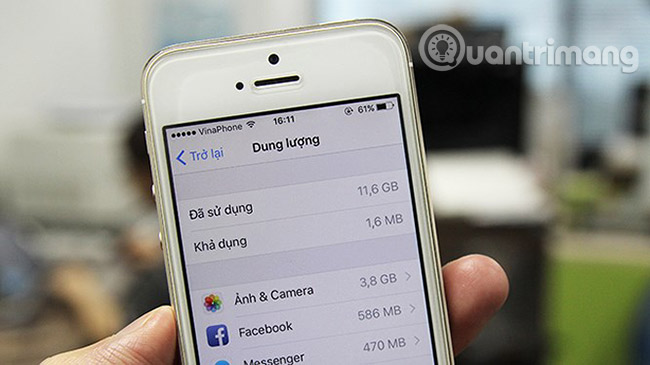
Because Google Photos automatically backs up your photos to your server, saving images on the device is an act of wasting memory space. You can choose to keep a few special photos on your phone in case you are in an area without service, but Google Photos can delete the rest of the photos in just a few seconds.
Open Google Photos on the device, swipe left to open the menu and click Free up space . Google Photos will find all items that have been safely backed up and delete them from your device to save space. This is great for those who don't have much free memory.
22. Disable proposed edits
Google Photos tries to help you through a tool called Assistant. It will automatically create albums when you take multiple photos in a short time or display the recommended filter (recommended) on some photos. If these things make you uncomfortable, they will be easily disabled.
Swipe left to open the menu and click Settings. Expand field Assistant Cards and you will see several options:
- Creations automatically creates collages and animations.
- Rediscover this day shows you remarkable photos from previous years.
- Suggested shares recommend that you share photos based on certain criteria.
- Suggested rotations will correct the skewed photos.
You should only disable these features in case you are sure you do not want to use them, as they are very useful.
Google Photos is now the default photo app on most original Android phones and it is more than a normal gallery application. No longer need to back up all your photos to the hard drive and CD. With Google Photos offers unlimited free memory, there's no reason not to back up your precious memories to the cloud and take advantage of Google's great sorting features.
See more:
- 6 solutions to replace the best Google Photos
- How to create and manage shared albums on Google Photos
- Instructions to install Google Photos for computers
You should read it
- ★ How to create and manage shared albums on Google Photos
- ★ How to share photos from Google Photos to other accounts
- ★ How does Google Photos work? How to make the most of 15GB of free storage?
- ★ Google Photos sends many private videos of some users to strangers due to technical issues
- ★ How to use Google Photos from AZ for new users