Drive letter is not available on Windows: Causes and solutions
Seeing an "unavailable drive letter" error message when accessing or creating a new drive can be very frustrating. The reason for the error isn't always immediately obvious, but it's rarely unresolvable.
Here are the most common causes of drive letters not being available on Windows and how you can fix it.
Why is the drive letter not available?
As mentioned, there are a number of possible reasons why you're seeing the "drive letter not available" error. The most common reasons include:
The character is being used by a hidden removable drive
When you connect a removable drive, such as a USB, a drive letter is assigned to it. Sometimes, even after the removable drive is disconnected, the drive letter is still associated with it. In this case, it will not be available and you will see an error message.
Characters permanently assigned to another storage volume
A drive letter can be permanently assigned to a specific partition or drive. This also includes optical devices such as CD/DVD drives. If you've done this before, the drive letter will no longer be available to select when setting up a new partition or drive.
How to make drive letters available for use
Both causes of the above error are fixable. You can download free software to help reassign characters. But you can also use Windows Registry Editor to solve the problem yourself. Here's how to do it.
1. Open the Run dialog box by pressing Win + R .
2. Type Regedit and click Ok to open the Registry Editor.
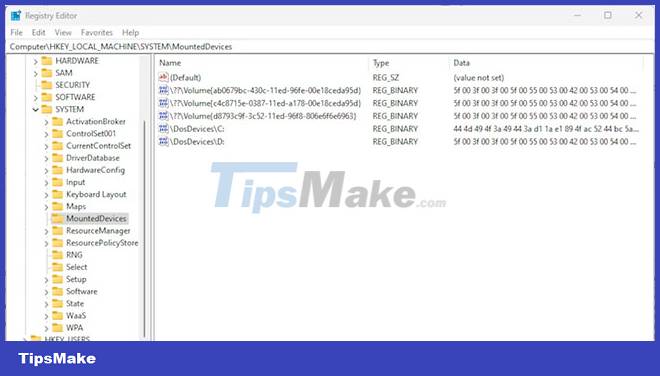
3. Using the panel on the left or the address field at the top, navigate to:
HKEY_LOCAL_MACHINESYSTEMMountedDevices. 
4. In the list of specified devices, right-click the device you want to change and select Rename.
5. Change the drive letter to any other unused character to release the character being used.
6. Close Registry Editor and restart the computer. You can then specify the unused character as you like.
If you don't want to mess around with the Registry directly, you can use something like AOMEI Partition Assistant Standard. The free version has limited tools but will allow you to reassign drive letters.
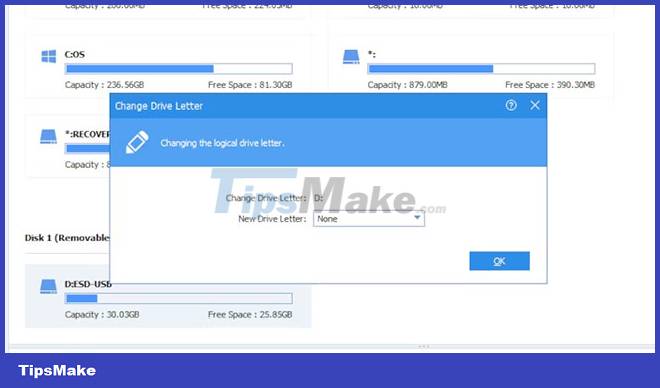
1. Open the Partition Assistant application and find the drive you want to reassign in the main window.
2. Right-click the drive and select Advanced > Change Drive Letter from the menu.
3. In the new control panel, use the drop-down menu to select a new and unused drive letter.

4. Click Ok and confirm the action on the next screen. It may take a few seconds to process the change.
5. You can then return to the main screen, find the drive to which you want to assign the character you selected, and repeat the process.
Although very annoying, the "drive letter is not available" error is rarely unresolvable. In most cases, you can simply force the change using Registry Editor or a third-party software. Either solution is quick and easy, then you'll find your desired drive letter free to use in no time.