How to delete drive letter in Windows 10
By default, Windows 10 automatically assigns the drive letter available to all connected internal and external storage devices. This guide will show you various ways to delete drive letter in Windows 10.
Table of Contents
By default, Windows 10 automatically assigns the drive letter available to all connected internal and external storage devices.
- Windows progresses through the alphabet from A to Z to assign available drive letters to connected devices.
- Windows stores A and B characters for floppy drives, but you can still manually assign them to another drive.
- The letter C can only be used for the drive on which Windows is installed. If you have multiple operating systems booting, the currently running Windows will always display its drive letter as C.
- If you delete a drive letter from a volume, partition, or volume, it will no longer be available to display as a drive in File Explorer "This PC".
This guide will show you various ways to delete drive letter in Windows 10.
Note: You must be logged in as an administrator to delete the drive letter.
Delete the drive letter in Command Prompt with Mountvol
1. Open Command Prompt with admin rights.
2. Enter the command below into the Command Prompt with admin rights and press Enter .
mountvol : /d
Replace the above command with the actual drive letter (for example, "G") you want to delete.
4. When done, you can close the Command Prompt with admin rights if desired.
Delete the drive letter in PowerShell
1. Open PowerShell with admin rights.
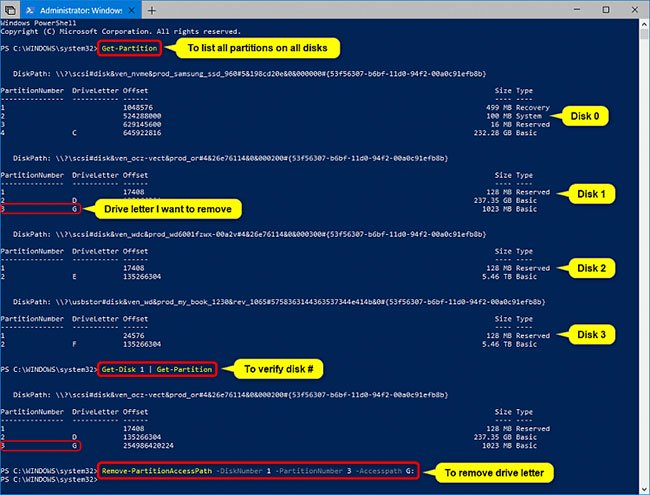
2. Enter Get-Partition into PowerShell and press Enter .
3. Note the disk number (e.g. "1") and PartitionNumber (eg "3") for DriveLetter (eg "G") you want to delete.
The drives will be listed in numerical order starting with "0" at the top.
4. Enter the command below into PowerShell with admin rights and press Enter to verify that the drive number (eg "1") is correct with the drive letter (eg "G") you want to delete.
Get-Disk | Get-Partition
Replace in the above command with the actual drive number (eg "1") from step 3 above for the drive letter (eg "G") you want to delete.
5. Enter the command below into PowerShell and press Enter to verify that the drive number (eg "1") is correct with the drive letter (eg "G") you want to delete.
Remove-PartitionAccessPath -DiskNumber -PartitionNumber -Accesspath :
- Replace in the above command with the actual drive number (for example, "1") from step 3 and be verified in step 4 above for the drive letter (eg "G") you want to delete.
- Replace in the above command with the actual PartitionNumber (e.g. "3") from step 3 for the drive letter (e.g. "G") you want to delete.
- Replace in the above command with the actual DriveLetter (e.g. "G") from step 3 above that you want to delete.
For example:
Remove-PartitionAccessPath -DiskNumber 1 -PartitionNumber 3 -Accesspath G:
6. When done, you can close PowerShell if you like.
Delete the drive letter and the previously connected drive by using the DiskPart> automount command
1. Open a Command Prompt with admin rights.
2. Type Diskpart into Command Prompt as admin and press Enter .
3. Type automount scrub into Command Prompt and press Enter .
4. Close Command Prompt.
5. Restart the computer to apply the changes.
Delete the drive letter and the drive that was previously connected using the mountvol command
1. Open a Command Prompt with admin rights.
2. Type mountvol / r into the Command Prompt as admin and press Enter .
3. Close Command Prompt.
4. Restart the computer to apply the changes.
In addition, you can delete drive letters using Disk Management and Diskpart. Refer to the following 2 articles for details:
- How to delete a drive that cannot be deleted by Disk Management
- Delete and assign any drive letter in Windows with Diskpart
Was this article helpful?
Your feedback helps us improve.
Related Articles
 Drive letter is not available on Windows: Causes and solutions4 minutes read
 How to change drive letters3 minutes read
 How to Allocate a Drive Letter2 minutes read
 How to rename a drive, change the drive letter in Windows3 minutes read
 How to change the name (letter) of a Windows hard drive8 minutes read
 How to Map a Folder to a Drive Letter in Windows3 minutes read
Reader Comments 0
Sign in with email or Google to join the discussion.