Table of Contents
This article provides a clear overview of Delete the Newly Opened File List in Word, with the main facts, useful context, and practical details organized for easy reading.
You can perform deleting or disabling the Recent Files feature with the operations guided in the article below, you follow along.
Step 1: First you open the Word editor, on the editor interface you select the File tab.

Step 2: Next, click Options to open the Word Options dialog box.

Step 3: The Word Options dialog box appears, click Advanced in the left menu.

Step 4: In the Advanced settings section, navigate to the Display section. In the square on the right of the Show this number of Recent Document line, change to 0 to turn off the file list. Then click OK to save the settings.

So you have set to delete the recently opened file list, from now when you open Word 2013, it will not appear list of recently opened files.
And if you may need to delete all the recently opened file list (the next time the list of recently opened files is still displayed), then when you open Word 2013, in the Recent section, click Right-click any file and select Clear Unpinned Documents .
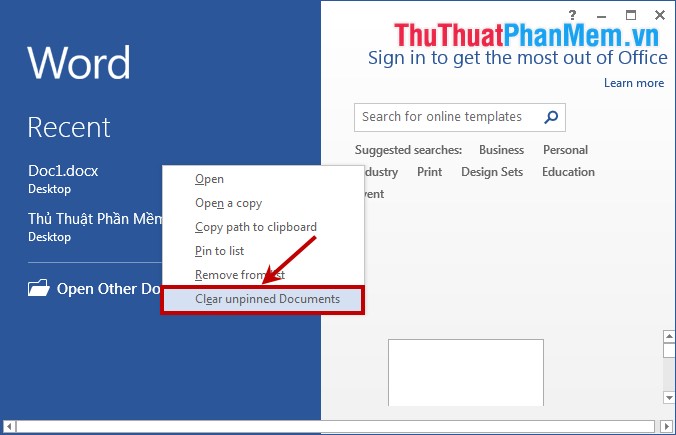
Thus, depending on your purpose of use, you can delete or disable the list of recently opened files in Word. Good luck!
FAQ
What is the main focus of Delete the Newly Opened File List in Word?
The article explains the most important facts, context, and practical details related to Delete the Newly Opened File List in Word.
Who may find this information useful?
It is useful for readers who want a clear overview, practical context, and a better understanding of the subject.
What should readers verify before taking action?
Check current product versions, official requirements, regional availability, and any details that may have changed since the original publication.
Related Articles
 Instructions for Deleting the Recently Opened File List in Word 20132 minutes read
 Delete Pages in Word - Instructions on How to Delete Pages in Word4 minutes read
 How to Handle Opened Word Documents with Font Errors3 minutes read
 Instructions for Deleting Table Paths in Word4 minutes read
 How to Corrupt a Word File7 minutes read
 Convert Word File to Csv File: How to Convert Word to a Csv File4 minutes read
Reader Comments 0
Sign in with email or Google to join the discussion.