Table of Contents
This guide provides a clearer, better-organized overview of 20+ Ways to Record Computer Screen, Record Laptop Screen. It focuses on the essential facts, practical steps, and common questions readers are most likely to have.
How many ways are there to record the computer screen? Actually, with the upcoming Windows 10/11 and 12, there are the simplest ways for users to return to the computer screen without having to rely on any 3rd party software.
What Is the Purpose of Recording the Computer Screen?
Record your computer screen to create gaming videos, software or system tutorials, create online courses, market your business to customers and more.
How to Record Computer Screen Without Software
Record Video of Windows 10 Screen
Step 1:
Select The Windows + G key combination

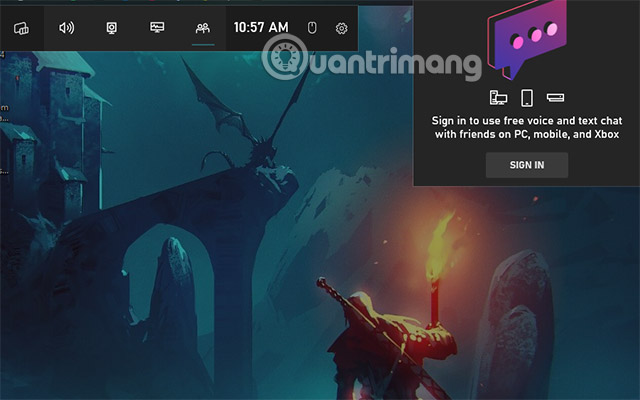
Here You Will Have Tools Like
- Audio: Option to change system sound output, software sound volume, change microphone input.
- Capture: Choose to record the screen or take a screenshot of the current screen, you will have tools such as taking a screenshot, recording the screen, turning on/off the mic when recording the screen, recording 30 minutes. last second.
- Performance: View current hardware performance, usage level of CPU, GPU, usage capacity of GPU VRAM, how much RAM is being used, how much FPS is.
- Xbox Social: Xbox social network, you must log in to your Xbox social network account to use Xbox social network, share experiences and moments with Xbox social network users.
Step 2:
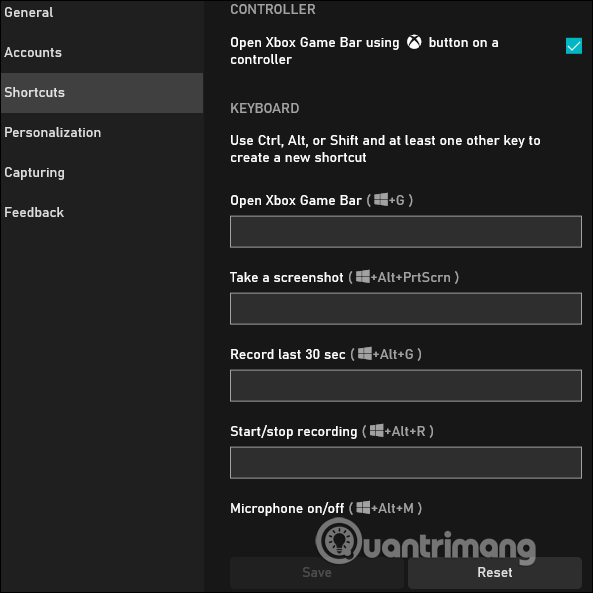
While you can select the tools available in the Xbox Game Bar, you can also enable those features with keyboard shortcuts:
- Activate Xbox Game Bar:
Win + G- Open Xbox Game Bar. - Record:
Win + Alt + R- Start or stop recording your computer/laptop screen. - Take a screenshot (Screenshot):
Win + Alt + PrtScn- Capture the entire current screen image. - Open Xbox social media friends list:
Win + GThen chooseB- Open friends list. - Open Control Panel:
Win + GThen tapK- Open Xbox control panel. - Record screen with camera:
Win + Alt + PrtScn- Record screen video and images from web camera simultaneously. - Open the performance panel:
Win + GThen chooseO- Open the system resource information panel.
Record Screen Video with PowerPoint
On PowerPoint 2016 and above, there is a feature to record video screen, take screenshots of the computer screen and save the file right in the computer folder. To see how to do this, follow the article How to use PowerPoint to record and capture laptop screens.
Top Video Recording Software for Computer Screens and Instructions for Recording Laptop Screens
OBS Studio
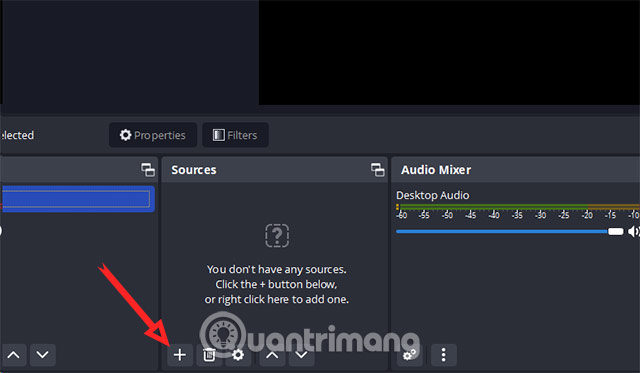
Step 1: First select the plus icon in the Sources Tab.
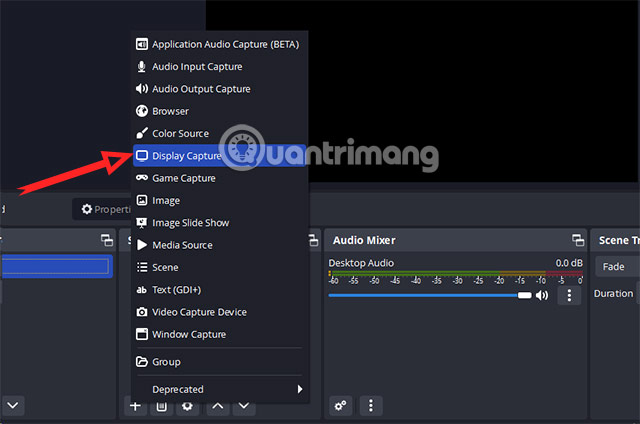
Step 2: Select Display Capture.
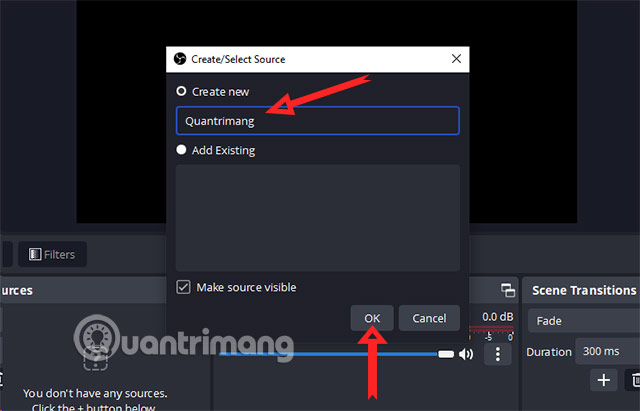
Step 3: Record a name for the new content by checking Create New and filling in your source name and selecting OK.
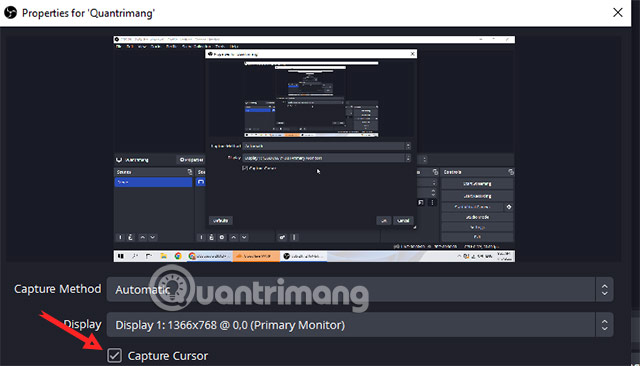
Step 4: When you choose OK, you will be returned to the stream screen selection interface. If you use multiple computers, select the small downward arrow to access the drop-down list. Select the screen you want to record and select OK. Select Capture Cursor to record mouse cursor movements on the computer screen interface.
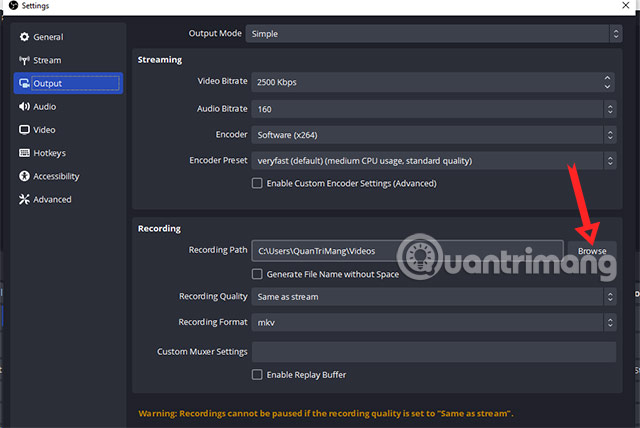
Step 5: Return to the main screen, select Settings in the Controls tab and select Output. In the Recording section, select Browse To choose the path to save the video. It is most convenient to save it on the Desktop screen.
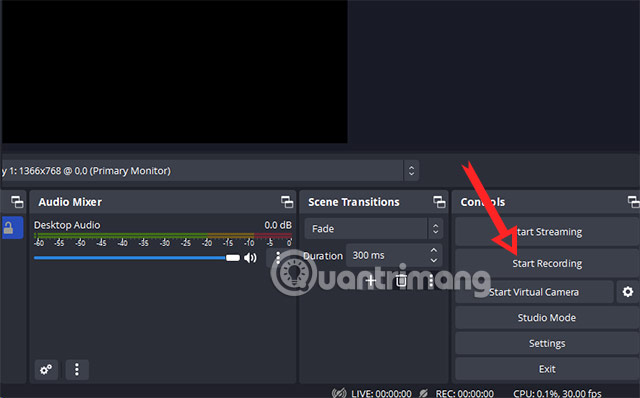
Step 6: Once you have completed the screen recording settings, select Start Recording To start recording your computer screen.
See more details on how to record a computer screen in the article How to record a computer screen using OBS .
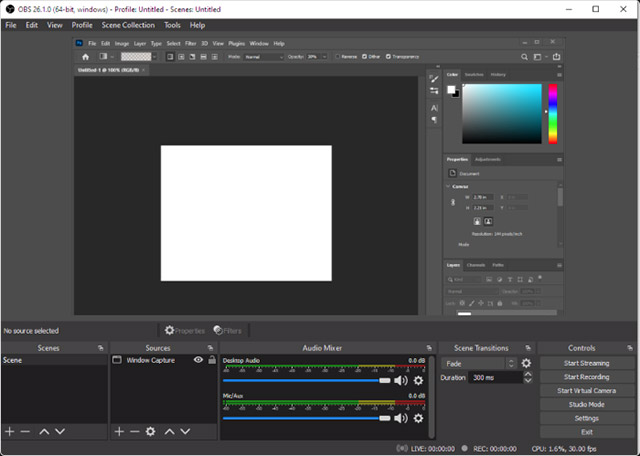
OBS Studio is a free and open source program for live streaming and recording video from many types of video sources, including computer screens, video games, webcams, video files, etc. You can live stream too Create your get videos on sites like Twitch, YouTube or Facebook Live, or record videos locally to share.
Compatible with Windows 10, 8.1 and 8 as well as macOS, the free OBS Studio offers a lot of features in one program. Some outstanding features of OBS Studio include:
- Stream live video to sites like Twitch, YouTube, Facebook Live, etc., including your get custom servers
- Record videos to save to your hard drive and share with friends
- High-performance real-time video/audio capture and mixing. Footage is made up of multiple sources including window shots, images, text, browser windows, webcams, etc.
- Set up an unlimited number of scenes, you can switch between scenes seamlessly through customizable transition features
- Intuitive audio mixing tools with source-specific filters such as noise gate, denoising, and gain. Full control with VST plugin support
- Powerful and easy-to-use configuration options. Add new sources, copy existing sources, and adjust their properties with ease
- The streamlined Settings panel gives you access to a range of configuration options to adjust every aspect of your broadcast video or recording.
- The modular user interface allows you to rearrange the layout exactly how you want.
- Choose from a number of different and customizable transitions as you transition between scenes or add your get video files
- Set up hotkeys for nearly any type of action, such as switching between scenes, starting/stopping streaming or recording, muting audio, push-to-talk, etc.
- Studio mode lets you view your scenes and sources before streaming them live.
- Watch the video creation process using Multiview. Monitor 8 different scenes and easily switch to any of them with a single or double select
Use the program's floating control panel to start and stop your recording. At the same time, OBS Studio can record screen activity, microphone and computer audio, then save the output as MP4 files.
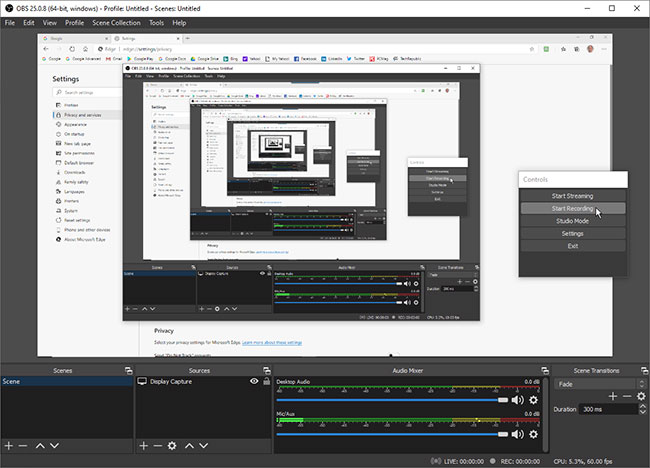
You can also stream your video live or switch to Studio Mode To add cuts, fades, and other transitions to your video. The program offers a series of settings where you can change the format and other criteria for both the video and audio parts of the recording. OBS Studio may seem intimidating at first glance, but you can grasp it quite quickly and learn how to use this program effectively.
Free Cam
Step 1: Download the Free Cam software above, open it and select New Recording as shown below.
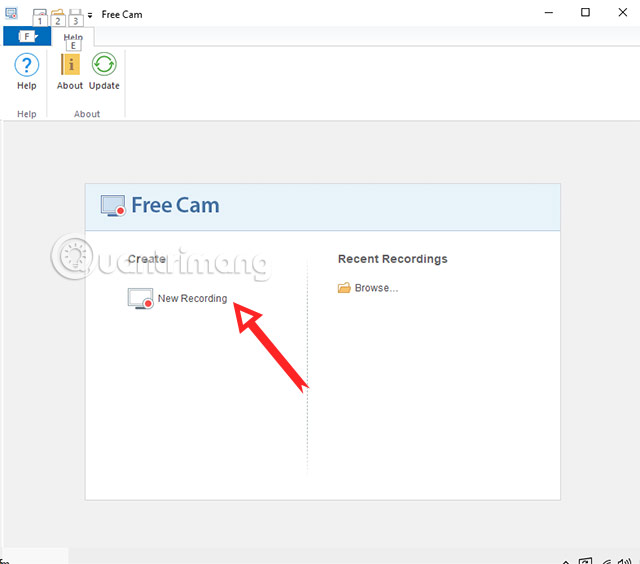
Step 2: Next, a striped frame appears in the window as shown below. select and hold the mouse on the 4 corners of this frame and then customize the frame so that they fill the entire screen if you want to record the entire image.
Or shrink it to just one corner if you only want to record a part of the screen. Once you have identified the area you want to record the screen, select the red button to start recording the screen.
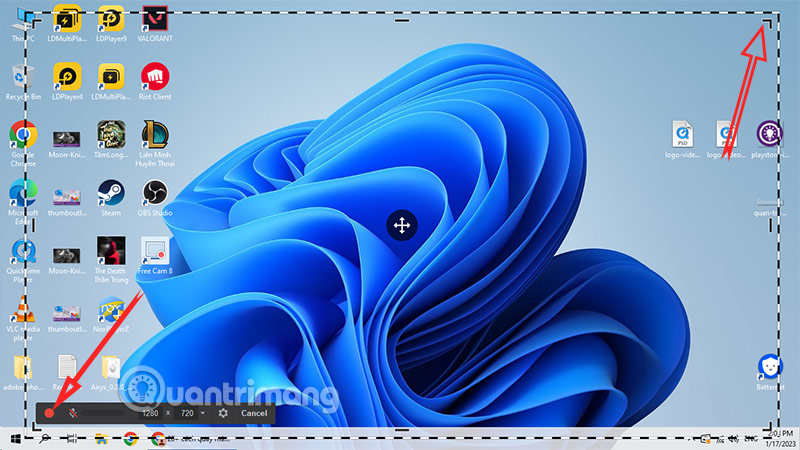
Or you can align by resolution as shown below.
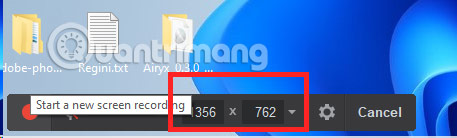
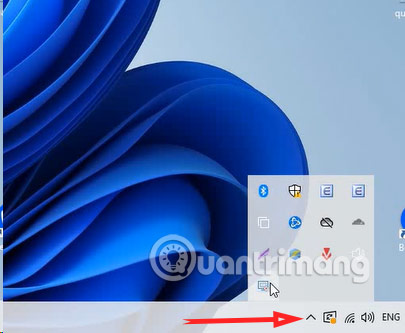
If you want to stop recording, select Hidden Icon near the wifi and sound icons.
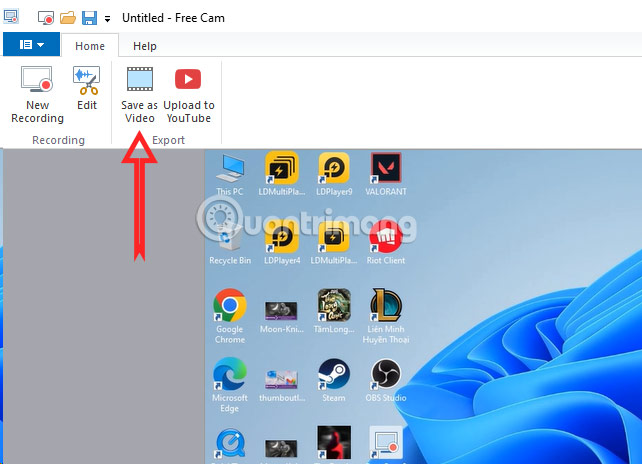
The video will not be automatically exported immediately, but you will have to review the recorded video. To export the video, select Save as Video .
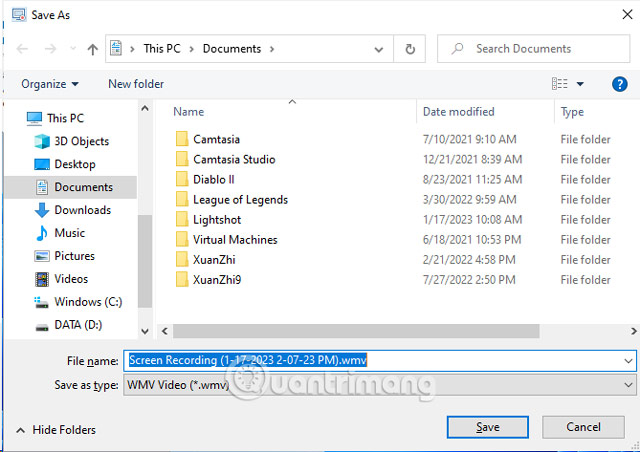
The default video will be exported to. wmv format, or you can change it to. mp4 if you want.
Free Cam is an extremely basic screen recorder but still capable of getting the job done. Designed for Windows 10, 8.1 and 7, this program records screen activity and audio, then saves the recording as a WMV file. Just select the button to record a new record. Then, select the area of the screen you want to record, anywhere from a single window or app to the entire screen.
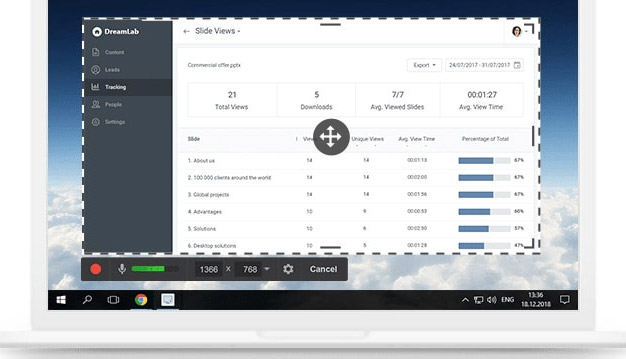
Screen Recording
Free Cam offers a complete set of features for creating professional video lessons and eLearning presentations from screen recordings.
- Select a recording area : You can record the entire screen, a selected area of the screen, or a window.
- Record your voice : To make your video lessons more informative, you can easily record your voice using your microphone.
- Record system sounds : You can record the sounds of programs and apps or add some background music to your videos.
- Highlight your mouse : To emphasize important details and steps, highlight your mouse pointer and turn on the select sound.
Fine-tune Your Videos
- Use the tool's built-in audio and video editor To turn your draft video into a comprehensive video lesson.
- Delete unnecessary parts : After recording your screen, you can easily cut out unnecessary video segments.
- Remove background noise : If there is any noise in the background of your voice, you can easily remove it from the entire clip.
- Highlight audio : You can adjust the volume, add a fade in or fade out effect, or mute selected parts of the video.
Share Videos
Free Cam allows you to save your screen recording on your computer or share it instantly on YouTube.
- Share on YouTube : Import your YouTube account to Free Cam and share videos with just one select.
- Save as video : Your screen recording will be a WMV video with HD quality (720p). You can use the video in presentations, email it to your colleagues and students, or post it to social media.
Camtasia
Camtasia is quite interesting screen recording and video editing software. This software provides you with many recording modes such as recording the entire screen, recording a certain area, recording with camera and recording system sound, recording microphone. After recording, you can add additional features. effects, cut video, add sound.
Another interesting feature of Camtasia is that it supports you to export videos into many different formats. This is very useful for those who need to make videos posted to multiple platforms.
How to use Camtasia you can use in this guide:
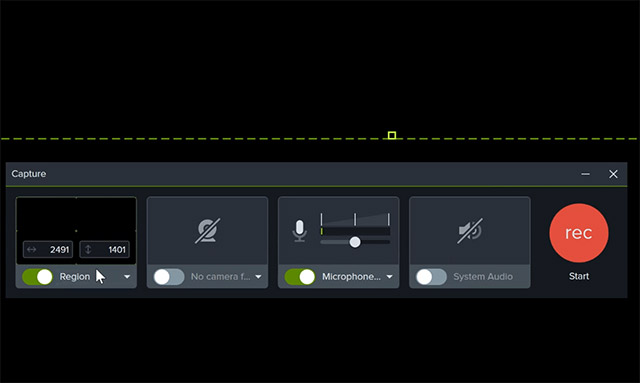
The advantages of using Camtasia include:
- Very easy to use : Clean setup and simple user interface, Camtasia is built with video editing beginners in mind. If you have little experience editing video, Camtasia is a great place to start. The visual effect buttons are large and clearly labeled. Effects can be applied with simple drag and drop. Timeline has an automatic snapshot feature that makes editing clear and simple.
- Awesome screen capture/recording feature : Camtasia blows away the competition with its absolute best screen recording feature. Not only is the resolution quality top-notch, but it's also intuitive to use. When the program is open, a screenshot icon will be added to the top toolbar. You can simply select the icon and start recording your screen with just a few clicks.
- Impressive cursor effects : These cursor effects provide automatic effects that can really sharpen your video editing process.
- Interactive features : Training videos often lack user interaction, which is crucial for learning. Camtasia allows you to add interactive quizzes directly to your videos, at the beginning, at the end, or throughout the video. Although you will have to pay attention to your export settings for the quizzes to be useful (only useful when embedding into eLearning modules).
- Good content library : If you're short on time and need to find content immediately, Camtasia has many of the basics you need. This includes icons, intro templates, moving backgrounds, music, etc.
- Mobile version : If you need to record your smartphone or tablet screen, Techsmith has a free app for iOS and Android. The application integrates with the desktop version of Camtasia and allows you to share files directly with your computer.
The only downside of Camtasia is that this software has a usage fee.
Bandicam
Step 1: Right on the main screen, select recording tools including:
- Rectangle Area: Free frame recording, you can optionally record frames under the software window.
- Fullscreen: Record full screen
- Around mouse: Record in the direction of the mouse, the frame will move under your mouse.
- Device Recording: Record with the recording tools you have, for example if you have a camera, you will record everything your camera records.
- Game Recording: Only record the screen while you play the game.
- Audio Only: This is new, you can only record your voice through the microphone. Any microphone you use to speak to your computer can record it.
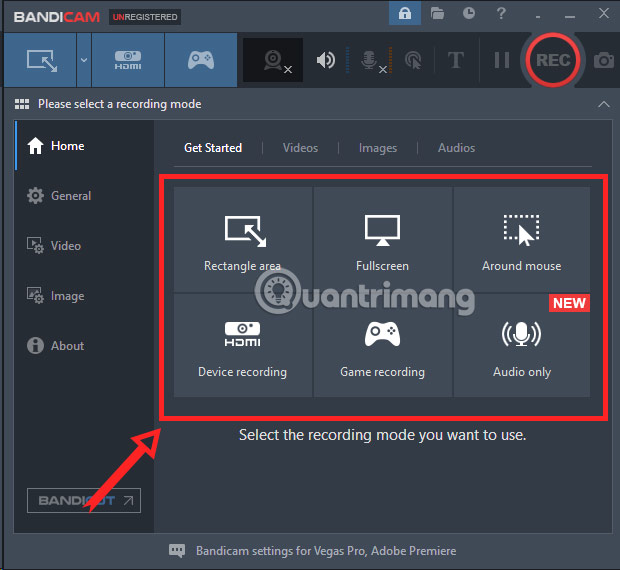
Step 2: Choose your recording tool, specify recording window or full screen.
Step 3: Once determined, select the Rec button to record, next to that is the photo button and pen icon to support you with guiding tools such as drawing, drawing frames.
Step 4: Icon number 1 is to pause recording, number 2 is to stop completely. When you stop completely, the video will be saved automatically.
Step 5: The Videos tab displays the videos you have recorded. Right-select each video and select Open Output Folder to open the folder containing that video. The remaining options will be to play the video, edit the video (edit), rename (rename), delete (delete), select all (Select All).
Bandicam is a screen recording program designed to record gameplay and video of computer screen activity. It is commonly used to record professional and educational conferences, webinars, and online courses. People also use it to create short personal videos and other screen recordings.
Advantages of Bandicam
- Allows you to record everything displayed on your PC or laptop screen.
- You can use animations and select effects when making tutorial videos.
- You can simultaneously draw lines, boxes or highlights while recording in 'Screen Recording' mode.
- You can add a webcam on top of your recorded screen.
- You can record system sounds and your voice at the same time.
- You can take screenshots and save them as BMP, PNG or JPG.
- The FPS number can be seen in the corner of the screen.
- Can capture DirectX/OpenGL/Vulkan games up to 480 FPS.
- You can add a webcam above your recorded screen.
- Can record system sounds and your get voice at the same time.
- Can take screenshots and save them as BMP, PNG or JPG.
- Allows you to capture footage from external devices such as iPhone, IPTV, game consoles and webcams, etc
- You can add a webcam on top of your recorded screen.
- You can record system sounds and your voice at the same time.
- You can take screenshots and save them as BMP, PNG or JPG.
Disadvantages of Bandicam
- Currently Bandicam only works on Windows (You cannot use it on Mac, Android or Linux).
- Screen recording mode is not suitable for recording high-quality games with high frame rates (FPS).
- Gaming screen recording only works when a DirectX/OpenGL/Vulkan application is running.
- Device recording mode will require a webcam or other recording device.
Please review detailed instructions on how to use Bandicam here:
Dvdvideosoft's Free Screen Video Recorder
How to Record Video with Dvdvideosoft's Free Screen Video Recorder
Step 1: Free Screen Video Recorder's interface is very simple and only includes 3 photo capture options and 3 recording options. This includes full-screen, windowed, and screen area capture/recording options.
Step 2: Select Continue , or if you want to remove The Watermark , select Remove Limitations And register the software.
Step 3: Once you have identified the partition you want to record, select the red Record button to start recording.
Step 4: With the window parts, you will have a little bit of food reaching the edge of the window. Along with that is the resolution of that window.
DVDVideoSoft's Free Screen Video Recorder is a full-featured but lightweight free screen recording software.
Free Screen Video Recorder can record Skype Conversations without limits. Therefore, this is very useful software for Skype meetings and online conference calls. Additionally, different Windows software can be separated and recorded as video specific to its get window. Includes a basic user-friendly editor.
Free Screen Video Recorder is an all-in-one application that allows you to record whatever is happening in your computer in the easiest, fastest and most comfortable way possible. You can record videos as well as images of all the elements that appear on your screen.
Key features of Free Screen Video Recorder include:
- Screencast : Free Screen Video Recorder is mainly used to record video from the computer screen. With this software, you can record everything they see in the window in video format.
- Free shooting mode : you can select between shooting in full screen mode or free shooting mode. For the second case, you must use the mouse to track the area you want to capture.
- Easy Process : Free Screen Video Recorder is very easy to use. To complete the screen recording, the user must select any key. Captured images will be saved in BMP, JPEG, GIF, TGA or PNG format. As for the video, the software will save it in MP4 format so that any media player can easily read it.
Advantage
- Provides convenient screen capture feature
- Convenient modes and features for recording your screen and videos
- Suitable for recording Skype conversations
- Step-by-step instructions are provided on the website
- Available in 10 languages
- Various output formats: MP4, BMP, TGA, JPEG, PNG and GIF
Defect
- Record using microphone only
- Too many ads can interrupt your work
- The interface lacks coherence and a media player
- Unwanted software may be installed during the download process
- Does not notify the user if a disconnection occurs
Sharex
This is an ad-free screen recording tool that boasts almost as many advanced features as some paid screen recorders. ShareX is primarily targeted at developers and users who use screen recording tools professionally. It is hardly suitable for those who are new to using screen recording tools despite having an intuitive and easy-to-use but quite advanced interface.
Advantage
- Record full screen, window, screen, area, free selection or middle mouse roll
- Combine keyboard shortcuts for easier and faster navigation
- Supports many URL sharing services
- Import existing videos, music or photos on the system
- Allows for custom color and shape effects
- Many file export options
Defect
- Game recording video quality is low
- Quite complicated for new users
- There is no webcam recording
- Downloading large files is sometimes limited
- No video editor
Camstudio
CamStudio is a very reasonable choice for video recording users with minimal editing needs. This lightweight and open source screen recording software creates videos in AVI format that can later be converted to SWF.
While its compactness appeals to some, other users call for further development and increased technical support. The tool also only has minimal video editing capabilities, so you may need additional video editing software.
Advantage
- Create screen-in-screen videos
- Allows you to create small sized files
- Various custom cursors
- Quality options available for output video
Defect
- Export to AVI only with conversion to Flash
- Output is not compatible with certain browsers
- Audio is out of sync
- Lacks some interactive features and animations
Tinytake
TinyTake by MangoApps is a computer screen recording and laptop screen recording software for Windows and Mac operating systems. TinyTake allows you to capture images and videos from your computer screen, add captures, and share them with others within minutes. TinyTake has an advantage that few computer screen recording software has: it comes with a cloud-based online library where you can store all your screenshots and recorded videos. mine.
See more: How to use TinyTake to record your computer screen
Advantage
- Share files in bulk
- URL available for sharing
- Built-in online file viewer for photos, videos and files
- Ability to create custom shortcuts to your liking
- Video player compatible with mobile devices
Defect
- The free version will be limited to 5 minutes of video recording
- Video files are saved as MP4 only
- Editing tools are limited
Movavi
Advantage
- Can be combined with a webcam
- Screen and audio can be recorded simultaneously or separately
- Save videos in HD format and supports many different formats such as: AVI, MP4, MOV and MKV
- Take screenshots and edit them instantly
- Enable scheduled recording
- Mouse screen during recording
- Very few editing tools
- The trial version limits recording time to 5 minutes
- Reported to have periodic crashes
Filmora Scrn
Advantage
- Can record from the computer and the computer's webcam simultaneously
- Import over 50 file formats and export in many formats
- There is a Picture-in-picture mode
- Frame rate from 15 to 120 FPS
- Supports HD recording and even up to 4K resolution
- Lacks advanced editing features
- Significant impact on performance if recording while gaming
- Reported lag and freezes when editing
Loom
Advantage
- Can capture images from network IP cameras and other devices
- Record screen, webcam and audio
- Unlimited recording time
- Diverse and professional editing options
- Multiple output formats
- Green screen tool
- Record time-lapse videos
- Limited editing features
- Outdated interface
- There are no interactive features or animations
- Reported slowness when uploading videos
Flashback
Advantage
- Record multiple screens
- Incorporate webcam recording
- Allows you to add special and custom watermarks
- Quickly upload to YouTube, FlashBack Connect or export videos as MP4, GIF, WMV, QuickTime.
- AVI and Flash
- Can zoom in/out and add video blur
- Not suitable for modifying existing files
- Import files in FBR format only
- Movement of windows in use cannot be tracked
Ezvid
Advantage
- Provides microphone recording feature for video narration.
- High quality auto resolution (HD 1280 x 720p)
- Control output video speed
- The interface is friendly, beautiful and modern
- Instantly upload to YouTube
- Selection of famous music
- Reviewers reported extraneous noise
- Or small errors appear
- Full screen recording during gaming is not available
Debut Video Capture
Advantage
- Can capture images from network IP cameras and other devices
- Record screen, webcam and audio
- Unlimited recording time
- Diverse and attractive editing options
- Several output formats
- Green screen tool
- Record time-lapse videos
- Some editing features are limited
- Old, outdated interface
- There are no interactive features or animations
- Reported slowness when uploading videos
My Screen Recorder Pro
Advantage
- Can record webcam or mobile phone screen, along with recording desktop screen
- Diverse video output with formats such as: AVI, WMV, MP4 and WebM
- Enables scheduled video screen recording
- Automatically upload recordings to any FTP account
- The screen can be safely monitored in hidden mode
- Editing options are limited
- There are no animations and transitions
Other Tools
Record Video of Macbook Screen
Record Screen Videos on macOS Mojave or Later
Record Screen Videos on macOS Mojave and Below
FAQ
What is the main point of 20+ Ways to Record Computer Screen, Record Laptop Screen?
How many ways are there to record the computer screen?
Why might the details change over time?
Software versions, prices, policies, services, and product availability can change. Check the official source before making a purchase or changing important settings.
How can I use this information safely?
Follow official instructions, verify downloads and claims, back up important data, and avoid sharing passwords or sensitive account information.
Related Articles
 How to Record ASUS Laptop Screen7 minutes read
 How to Record Windows 11 Laptop Screen Videos7 minutes read
 11 Simplest and Fastest Ways to Record Your Computer Screen: Best Options10 minutes read
 How to Record Computer Screen and in Detail8 minutes read
 How to Rotate Computer Screen13 minutes read
 How to Turn the Computer Screen4 minutes read
Reader Comments 0
Sign in with email or Google to join the discussion.