Table of Contents
This guide provides a clear, practical overview of steps to record screen with VLC media player, with useful context, important details, and straightforward takeaways for everyday readers.
Step 1: First you need to download VLC Media Player software here and install them to use.
Step 2: At the main interface of VLC Media Player, proceed to select Media and select Open Capture Device… (Ctrl + C) to open screen recording settings.

Step 3: When the Open Media window appears, proceed to set Capture Mode to Desktop to record the computer screen.
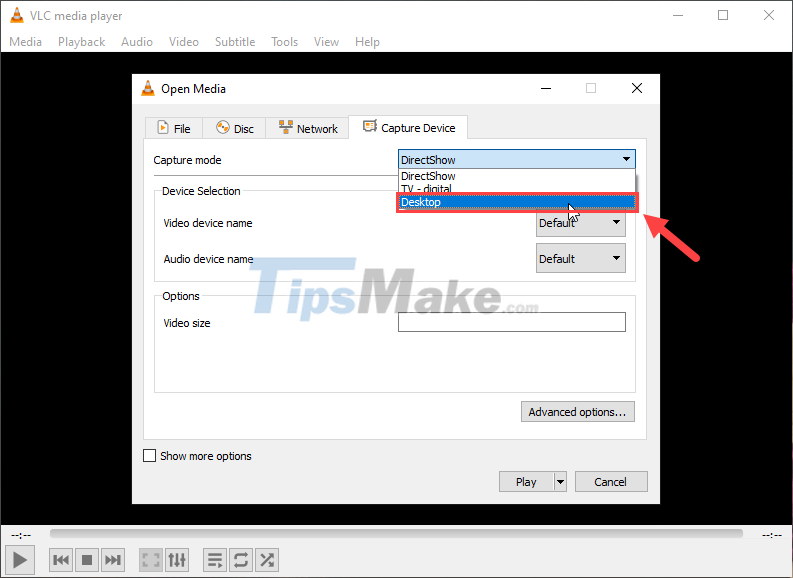
Step 4: When switching to Desktop mode, the Options section will appear to set FPS when recording the screen. To make the video quality beautiful and smooth, you should set the FPS level from 20f/s or more.

Step 5: After setting up the information for the screen recording feature, select the Arrow icon (1) and proceed to select Convert (Alt + O).

Step 6: Now we will have a Convert window, in this window you need to set up the Profile section (Video format when recording), normally we will choose H.264 + MP3 (MP4) format because this is a universal format that can be used by all platforms.

Step 7: After setting the format, select Browse to select the folder to store the Video after the screen recording is complete.
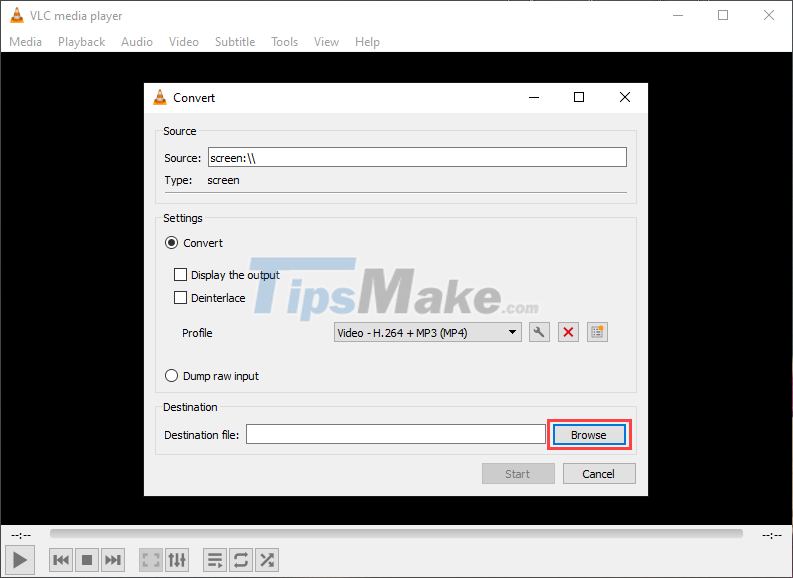
Step 8: So you have completed the settings related to computer screen recording, now click Start to start recording the screen.

Step 9: Now VLC Media Player will switch to screen recording mode, at the interface of the software you will have 02 main features as follows:
- Pause/ Resumed: Pause/ resume
- Stop: End screen recording

After finishing the screen recording, you can reopen the saved file to see the product recorded by VLC Media Player.

In this article, Tipsmake has shown you how to record screen with VLC Media Player quickly and effectively. Have a nice day!
Key Takeaways
Use the information above as a practical reference for steps to record screen with VLC media player. Review each step carefully, confirm any requirements, and choose the option that best fits your situation.
FAQ
What does this guide explain about Steps to Record Screen with VLC Media Player?
It explains the main concepts, practical considerations, and useful steps related to steps to record screen with VLC media player without requiring advanced knowledge.
Who can benefit from learning about Steps to Record Screen with VLC Media Player?
This information is useful for readers who want a clear overview, practical guidance, and reliable steps related to steps to record screen with VLC media player.
What should I check before applying this information?
Review the requirements, confirm that your device, software, or situation matches the instructions, and back up important data before making major changes.
Related Articles
 8 Tips to Make VLC the Best Open-source Media Player9 minutes read
 Advanced Tricks Use VLC Media Player15 minutes read
 How to Record a Screen with VLC Media Player?3 minutes read
 Instructions to Record Screen with VLC Media Player3 minutes read
 22 Shortcuts to VLC for Windows and Mac8 minutes read
 Summary of Shortcuts in Windows Media Player5 minutes read
Reader Comments 0
Sign in with email or Google to join the discussion.