The simplest way to turn on the camera on Windows 7,8,10 laptops
To study or work online, we need to own a computer or laptop with a full camera, microphone, and headphones. Usually, current laptop models have a built-in camera. So how to turn on the camera on a laptop?
Most laptops have a webcam so we can use the front camera on the computer. With this webcam, we can easily take pictures and make video calls when using video calling applications. We do not need to use additional separate camera devices to connect to the laptop. With different versions of Win, the way to turn on the camera is generally not too different or requires many other customizations. The following article will guide readers on how to turn on the camera on Windows versions on laptops.
How to turn on laptop camera Win 10
Turn on the camera in Settings
You need to allow the application to access the Camera, video calling and online meeting applications such as Zoom, Google Meet, Viber, Skype use the camera from settings. To grant camera access to Camera and other software, do the following:
1. Click the Start button, then select Settings.
2. In the window that appears, scroll down to the Privacy section and select it.
3. On the left menu, scroll down and click Camera.
4. On the right side, scroll down to find Allow apps to access your camera > drag the button to On and slide it to On at Camera to turn on Camera. If you want to use the applications, turn on the button next to it to use the camera.
5. To allow installed applications such as Google Meet, Zoom to use the camera, scroll down to find Allow desktop apps to access your camera, turn On. Then the applications listed below will be allowed to use the camera.
Turn on and use the camera on your laptop
Step 1: Enter the keyword camera into the laptop's search bar and then click on the Camera result that appears as shown.
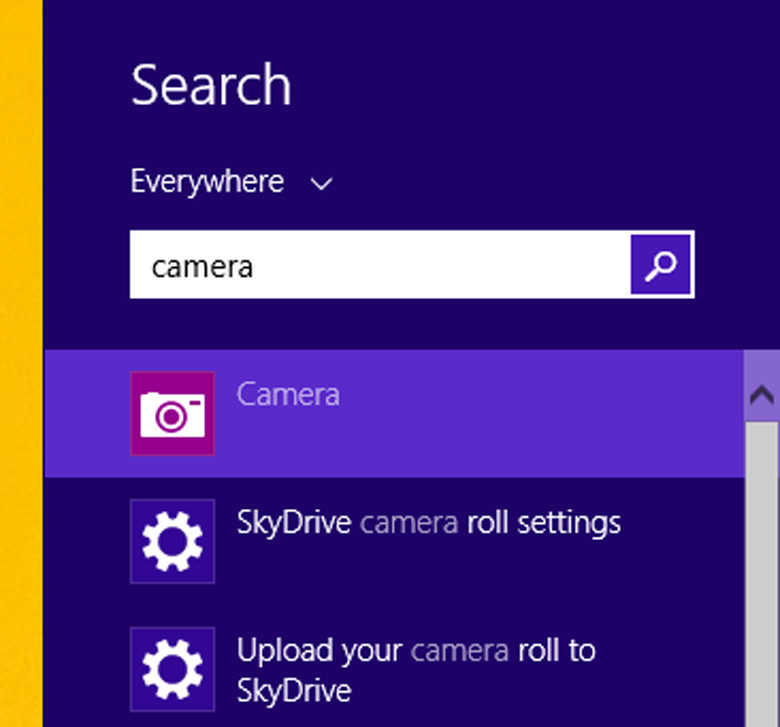
Step 2: The screen interface is displayed with the camera on the computer. The camera will automatically recognize the face displayed on the screen. The face is recognized and shown in a square. You can turn HDR mode on or off, select the countdown time before taking a photo with the 2 icons on the left.
Click on the camera icon to take a photo. If you want to record a video, click on the video icon. The video recording screen appears, click on the video recording button in the middle to record a video.
Step 3:
Click the gear icon to change settings when taking photos and recording videos. When taking photos, the adjustment interface is as below.
- Show advanced control: replace the photo countdown with a light adjustment bar.
- Photo Quality: select image quality.
- Framing grid: a grid is displayed that can help you align images as desired.
- Time lapse: the effect helps to fast-forward time and the software will record a short video after pressing the capture button with the Time-lapse effect.
The video editing section as shown below includes:
- Quality: choose the best video quality.
- Flicker reduction: adjusts the refresh rate when recording video under LED lights.
- Digital video stabilization: shoots video at a steady speed, but if the subject moves, this feature will cause the camera to focus more slowly.
Optional webcam settings
The first time you launch the Camera app on your laptop, a prompt will appear asking if your webcam can access your location to add location information to your videos and photos. If you change your mind about the initial setting of the option, you can change it by going to Settings in the Camera app. Additional options include grid display for frames, photo and video quality, and where to store photos and videos on your computer.
Instructions on how to turn on laptop camera win 8
- For Win 8 operating system, opening the camera is not too complicated. You just need to follow these simple steps:
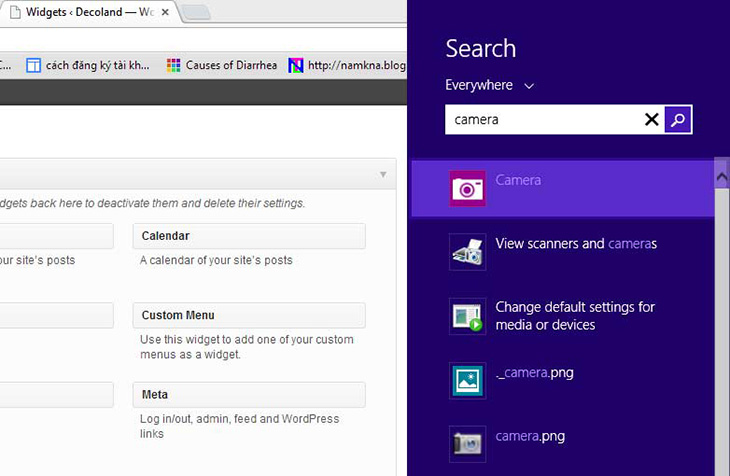
+ Step 1: You search for the Search tool by dragging the mouse to the right side of the screen.
+ Step 2: Then you just need to type the word "camera" in the search bar. If the camera appears, you just need to click on it and you're done.
- When you type in the search bar and the camera does not appear, it means your computer does not have the camera driver installed. Please check it immediately.
Instructions on how to turn on the camera on a laptop with Windows 7
2 simple ways to turn on the camera on Windows 7 laptops are currently being applied by many people.
1.1. Camera software is pre-installed on Win 7 laptop:
- Step 1:
+ After downloading the Windows 7 laptop camera software and starting the installation.
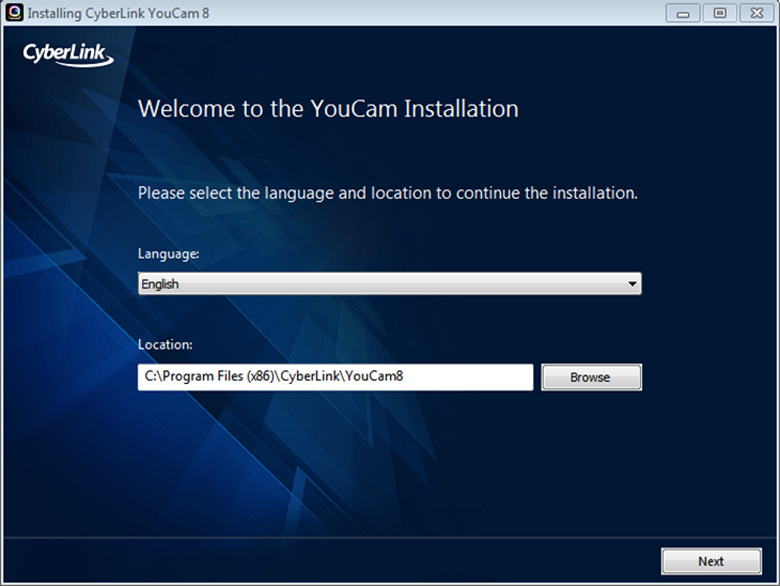
+ Select the language as English and choose the installation location according to your preference in the Location section.
+ Next, click Next to move to the next step.
- Step 2: Click the Accept button to agree to the terms of the Win 7 laptop camera software.
- Step 3:
+ After the computer has finished installing, open the YouCam software on the Win 7 laptop camera.
+ When a notification appears, click Continue to continue.
- Step 4:
+ To take a photo with the Win 7 laptop camera, click on the circular icon to take a photo.
+ In addition, you can edit more photo frames, emoji effects. in the Gadgets and Emotions sections.
1.2. Windows 7 does not come with its own camera software suite:
Windows 7 does not have its own camera software, so you need to use Cyberlink YouCam software. To do it most simply, you just need to download CyberLink YouCam and install it on your computer.
Conclude:
With the instructions to turn on the laptop camera on Windows 7, Windows 8 and Windows 10 that TipsMake shared above, we hope that it will help you more easily in using your laptop camera. For any questions, please contact hotline: 19001903 for the best advice and support.
- The simplest way to turn Bluetooth on and off on Windows 11
- How to turn on the camera on a Mac
- Tips to permanently turn off the sound when taking photos on Samsung phones
- How to turn your old phone into a security camera
- 5 tips to fix camera errors on laptops are extremely effective for you to use
- Instructions to turn off audio capture on iPhone Lock iOS 10
- Instructions on how to turn on and off Windows 10 firewall in the easiest way
- Turn your Android device into a webcam for Windows 10
- How to turn your laptop screen into a simple TV at home
- How to turn on and off the cooling fan on Dell and Asus Tuf Gaming laptops!
- 4 ways to turn off touchpad on Asus laptop from simple to complicated
- How to Reset a Volvo Oil Light
- How to Disable User Account Control (UAC) on Windows
- How to fix slow Windows computer
- 9 new uses for your old Android phone
- How to Turn Off Speakerphone
- How to Drift a Car
- How to Ride a 'Hoverboard' (Two‐Wheeled Self‐Balancing Scooter)


-
 How to open the camera on a Windows computer or laptop.
-
How to turn the camera on and off in Windows 11
-
5 Android camera features only available on foldable phones.
-
These minimalist camera apps will help you fall in love with photography again.
-
Transfer files from computer to phone using just camera – no internet needed
-
How to turn your old phone into a security camera
 How to open the camera on a Windows computer or laptop.
 How to turn the camera on and off in Windows 11
 5 Android camera features only available on foldable phones.
 These minimalist camera apps will help you fall in love with photography again.
 Transfer files from computer to phone using just camera – no internet needed
 How to turn your old phone into a security camera