Managing mailboxes in Exchange Server 2007 (Part 2)
We have seen the first part about managing mailboxes in Exchange Server 2007, in part two we can analyze this issue in more depth. In this article, we will look at information in mailboxes, blocking, reconnecting and advanced mailbox features.
We have seen the first part about managing mailboxes in Exchange Server 2007, in part two we can analyze this issue in more depth. In this article, we will look at information in mailboxes, blocking, reconnecting and advanced mailbox features.
Information from mailboxes
After creating mailboxes, you will get information about them using the Exchange Management Shell. To do that, you can use two cmdlets:
-
get-mailboxStatistics
-
get-mailboxFolderStatistics.
Using the Get-MailboxStatistics cmdlet as shown in Figure 1, you can get some information from the mailbox such as the quality and quantity of the items, the quality and the number of deleted items, the time of last login and logout. To get this information you use the following syntax:
Get-MailboxStatistics |fl
fl is the alias of the cmdlet format list, allowing to format the output as a attribute list in which each attribute appears on a new line.

Figure 01 : Information from Anderson.Patricio mailbox
Sometimes we need more information than Get-MailboxStatistics, in which case you can use Get-MailboxFolderStatistics to get as much information as the number of items and the size of each folder for a specific mailbox ( Figure 2).
The command and syntax are shown below:
Get-MailboxFolderStatistics

Figure 02 : Directory information from user Anderson.Patricio
Define features for a specific mailbox
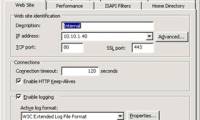
Another important feature allows you to configure some features of Outlook Web Access. To configure at the virtual directory level you can follow the steps below:
1. Open the Exchange Management Console
2. Expand Server Configuration
3. Click Client Access
4. In Work Panel choose your server
5. In the Result Panel, click OWA
6. Click Properties in the Actions pane (Figure 03).
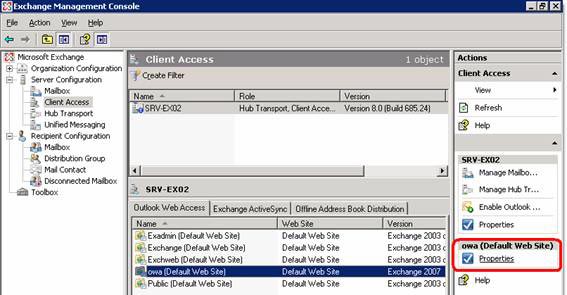
Figure 03 : Properties of the OWA virtual directory
7. Go to Segmentation tab (Figure 04), you can enable or disable some features of OWA by using virtual directory for all users.
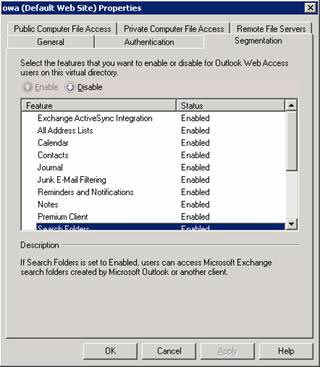
Figure 04 : Managing features for OWA at the virtual directory level
However, sometimes we need to be more flexible, for example when a particular user cannot change his password or in another specific situation, so with this problem we can manage Those features are via the Set-CASMailbox cmdlet.
Here are some key features that we can change at the user level using the Set-CASMailbox cmdlet:
-
MAPIBlockOutlookNonCachedMode
-
MAPIBlockOutlookRpcHttp
-
MAPIBlockOutlookVersions
-
MAPIEnabled
-
OWAActiveSyncIntegrationEnabled
-
OWAAllAddressListsEnabled
-
OWACalendarEnabled
-
OWAChangePasswordEnabled
-
OWAContactsEnabled
-
OWAEnabled
-
OWAJournalEnabled
-
OWAJournalEnabled
-
OWAJunkEmailEnabled
-
OWANotesEnabled
-
OWAPremiumClientEnabled
-
OWARemindersAndNotificationsEnabled
-
OWASearchFoldersEnabled
-
OWASignaturesEnabled
-
OWASpellCheckerEnabled
-
OWATasksEnabled
-
OWAThemeSelectionEnabled
-
OWAUMIntegrationEnabled
-
OWAUNCAccessOnPrivateComputersEnabled
-
OWAUNCAccessOnPublicComputersEnabled
-
OWAWSSAccessOnPrivateComputersEnabled
-
OWAWSSAccessOnPublicComputersEnabled
By default, all of these properties are empty, users use OWA virtual directory settings. When allowing any attribute, other attributes are automatically given $ false , so you will have to enable the attribute to be used by the user.
Here are some examples of what you can do with the Set-CASMailbox cmdlet:
1. Disable E-mail signature in OWA
Set-CASMailbox -OWASignaturesEnabled: $ false
2. Set up a user to use only the OWA Light version
Set-CASMailbox -OWAPremiumClientEnabled: $ false
3. Disable the change of password.
Set-CASMailbox -OWAChangePasswordEnabled: $ false
Disable Mailboxes
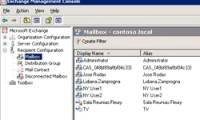
When disabling a mailbox in Exchange Server 2007, you must remove the exchange properties of this mailbox but the user is still in Active Directory. To disable a mailbox you should proceed as follows:
1. Open the Exchange Management Console
2. Expand Recipient Configuration
3. Click Mailbox
4. Select a mailbox and click Disable in the Actions pane (Figure 05).
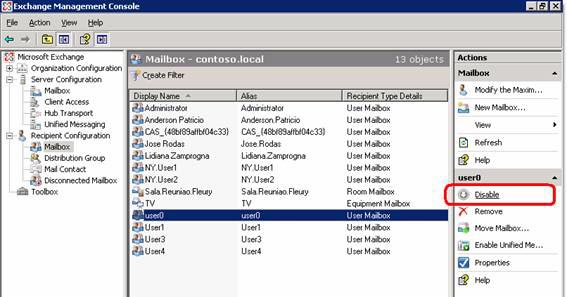
Figure 05 : Disable a mailbox through the Exchange Management Shell
5. On Microsoft Exchnge page, a dialog with a new message will appear asking if you really want to disable that user, click Yes to continue (Figure 06).

Figure 06 : Dialog box confirming the disabling of mailbox
Obviously we can remove the mailbox using Exchange Management Shell with the remove-mailbox cmdlet. Then disable it, to confirm this operation press Y and Enter (Figure 07).

Figure 07 : Disable user with Exchange Management Shell
Remove mailboxes
We can remove a mailbox but need to know that removing a mailbox will also delete the object in Active Directory.
1. Open the Exchange Management Console
2. Expand Recipient Configuration
3. Click Mailbox
4. Select the mailbox and click Remove in the Actions pane (Figure 08).
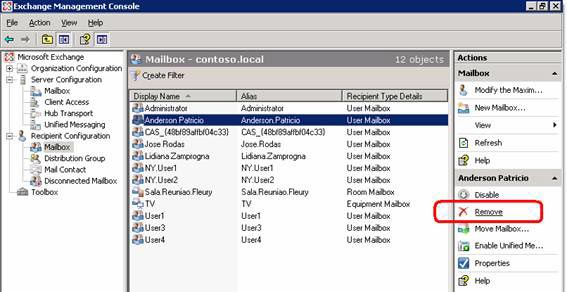
Figure 08 : Removing a mailbox in the Exchange Management Console
5. On the Microsoft Exchange page, click Yes to confirm the deletion of the Windows User and mailbox objects (Figure 9).

Figure 09 : Confirm that a mailbox has been removed
Another way to do this is to use the Exchange Management Shell, using the remove-mailbox cmdlet (Figure 10):
Remove-Mailbox
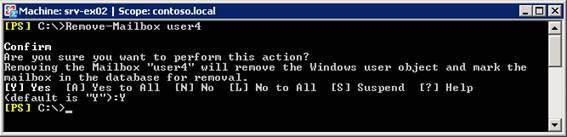
Figure 10 : Removing a mailbox in the Exchange Management Shell
Reconnect mailboxes
So complete the process of creating and removing / disabling a mailbox, we will then see how to reconnect a removed or disabled mailbox. By default, all removed or disabled mailboxes are in the archive for about 30 days. This value can be set at the mailbox storage level. To change this parameter, proceed as follows:
1. Open the Exchange Management Console
2. Expand Server Configuration
3. Click Mailbox
4. Select your server in the Mailbox Pane
5. Click Mailbox Store in the Result Pane
6. Click Properties in the Actions pane (Figure 11).

Figure 11 : Storage mailbox and Properties
7. Go to the Limits tab
8. In the Deletion Settings section, you can select the number of days that a disconnected mailbox still exists in Mailbox Database (Figure 12).
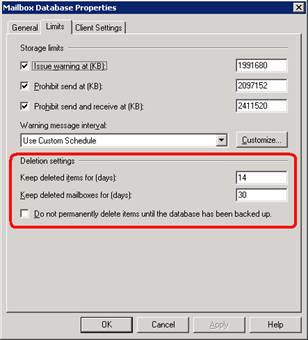
Figure 12 : Defining the number of days that the mailbox was canceled
The connection still exists in the mailbox store
Now that we know how long it will take for a disconnected mailbox to remain in the archive, proceed to check the mailboxes and connect them as follows:
1. First create a user in Active Directory User and Computers called user.recovery
2. Open the Exchange Management Console
3. Expand Recipient Configuration
4. Click Disconnected Mailbox
5. You will see all disconnected mailboxes in the work pane. Select the disconnected user and click Reconnect in Actions pane (Figure 13)
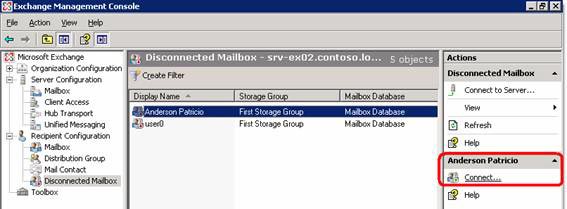
Figure 13 : Reconnecting a mailbox
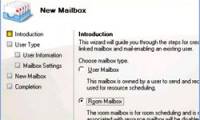
6. Introduction . On the Introduction page, select User Mailbox then click Next to continue (Figure 14).

Figure 14 : Select mailbox type to reconnect
7. Mailbox Settings . You have created a new mailbox called user.recovery . Now you can click Existing user and click user.recovery, which will connect to the contents of the mailbox that has been disabled or removed. (Figure 15). On the Mailbox Settings page, there are two options:
Matching user : To locate a user account valid with the mailbox object, Exchange will use the LegacyExchangeDN and DisplayName properties of the Exchange storage mailbox object. If Exchange does not find what to choose for an existing user.
Existing User : If you want to connect the mailbox to a user other than a valid user. Click Browse to see the list of users in Active Directory. This list will only have users without the relevant mailbox.
For the purposes of this article, click Existing User and select user.recovery on the Browse button, then click Next to continue (Figure 15).
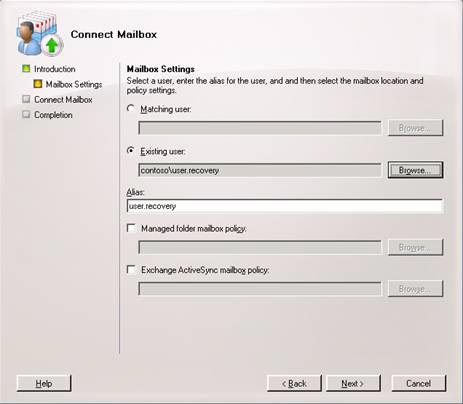
Figure 15 : Connecting an existing user to an old mailbox
8. Connect mailbox . Shows that the entire configuration will be completed in the next step. Click Connect to continue (Figure 16).
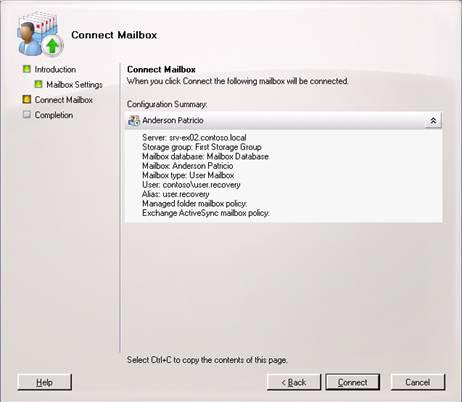
Figure 16 : Complete configuration in Connect Mailbox wizard
9. Completion . On the Connect Mailbox page, the final screen of the mailbox wizard connection, if everything happens without any error, this page will appear when completed (Figure 17).
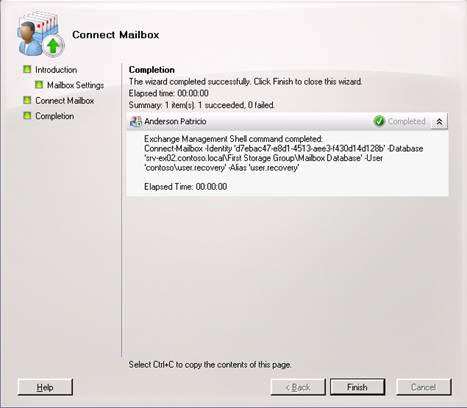
Figure 17 : The last screen shows the cmdlet connect-mailbox
has been successfully completed
10. Now user.recovery can log in to their mailbox and check all the content they already own.
Change rule limits in mailboxes
This is a point not to be missed in this article; A new feature of Exchange Server 2007 allows changing the size of RulesQuota. By default, the value is 64KB but they have been upgraded to 256 KB per user.
Another interesting point is that this value is only applicable for valid roles; all other roles that have been disabled are not included in the RulesQuota value.
To change the RulesQuota value in Exchange Server 2007, you can use the cmdlet in Exchange Management Shell:
Set-Mailbox -RulesQuota: 256KB
Conclude
In this last article on mailbox management, we introduced some features at the mailbox level and observed the process of removing and restoring mailbox content.
Was this article helpful?
Your feedback helps us improve.
Related Articles
 Managing Resource Mailboxes in Exchange Server 2007 (Part 2)9 minutes read
 Transfer mailboxes in Exchange 2007 through the Exchange Management Console11 minutes read
 How to Back Up Exchange 20033 minutes read
 Manage mailboxes in Exchange Server 200717 minutes read
 Managing Resource Mailboxes in Exchange Server 2007 (Part 1)10 minutes read
 Managing log files of Exchange Server 2007 - Part 27 minutes read
Reader Comments 0
Sign in with email or Google to join the discussion.