Manage mailboxes in Exchange Server 2007
In this article, we will approach the management of mailboxes in Exchange Server 2007 .
This seems to be a simple discussion issue but we will look at some advanced points regarding user management tasks to support beginners and advanced administrators. This article will be divided into two parts, in this first part, we will review mailbox management and user-level functions.
Creating a mailbox using the Exchange Management Console
This procedure is the starting point of the lesson. Exchange Server 2007 allows administrators to create objects such as Mailbox, Contact, Mail User and Distribution Group. In the following steps we will look at how to create a mailbox object:
1, Open the Exchange Management Console
2, Expand Recipient Configuration
3, Click on Mailbox
4, In the Mailbox window, click New Mailbox . (Figure 01)

Figure 01 : Create a new user in the Exchange Management Console
5, Introduction : Select the type of object to create, in Exchange Server 2007 there are four different mailbox types:
- User mailbox : This is a traditional mailbox.
- Resource mailbox : This is a specific mailbox assigned to Meeting Rooms. The user account associated with it will be disabled in Active Directory.
- Equipment mailbox : This is a mailbox specific to resources (eg TV, Projector and .). With a Resource mailbox, this type of mailbox will disable users in Active Directory.
- Linked Mailbox : This type of mailbox will be used in multi-linked environments. This specific feature will be explained in some of the following articles.
In the Introduction window, select the appropriate mailbox type then click Next to continue. (Figure 02).
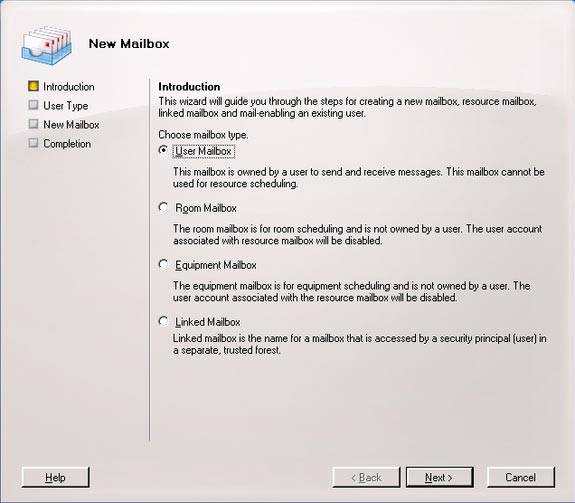
Figure 02 : Select the type of mailbox to create.
6, User Type : In the User Type window, select create a new user or assign an existing user to a new mailbox. If assigning it to an existing user, it will have to check if there is a mailbox associated with it. Click Next to continue. (Figure 03).
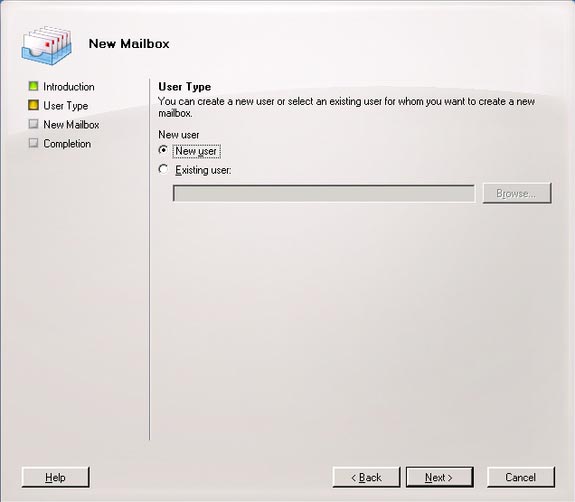
Figure 03 : Create a new user for a new mailbox.
7, User Information : In the User Information window, you must fill in the user's personal information and select the Organization Unit where it will be created. Then click Next (Figure 04).
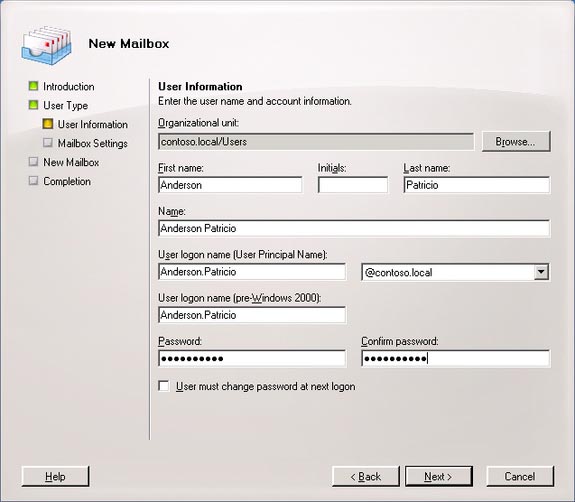
Figure 04 .Enter personal data and position OU (Organization Unit)
8, Mailbox Settings . On the Mailbox Settings page, you can define mailbox information like Alias, Mailbox Server and Mailbox Store where the new mailbox will be located. Mailbox and ActiveSync policies can also be defined in this step. We can select the fields to fill and then click Next to continue. (Figure 05).

Figure 05 . Select Server, Storage Group, Mailbox database
and policies during the process of creating mailboxes.
9, New Mailbox . In the New Mailbox window, have all the information selected in the previous steps. These parameters will be used by PowerShell technique to create mailbox objects. To create a mailbox, click New (Figure 06).
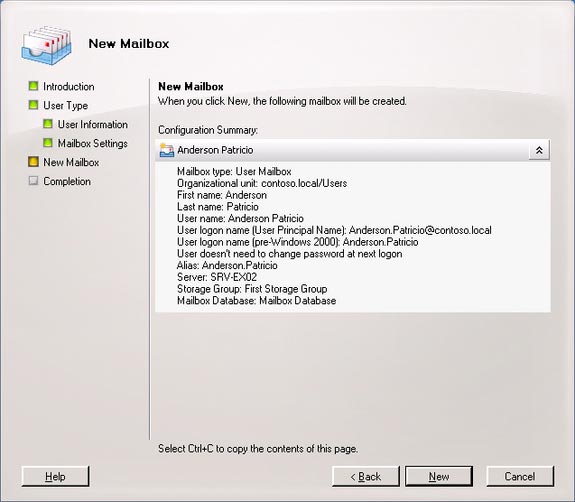
Figure 06 : Parameters will be used to create a new mailbox
10, Completion . In the Completion window, you will see New-mailbox and the parameters used in creating this new mailbox.
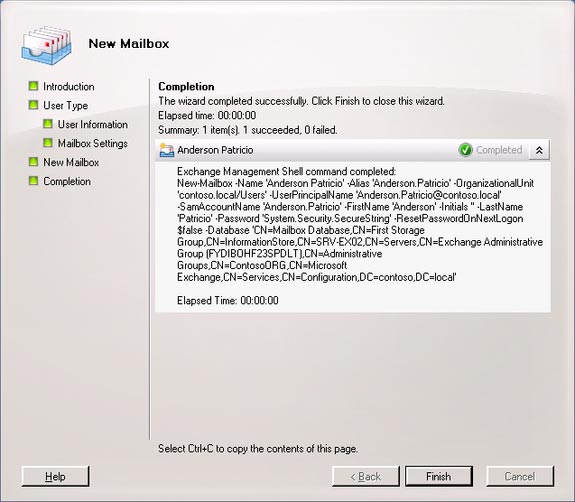
Figure 07 : The final screen of the New Mailbox Wizard displays the cmdlet
(commands) used in creating mailboxes
Create mailboxes via Exchange Management Shell
Another way to create users is to use the Exchange Management Shell. To do this, we use the cmdlet called New-Mailbox. There are many parameters related to this command and the required parameters for the commands given below:
- Alias
- Name
- Database
- OrganizationalUnit
- UserPrincipalName
To create a user using the Exchange Management Shell, you can proceed to the following cmdlet:
New-Mailbox -alias -name -Database -OrganizationUnit Users –UserPrincipalName
If you do not enter all the required parameters, you will get a window asking for missing parameters. In Figure 08, the password box, you must enter the password. Once completed, a user user will be created.
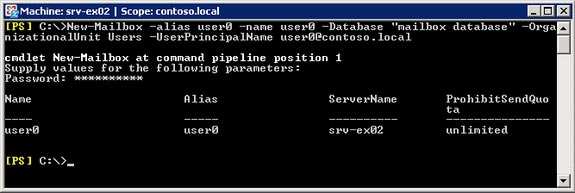
Figure 08 : Creating a mailbox through the cmdlet New-Mailbox
in the Exchange Management Console
Use * .csv files to create mailboxes
Another interesting feature is the feature for administrators to create multiple users from a * .csv file. In the following section, we will review each step of the procedure to create multiple mailboxes.
1, First, create a * .csv file called recipients.csv in the root path (C :) and enter the column names for the file in the first line. These columns will be Alias , Name and UPN . The bottom line will complete user information (Figure 09).

Figure 09 : Create a csv file to use in creating users
via Exchange Management Shell
2, When user information is completed, a variable must be created in order to keep the original password for all accounts in recipients.csv files. To do so, enter as follows:
$ Password = Read-Host 'Type the default password for the new accounts:' -AsSecureString

Figure 10 : Create a variable to keep the original password in the new account.
3, The next step will run two cmdlets using a pipe to create new users using the * .csv file. This is the structure of the cmdlet statement:
Import-Csv recipients.csv |foreach {New-Mailbox –alias $ _. Alias –name $ _. Name -UserPrincipalName $ _. UPN –Database 'mailbox database' –OrganizationalUnit Users –Password $ Password –ResetPasswordOnNextLogon: $ true
Giải thích : Explain :
- $_. $ _.: Tên của từng cột trong file nguoinhan.csv. : Name of each column in nguoinhan.csv file.
- Foreach : Với mỗi dòng của file; Foreach : With each line of the file;lưu ý: dòng đầu tiên là dòng tiêu đề. Note: the first line is the subject line.
- $Password : biến được nhập trong bước trước. $ Password : variable entered in the previous step.
- -ResetPasswordOnNextLogon:$true : Nếu thiết lập đúng tham số, tất cả người dùng sẽ phải thay đổi password của họ khi đăng nhập lần đầu. -RetetPasswordOnNextLogon: $ true : If set to the correct parameter, all users will have to change their password when logging in for the first time.

Hình 11 : Tạo các user thông qua file *.csv Figure 11 : Creating users through the * .csv file
4, Để kiểm tra xem các user đã được tạo hay chưa có thể vào Exchange Management Console (Hình 12). 4, To check if the users have been created, go to the Exchange Management Console (Figure 12).

Hình 12 : Các user mới được tạo thông qua file csv Figure 12 : New users created via csv file
Các tính năng quản lý Mailbox Mailbox management features
Quản lý các chức năng ở mức người dùng bằng việc kích hoạt hay vô hiệu hóa những tính năng dưới đây: Manage functions at user level by enabling or disabling the following features:
- OWA OWA
- Exchange ActiveSync Exchange ActiveSync
- Unified Messaging Unified Messaging
- MAPI access. MAPI access.
Nhiệm vụ này có thể được hoàn tất theo hai cách: This task can be completed in two ways:
Sử dụng Exchange Management Console Use the Exchange Management Console
1, Mở Exchange Management Console 1, Open the Exchange Management Console
2, Mở rộng Recipient Configuration 2, Expand Recipient Configuration
3, Nhấn vào Mailbox 3, Click Mailbox
4, Nhấn vào user và trong Toolbox Actions nhấn Properties 4, Click on the user and in Toolbox Actions click Properties
5, Nhấn vào tab Mailbox Features . 5, Click the Mailbox Features tab.
6, Bây giờ bạn có thể nhìn thấy tất cả các tính năng mailbox của người dùng và có thể vô hiệu hóa hoặc kích hoạt mỗi tính năng. 6, Now you can see all the user's mailbox features and can disable or enable each feature.

Hình 13 : Quản lý các tính năng của Mailbox ở mức người dùng Figure 13 : Managing Mailbox features at user level
Liệt kê tất cả người dùng và tính năng của họ… List all their users and features .
Trong một số trường hợp, chúng ta phải thẩm định các chức năng mà user có và không có cách nào để thực hiện từng người một. In some cases, we have to verify the functions that the user has and there is no way to do them one by one. Trong Exchange Server 2007, nhiệm vụ này rất đơn giản và có thể được thực hiện với một cmdle được gọi là get-casmailbox (hình 14). In Exchange Server 2007, this task is very simple and can be done with a cmdlet called get-casmailbox (Figure 14).
Sử dụng cmdlet này có thể xuất các kết quả ra file *.csv, phân tích nó trong Microsoft Excel và tạo các báo cáo hoặc phân tích theo cách mà bạn muốn. Using this cmdlet can export the results to a * .csv file, analyze it in Microsoft Excel and create reports or analyze the way you want.

Hình 14 : Tất cả user với các chức năng thông qua Exchange Management Shell Figure 14 : All users with functions through the Exchange Management Shell
Sử dụng Exchange Management Shell để thay đổi các tính năng người dùng Use Exchange Management Shell to change user features
Để quản lý các tính năng bằng việc sử dụng Exchange Management Shell bạn có thể sử dụng cmdlet được gọi là set-casmailbox như dưới đây: To manage features using the Exchange Management Shell you can use the cmdlet called set-casmailbox as follows:
Set-casmailbox -OWAEnabled:Set-casmailbox -OWAEnabled:
Trong đó : là tên người dùng; In it : is the username; có thể là $true hoặc $false can be $ true or $ false
Để hiển thị cho bạn thấy sự ảnh hưởng thực tế giá trị sử dụng của Exchange Management Shell thì đây là một ví dụ. To show you the actual effect of the Exchange Management Shell usage, this is an example.
Giả sử : Có một công ty với 50 chi nhánh văn phòng và phải vô hiệu hóa sự truy cập MAPI cho tất cả user trong Toronto. Assume : There is a company with 50 branch offices and must disable MAPI access for all users in Toronto.
Làm thế nào bạn có thể thực hiện điều này với công việc quản trị tối thiểu? How can you do this with minimal administrative work?
Trước hết, phải bảo đảm rằng tất cả thông tin Active Directory là nhất quán. First of all, make sure that all Active Directory information is consistent. Trong tình huống đưa ra, tất cả người dùng đều có các thuộc tính thành phố và tỉnh đã được điền đúng. In the given situation, all users have the correct city and province attributes. Một ví dụ về vấn đề này được thể hiện trong hình 15 thông qua các cmdlet get-user | An example of this is shown in Figure 15 through the cmdlet get-user | select name , recipientType , City , StateorProvince select name , recipientType , City , StateorProvince

Hình 15 : Thẩm định các thuộc tính thành phố và tỉnh cho tất cả người dùng Figure 15 : Verifying city and province attributes for all users
Nếu tất cả thông tin Active Directory nhất quán (phù hợp) thì có thể sử dụng tài nguyên này trên Windows PowerShell, nơi mà một đầu ra của một lệnh được sử dụng như một đầu vào cho một cmdlet khác. If all Active Directory information is consistent (appropriate), this resource can be used on Windows PowerShell, where an output of a command is used as an input to another cmdlet.
Bạn sẽ cần đến vài thuộc tính người dùng cụ thể mà không cần phải đi hết get-mailbox , bởi vì cmdlet này chỉ trả lại thông tin mailbox. You will need some specific user properties without having to go through get-mailbox , because this cmdlet only returns mailbox information. Phải sử dụng get-user cmdlet để lọc thuộc tính thành phố từ người dùng và kết hợp các kết quả đó với set-casmailbox cmdlet. The get-user cmdlet must be used to filter the city attribute from the user and combine those results with the set-casmailbox cmdlet.
Để giải quyết vấn đề này bạn có thể sử dụng subset này của cmdlet như hình 16. To solve this problem you can use this subset of cmdlets as shown in Figure 16.
Get-User |Get-User |Where-Object { $_.City –eq 'Toronto'} |Where-Object {$ _. City -eq 'Toronto'} |Set-CasMailbox –OWAEnabled: $ false
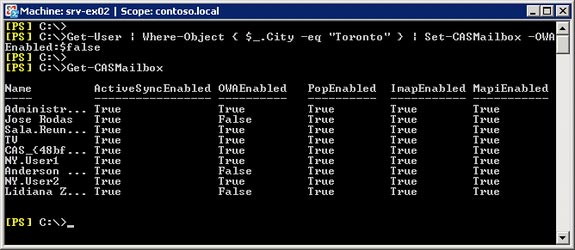
Figure 16 : Disabling OWA access for all users in the city of Toronto
and Ontari state, then a list of new user features.
Now check if everything worked as expected. No user, who has the OWA feature set disabled, can access their mailbox via Outlook Web Access. You can test it by trying to see if the user Anderson.Patricio can access the mailbox with Outlook Web Access.
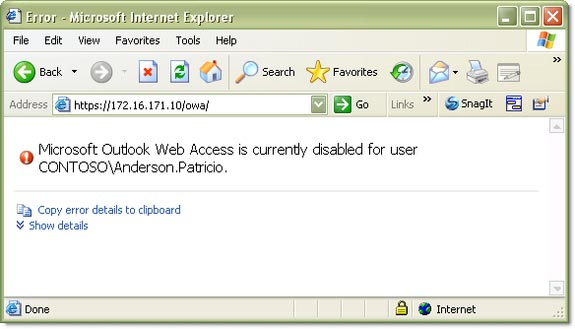
Figure 17 : After the authentication, the user receives
A message that OWA has been disabled
Conclude
In this article we reviewed the steps needed to create a user (in the usual way) using the Exchange Management Console. Consider some of the same tasks using the flexibility of Exchange Management Shell to help create one or more users through commandlets. At the end of this article, we discussed how to manage mailbox features at the user level.
See the last section