Statistics mailbox in Exchange 2007
Neil Hobson
The requirement for obtaining a mailbox list along with their sizes is categorized as a rather high requirement in the list of questions from Exchange administrators. In Exchange 2000 and Exchange 2003, it is possible to view this information within Exchange System Manager snap-in. It is also possible to export the information presented within Exchange System Manager into a text format and then import this information into applications such as Excel. Other members of the Exchange community have announced VBScripts to use Windows Management Instrumentation (WMI) or Messaging Application Programming Interface (MAPI) to do the same things. Obviously, for some administrators, those scripts are sometimes difficult to understand or change. However, Exchange 2007 provides you with an Exchange Management Shell utility that can manage Exchange 2007 from a command prompt and one of the commands or cmdlets that we already know, allowing administrators to simplify collection. Get statistics about mailboxes.
The basics of Get-MailboxStatistics
The most basic Cmdlet of Exchange Management Shell to use is the Get-MailboxStatistics on itself. Figure 1 below shows a sample output of this cmdlet process without any additional parameters. This process runs against the local mailbox server.
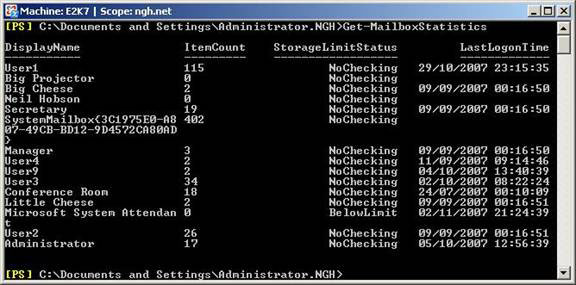
Figure 1: Default result of Get-MailboxStatistics
As you can see, by default this process shows four pieces of information for each mailbox on the local server, namely the mailbox display name, the number of items in the mailbox, the state of storage limitations and the time of posting. Last entered. The actual size of the mailbox is not displayed by default, so the first task is to distinguish the name of the attribute that stores that value. One way to specify the available properties can be called observing the results of the cmdlet in the Format-List cmdlet, or fl for short. For example, our cmdlet now is:
Get-MailboxStatistics | fl
Figure 2 shows the results of executing this command, the mailbox properties of User2 are displayed.
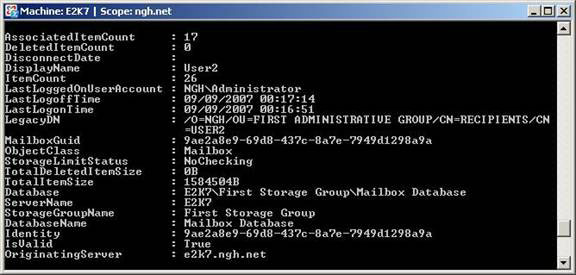
Figure 2: Results of Get-MailboxStatistics | fl
Now you can see other important pieces of information, such as the TotalItemSize attribute that has a value of 1584504B, approximately 1.5MB. Obviously User2 is not a large user of Exchange 2007. Once you know the properties you need to consider TotalItemSize , we can change the original cmdlet to get the information along with the mailbox name and the number of items. its. Cmdlet to use is shown below. Note that this time, we used the Format-Table command, or its abbreviation ft , to create the output in tabular format:
Get-MailboxStatistics | ft DisplayName, TotalItemSize, ItemCount
The result of this process is shown in Figure 3.
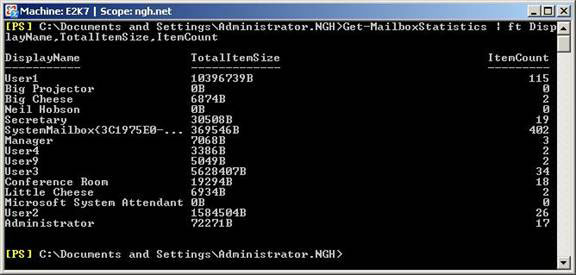
Figure 3: Get-MailboxStatistics with mailbox size.
Now we will continue the investigation as this is a fairly concise output while giving many things we need. However, there is a slight obstacle to this output. First, it does not increase or decrease in order, so it is difficult to quickly see which mailboxes are the largest. In addition, the TotalItemSize column is displayed by default by byte, making it easy for us to read.
Additional Get-MailboxStatistics format
Let us first consider the order of output. Sorting objects with PowerShell is really easy through the Sort-Object command. All you need to do for this exercise is to perform mailbox statistics and then observe the results according to the Sort-Object command, before the Format-Table command. With the cmdlet Sort-Object , you need to decide which column you want to classify and what sort of direction it should be. The first parameter to add to Sort-Object is the column name to classify, in our example, TotalItemSize . Then add –Descending or –Ascending to indicate what the orientation is. Arrange the largest mailboxes on the top, which is typical that administrators need to know. Cmdlet now becomes:
Get-MailboxStatistics | Sort-Object TotalItemSize -Descending | ft DisplayName, TotalItemSize, ItemCount
The result of the cmdlet is shown in Figure 4.
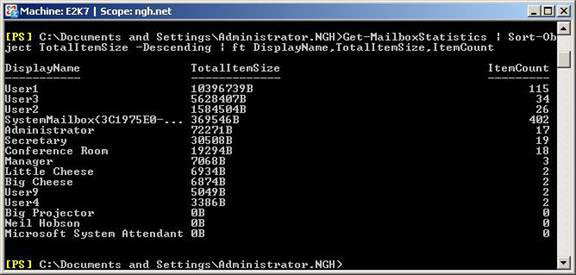
Figure 4: Get-MailboxStatistics with mailbox sizes in descending order of size
Next we need to convert the mailbox sizes from a byte type to a more usable one, for example, MB, for example, will be easier to use. However, since this test only has small mailbox sizes, we will display their sizes in KB. To do that, we need to replace the TotalItemSize parameter in the cmdlet:
@ {expression = {$ _. TotalItemSize.Value.ToKB ()}}
Therefore, the new cmdlet will be:
Get-MailboxStatistics | Sort-Object TotalItemSize -Descending | ft DisplayName, @ {expression = {$ _. TotalItemSize.Value.ToKB ()}}, ItemCount
The result of this cmdlet is shown in Figure 5 below. If you want to display mailbox sizes in MB, use TotalItemSize.Value.ToMB in the above cmdlet. Or you can use TotalItemSize.Value.ToGB .
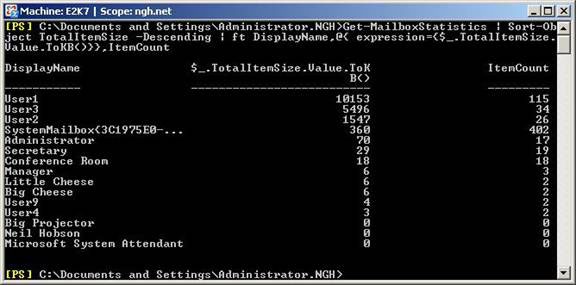
Figure 5: Get-MailboxStatistics with mailbox size in KB
Now the results look easier. However, look at the column names now. We can see that the previously called column TotalItemSize is now cited in a more cumbersome form than $ _. TotalItemSize.Value.ToKB () . We can solve this very easily by adding a new label for the cmdlet. In fact, all you need to do is change the cmdlet to reset the column label appropriately. The new cmdlet is shown below:
Get-MailboxStatistics | Sort-Object TotalItemSize -Descending | ft DisplayName, @ {label = "TotalItemSize (KB)"; expression = {$ _. TotalItemSize.Value.ToKB ()}}, ItemCount
The result of this command is shown in Figure 6:
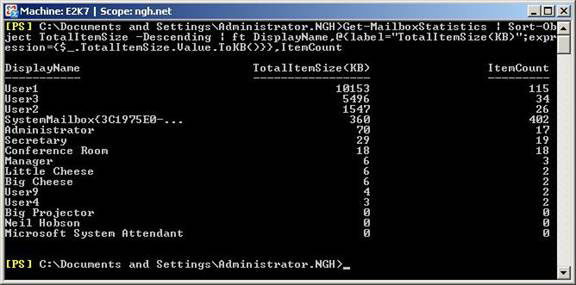
Figure 6: Get-MailboxStatistics with labeled column names
Finally, we have an output for the right purpose and are quite nicely formatted; We can use it to identify which mailbox is the largest. What you don't want to do is run that script manually every day, weekly or monthly. Obviously applications like System Center Operations Manager (SCOM) 2007 can bring this information back to you through the management interface, so how can we do the same with the Exchange Management Shell? The most obvious method is to send information via an email.
Email the results
Figure 7 below shows a PowerShell script called sendstats.ps1 , which is the first script used to create mailbox statistics through the cmdlet that was built in this article, then send the following links. Result of this cmdlet to administrator. The first thing to note with the script is that the results of the Get-MailboxStatistics cmdlet have been directed to a file named mailboxes.txt . This file is created in the directory where the script is run. The other lines of the script create and send the email, adding the mailboxes.txt file as an attachment. Another important thing to note is that the $ SendingServer line refers to the FQDN of the mail server, which is responsible for sending mail. Obviously it will be a requirement to ensure that the server can forward the message.
### Send mailbox statistics script
### First, administrator cần phải thay đổi giá trị thư trong trong phần này
$ FromAddress = "MailboxReport@ngh.net"
$ ToAddress = "administrator@ngh.net"
$ MessageSubject = "Mailbox Size Report"
$ MessageBody = "Attached is the list của hiện thời của các gói
$ SendingServer = "e2k7.ngh.net"
### Now get the stats and store in a file text
Get-MailboxStatistics | Sort-Object TotalItemSize -Descending | ft
DisplayName, @ {label = "TotalItemSize (KB)"; expression = {$ _. TotalItemSize.Value.ToKB ()}},
ItemCount> mailboxes.txt
# #
$ SMTPMessage = New-Object System.Net.Mail.MailMessage $ FromAddress, $ ToAddress,
$ MessageSubject, $ MessageBody
$ Attachment = New-Object Net.Mail.Attachment ("./ mailboxes.txt")
$ SMTPMessage.Attachments.Add ($ Attachment)
### Send the message
$ SMTPClient = New-Object System.Net.Mail.SMTPClient $ SendingServer
$ SMTPClient.Send ($ SMTPMessage)
Figure 7: SendStats script.PS1
When executed, the script sends email as you can see in Figure 8 below. Opening an attachment will show the output of the Get-MailboxStatistics script as shown in Figure 9.
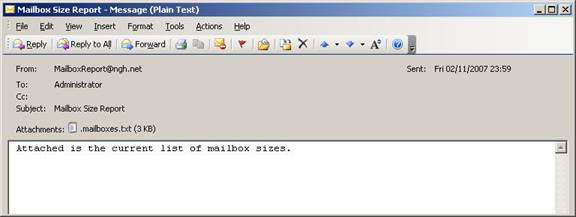
Figure 8: Report sent mail
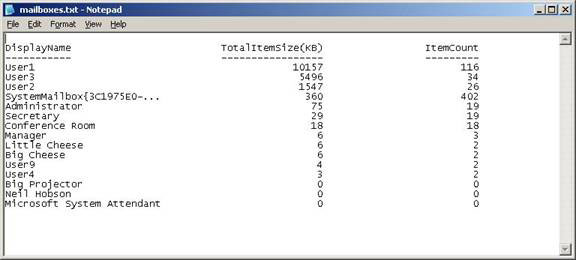
Figure 9: Attached content
Although we have an email with relevant data inside, there is nothing in the script regarding the scheduling of sending. To do that, we have to take advantage of the Windows scheduling service and execute the script on a regular basis. To do so, we need to run the Exchange Management Shell and specify the script. This can be done with the following command:
PowerShell.exe -PSConsoleFile "C: Program FilesMicrosoftExchange ServerBinExShell.psc1" -Command "./sendstats.ps1"
Here you can see that PowerShell runs and loads Exchange control files, which are found on the C: drive in this example. Obviously you need to change, depending on which drive Exchange 2007 is installed on. The –Command parameter is used to distinguish the scenario that we want to run, a specific file such as sendstats.ps1 .
Conclude
In this article, we have introduced very interesting issues that Exchange administrators are interested in, namely the ability to create lists of mailboxes and their sizes. Although tools like SCOM 2007 can do this, you can simply implement it using the Exchange Management Shell cmdlet Get-MailboxStatistics . PowerShell can be the first step in a long and difficult way, but it is also worth what people care about.