Table of Contents
This updated guide examines Configure Shared Mailbox in Exchange 2010 and organizes the essential facts, background, and practical takeaways in clear American English.
Create Mailbox
Use the Exchange Management Console to locate Recipient Configuration . From the action table on the right, select New Mailbox , then the user will see a screen like the one below.

You will notice that in Exchange 2010 we have 4 different mailbox types:
- User Mailbox - This mailbox type we will use for single users to send / receive email, calendar and contact.
- Room Mailbox - Use to schedule meeting rooms. It is added when sending a meeting request as a source. In addition, there are many different management options.
- Equipment Mailbox - Used to schedule a source, such as a digital camera or projector. They can also be added when sending meeting invitations as a source.
- Linked Mailbox - It is used to assign users to a mailbox in another forest.
The option we will use is User Mailbox. Once selected, click Next . And you will get a screen like the one below.
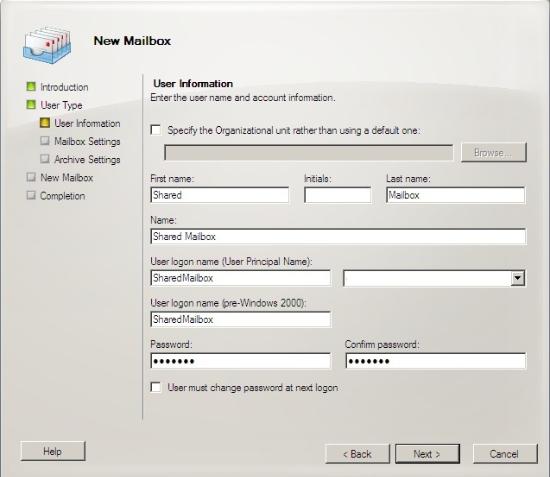
Complete personal information for users. After completing, click Next and you will see the screen shown below.
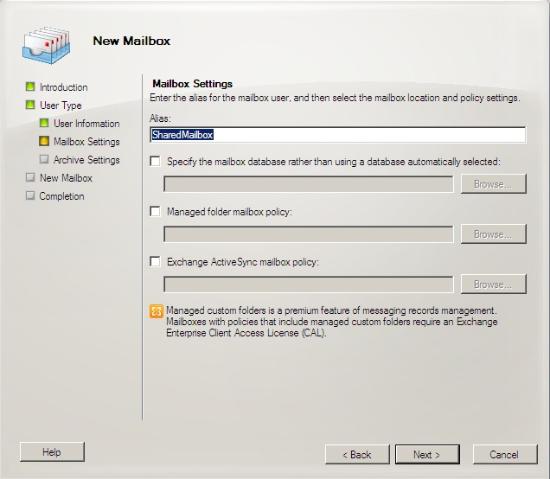
Enter the Exchange Alias , we usually put it with the same username, but you can still put it with any name. If you want to confirm a database (in case there are multiple databases) and any mailbox / activesync policies, do it here. Since this is a shared mailbox, you may not want to set any policies for other users or you want to specify a separate policy for shared mailboxes. Once done, click Next .
Whether or not to include a storage mailbox. Click next and finish to complete the wizard.
Decentralization
Once you have completed the wizard and installed the mailbox, locate this mailbox in ExchangeManagement Console and right-click. You will see the following menu:
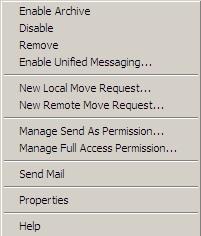
Select Manage Full Access Permissions, it will display the first screen with permissions as shown below.
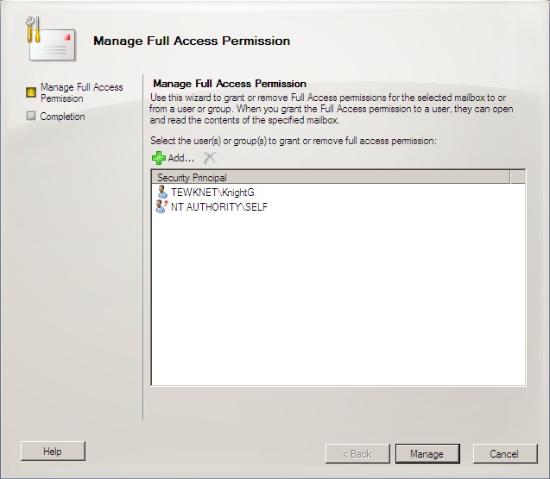
Click the Add button and locate groups / users you want to delegate. We recommend using Security Groups because you can then add users to this group instead of having to run through the Exchange wizard each time.
Once you have selected users / groups, click Manage and then Finish to apply the assigned permissions.
Open the mailbox
Now that the mailbox has been created and the permissions are finished, we need to add this mailbox to some users. We need to open it in Outlook.
Doing this is slightly different based on the version of Outlook you are using. Go to Tools > Account Settings (If you use Outlook 2010 you need to go to File and select Account settings) and highlight the Exchange account and select or properties or change (depending on the version). After that, you will see the screen below.
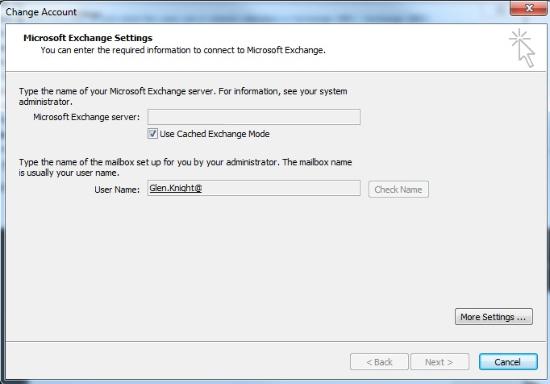
Click the More Settings button and select the Advanced tab. As shown below.
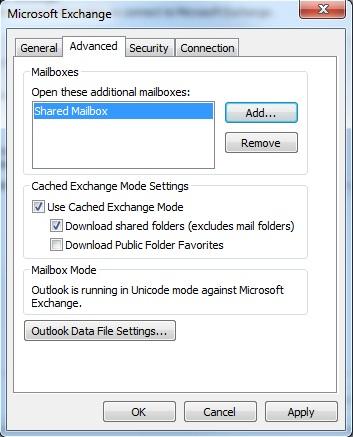
Next, click on Add and enter the mailbox name, in this case the shared mailbox. Click OK > Apply and Finish .
Now you can see this shared mailbox is in Outlook's list.
FAQ
What is Configure Shared Mailbox in Exchange 2010 about?
It provides a structured overview of Shared mailbox, explains the main context, and highlights practical takeaways for readers.
Why does this topic matter?
Understanding the main concepts helps readers evaluate the issue, avoid common mistakes, and make better-informed decisions.
How should readers use this information?
Use the guidance as a practical starting point, confirm details that may have changed, and follow current product, safety, or security recommendations.
Related Articles
 How to Add a Shared Mailbox in Outlook: Step-by-Step Guide3 minutes read
 Mailbox Exchange 2007 Sp1 Management Features10 minutes read
 Managing Resource Mailboxes in Exchange Server 2007 (Part 1)10 minutes read
 Totalitemsize: Statistics Mailbox in Exchange 200711 minutes read
 Transfer Mailboxes in Exchange 2007 Through Exchange Management10 minutes read
 Mailbox Recovery Exchange 2010: A Practical Guide9 minutes read
Reader Comments 0
Sign in with email or Google to join the discussion.