Instructions to thoroughly remove the VGA card driver on Windows 10
How to remove VGA driver on Windows 10 operating system thoroughly and safely? How to use Display Driver Uninstaller (DDU) to remove VGA driver.
As you know, Driver is an extremely important device driver included in a computer.
Drivers enable operating systems and software to use, interact with, and take full advantage of your computer's hardware, so you can surf the web, go online, play games, edit photos, and render videos. …
The most obvious example is the driver of the video card , without it, even if you have 2 Geforce RTX 2080Ti running NVLink or Radeon RX 5700, it will not do anything.
My laptop has also had a video card driver device, but to be more precise, the driver is too old because it has not been updated for a long time. You know why?
I can't adjust the screen brightness, the image when opened is blurry, even faulty. And after I update the video card driver to play, it's smooth again.
Unlike on Windows 7 operating system - you will have to manually find and download drivers for each corresponding hardware or use software that automatically searches for drivers such as DriverEasy , Driver Booster .
On Windows 10 it's different!
After installing Windows 10 , it will automatically update all the necessary drivers for the system if you have an Internet connection, even the AMD and nVidia VGA drivers. And if you want to upgrade the driver, you just need to upgrade the Windows 10 operating system .
So in this article, I will show you how to completely remove the VGA driver because Windows Update updates itself to reinstall it correctly!
#first. About Display Driver Uninstaller (DDU)
Normally, to remove the video card driver, you can go to Device Manager => then right-click on the name of the pre-installed VGA driver in the Display Adapter => then select Uninstall.
NOTE: To open Device Manager, open the Run dialog box (Windows + R) => then enter the command devmgmt.msc => and press Enter. There are many ways but this is the fastest way.

You can use this method, but definitely removing this way will not be thorough. Because part of the information and files related to the driver is still kept in the Registry , the computer's hard drive.
The fact that you continue to install another driver version of VGA will be very easy to cause conflicts, unnecessary errors with the graphics card, which reduces the user experience as well as your work performance.
Even the driver version that Windows Update installed for the graphics card can cause errors, typically the MSI RX470 Gaming X that I am using, when running with the driver installed by Windows Update, it crashes at all all games after opening for a few seconds.
That's why I found a way to thoroughly remove the video card driver and reinstall a more standard version of the driver, the drivers recommended by the brothers in the AMD Group on Facebook.
The best candidate for this is Display Driver Uninstaller aka DDU. This is one of the completely free software, supporting for Windows 7, 8, 10 and developed by the famous computer hardware and consumer electronics review site Guru3D.
True to its name, its main effect is to help you completely remove everything related to the VGA driver installed on the operating system when you want to reinstall the driver or upgrade to another better VGA sister, higher level.
Display Driver Uninstaller proved to be very effective when it received a lot of positive comments and reviews, as well as recommended by many users, including myself, I am also evaluating and recommending it to you through this article. here
#2. How to remove VGA driver thoroughly and safely with DDU
+ Step 1: This is a 100% free software, so please feel free to visit Guru3D's download page here to download DDU.
Scroll down to the bottom of the page, the Download Location section will provide you with 7 servers to download, you can choose the one that feels close to the speed for the fastest speed, choose, or try them all. It's up to you.

+ Step 2: After downloading the DDU installer, open it and double-click on the DDU vxx.exe file to install the application.
Right after that, a window named 7-Zip self-extracting archive will appear, please click on the 3 dots to select the path out of the Desktop like me => then finally click Extract to extract it out. Desktop.
NOTE: Actually, it is not necessary to extract to the Desktop, you can extract anywhere as long as you find it convenient.

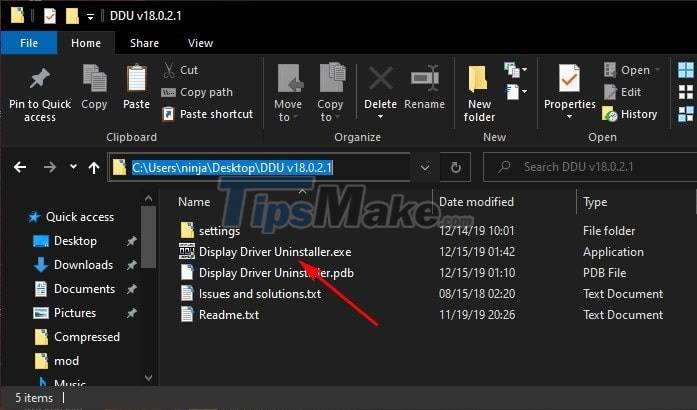
+ Step 3: After decompression is complete, you access the folder with the same name as the downloaded file (here is DDU v18.0.2.1)
There will be files like this in here, check if it's missing, try downloading it again or extract it again! Now double click on the Display Driver Uninstaller.exe file to run the DDU software.
+ Step 4: The first time you open the software, there will be an Options window with a lot of options like this appearing.
The rest you do not need to care, look to the bottom and check the box Prevent downloads of driver from 'Windows Update' when 'Windows' search for a driver for a device => then click Close.
This option is very important as it will prevent Windows from automatically installing the latest driver for VGA using Windows Update when there is an Internet connection.
And if you do not use this option, you can do it manually, that is, disconnect the network on the computer and you're done.

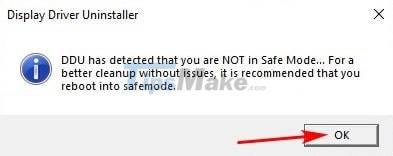
+ Step 5: Next, there will be a notification window that you are not running Display Driver Uninstaller in Safe Mode of Windows 10 => click OK to skip.
Using DDU in Safe Mode will help remove the driver more thoroughly, but I have also tried it in normal mode as in the article and completely OK, no errors at all.
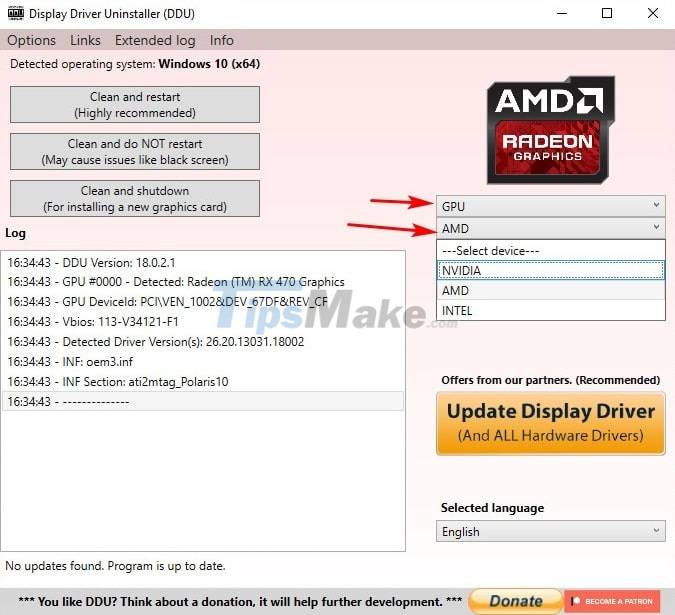
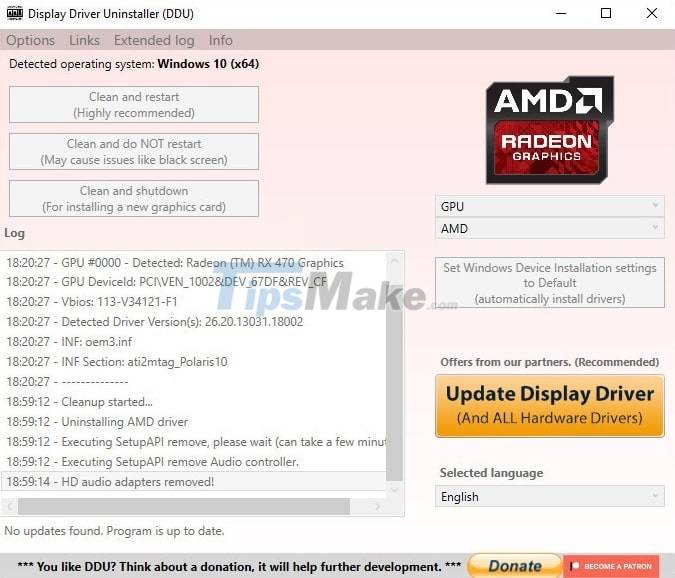
+ Step 6: And this is the main interface of Display Driver Uninstaller, very simple and easy to use. To remove the VGA driver installed on the computer, first click on Select device type => then select GPU.
Immediately it will recognize the type of VGA you are using, for example: AMD, NVIDIA and Intel HD Graphics.
If the software detects a mistake or you want to choose to remove Intel HD Graphics, you can click Select device to select it again.
Previously, just opening the software would be able to immediately detect what type of graphics card you have, but because it has just been added the Audio driver removal feature, we have to choose it manually.
+ Step 7: After selecting the correct type of graphics card driver to remove, the software will give you 3 options to uninstall the driver, they include:
- Clean and Restart (Highly Recommended): Uninstall the video card driver and reboot the system to reinstall another driver version (recommended).
- Clean and do NOT restart: Uninstall the video card driver but do not restart, in some cases may cause a black screen error .
- Clean and Shutdown: Uninstall the video card driver and then turn off the computer. This option is suitable for those who want to upgrade to a new card.
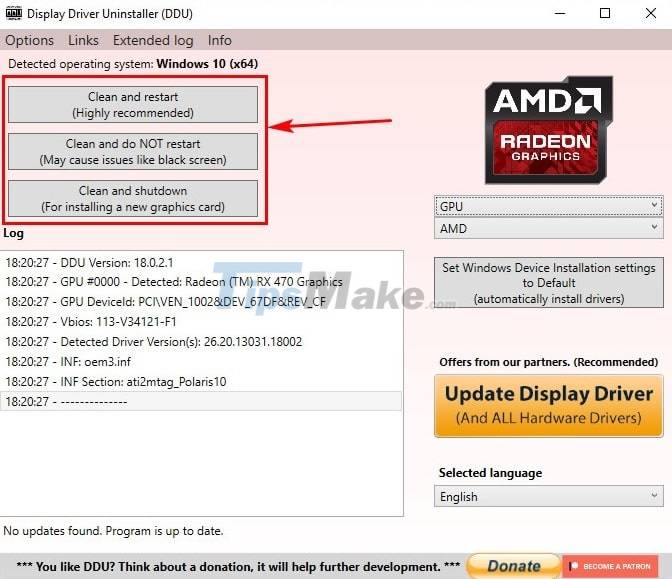
=> In this case, I need to reinstall the older driver version of the RX470 to be able to use it normally, so I will choose Clean and Restart, please choose an option that suits you.
+ Step 8: Immediately, DDU will execute the commands you have given:
Uninstall the driver and automatically restart the operating system for you, in the process of removing, the screen will flash a few times, so don't worry about the damaged card or the screen!
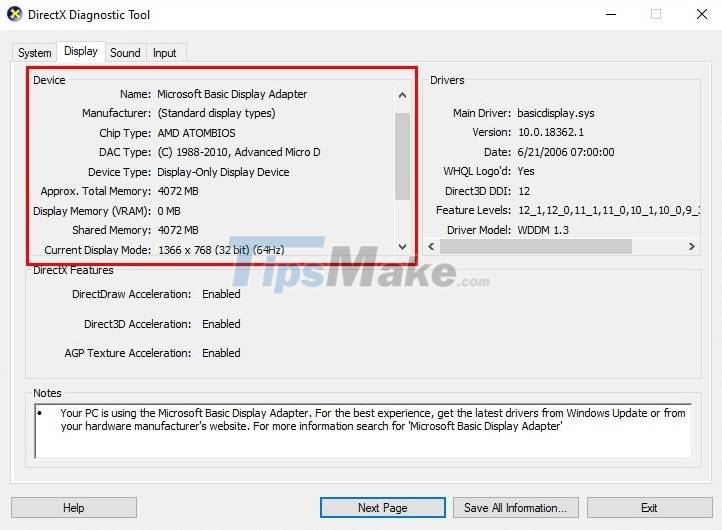
And this is the result, you can see in the dxdiag window, in this Display tab, the Device section has returned to the Microsoft Basic Display Adapter, which means that Windows has not yet received the video card because it does not have the correct Driver.
Now you can download and install the desired driver for your graphics card!
So I have just finished showing you how to use DDU to remove the VGA driver completely and safely on Windows 10 operating system.
Hope this article will help you.