Table of Contents
Use this guide to understand instructions for syncing iPhone / iPad via Wi-Fi and the factors that affect it. The information is organized to make the topic easier to apply in practice.
Request
To conduct iPhone synchronization via Wi-Fi, you will need the following:
- IPhone, iPod Touch or iPad using iOS 5 or higher operating system, encourage updating recent iOS versions.
- Latest version of iTunes
Download iTunes to the latest version
- Your iPhone and computer need to be connected to the same Wi-Fi network.
Initial installation
To synchronize your iPhone via Wi-Fi you still need to use the USB cord to connect your iPhone to the computer at least once. That's because you need to change iTunes settings to enable iPhone synchronization via Wi-Fi. Just do this once and the next time you can sync your iPhone easily via Wi-Fi.
- Connect your device to the computer via USB cord as you normally sync.
- In iTunes, click the iPhone icon in the upper left corner of the iTunes screen to enter the iPhone device management screen.
- Once inside this screen, you will see a frame that includes a number of options, select Sync with this iPhone over Wi-Fi.

- Click Apply In the lower right corner of the screen to save changes.
- Disconnect the iPhone to the computer then unplug the iPhone.
Synchronize iPhone via Wi-Fi
With all the changes, you can synchronize your iPhone without having to plug in your computer.
- Make sure your iPhone and computer are connecting to the same Wi-Fi network.
- On the device's main screen, go to Settings> General> iTunes Wi-Fi Sync (synchronize with iTunes via Wi-Fi) .
- Here, you will see all the computers you have used to synchronize your device. Scroll down, select Sync Now.
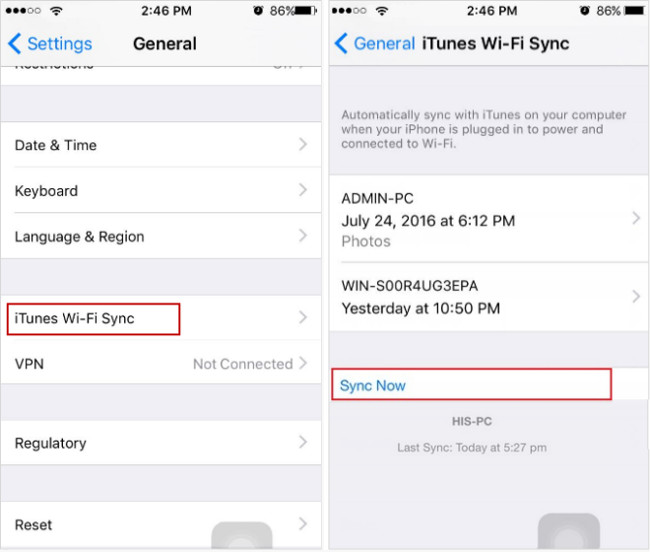
- Wait until the synced message appears.
Some attention when syncing iPhone via Wi-Fi
- Synchronizing your iPhone via Wi-Fi will take longer when you synchronize by connecting the USB cord. So if you have too many things to synchronize, you should use the usual way.
- You do not need to synchronize your device manually. When charging iPhone and using a computer connected to the Wi-Fi network, the device will automatically sync to you.
- When syncing via Wi-Fi, you can synchronize the device with many different computers, as long as you are using the same Apple ID on both devices.
- You can change the settings on iTunes when reconnecting your iPhone to your computer via USB cable.
Can't sync iPhone via Wi-Fi?
If you get an asynchronous error of your device via Wi-Fi, try fixing it with one of the following ways:
- Restart iPhone.
- Make sure both iPhone and computer are connected to the same Wi-Fi network and your computer is not leaving Sleep Mode.
- Check your computer's firewall. Make sure that the computer firewall or antivirus software does not prevent your computer from connecting to your iPhone.
Good luck!
FAQ
What is the main benefit of instructions for syncing iPhone / iPad via Wi-Fi?
The main benefit is a clearer understanding of the topic and a practical way to apply the information covered in this guide.
What should I check before using instructions for syncing iPhone / iPad via Wi-Fi?
Confirm compatibility, review the required settings, protect important data, and use the latest supported version whenever possible.
What should I do if the result is different?
Repeat the steps carefully, verify permissions and version differences, and consult the product's official support documentation for changes not shown in the article.
Related Articles
 How to Play Wi-Fi with iPhone / iPad5 minutes read
 Detailed Instructions on How to Disconnect Your iPad from Your iPhone4 minutes read
 How to Prevent iTunes from Automatically Syncing When Connecting iPhone4 minutes read
 Sync Data Between iPhone and iPad in Just a Few Simple Steps5 minutes read
 You Have Problems with Wi-Fi on iOS 11? This Is How to Fix It6 minutes read
 How to Share Wi-Fi Passwords from Your iPhone to Another iOS 11 Device7 minutes read
Reader Comments 0
Sign in with email or Google to join the discussion.