Table of Contents
This guide reviews 6 ways to fix Wi-Fi connection errors on iPhone 6 with a focus on usability, value, and practical features. Use the comparisons below to narrow down the best choices.
Many iOS 9 users (iPhone 6, iPhone 6 Plus) often encounter problems when connecting to Wi-Fi as if they cannot connect to the previously connected Wi-Fi network, even enter the correct password but do not connect Yes,. To overcome this situation, in the article below Network Administrator will introduce you 6 ways to fix Wi-Fi connection errors on iOS 9.
1. Forgot the connected Wi-Fi network
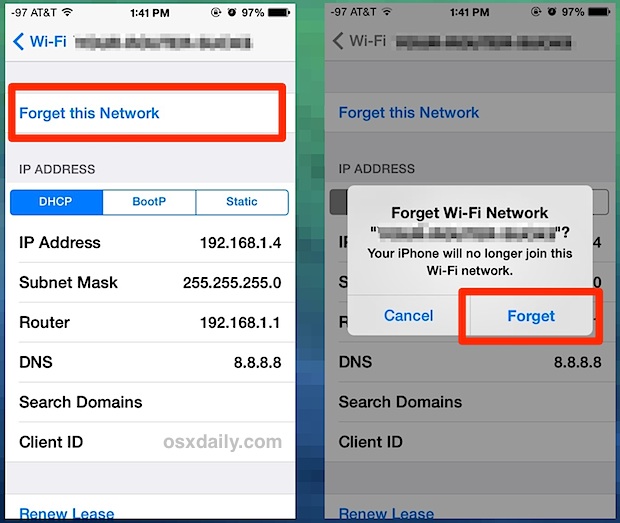
If your iPhone 6 phone cannot connect to a Wi-Fi network that you have previously connected. In this case, the most effective solution is to forget that Wi-Fi network (Forget Wi-Fi) and then reconnect.
To do this, first go to Settings> Wi-Fi> select the i next to the name of the Wi-Fi network connected to the error> Forget this network (Forget Wi-Fi). Then then connect and enter the password to reconnect the Wi-Fi.
2. Disable (turn off) Wi-Fi networks

To disable Wi-Fi network on iOS, go to Settings> Privacy> Location services> System services> Select off Location usually.
3. Reset Wi-Fi network

Reset the Wi-Fi network will reset the system that connects all Wi-Fi networks on your iPhone 6, including caches, DHCP, other settings or customized data set up on iPhone 6.
To reset the connection of Wi-Fi networks, go to Settings (Settings)> General settings (General)> Reset (Reset)> select Reset network settings (Reset Network Settings).
4. Customize DNS on your iPhone
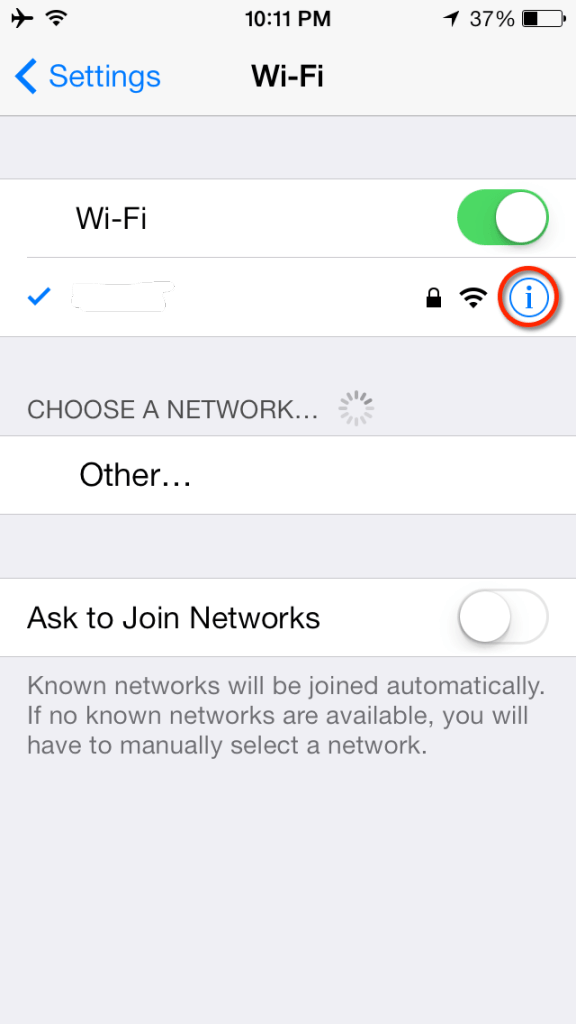
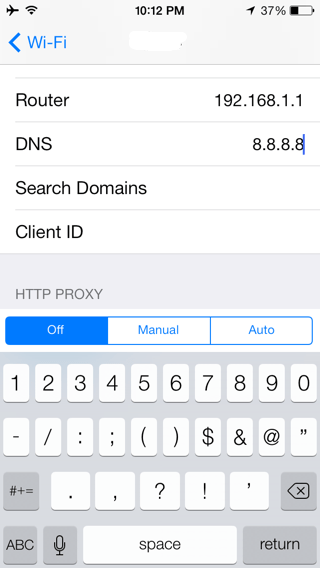
To change DNS on iPhone 6, iPhone 6 Plus, go to Settings> Wi-Fi> select i next to the name of the Wi-Fi network that you want to edit DNS, and finally then repair the DNS of the network.
You can use either DNS below:
Google DNS: To use Google's DNS, you can enter any of the following addresses in the DNS field: 8.8.8.8, 8.8.4.4
OpenDNS: You can enter one of the following addresses to use OpenDNS: 208.67.222.222, 208.67.222.220.
5. Upgrade iOS
This solution will take a long time. If you assume that If you apply one of the above solutions and still have not resolved the Wi-Fi error on your iPhone, this solution can be applied.
6. Restart the device
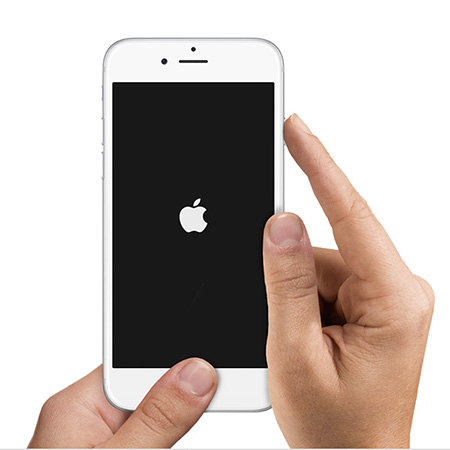
This is how you most often think of any errors on the device. To restart the iPhone or iPad system, hold down the Power button and the Home button at least ten seconds at a time, until the Apple logo appears.
You can refer to more
-
Fix the Wi-Fi connection of iPhone and iPad when on iOS 8
-
5 steps to turn your iPhone into Wi-Fi hotspot
-
Troubleshoot Wi-Fi connectivity problems in iPad and iPhone
Good luck!
FAQ
How were the 6 ways to fix Wi-Fi connection errors on iPhone 6 options selected?
The options are compared by usefulness, ease of use, core features, and their fit for the situations described in the article.
Which option is best for beginners?
Choose the option with the simplest setup, clear documentation, and the features you actually need. A more advanced option is not always the better starting point.
What should I check before choosing?
Check compatibility, current availability, pricing or licensing, privacy requirements, and whether the product still receives updates and support.
Related Articles
 Top 7 Ways to Fix iPhone 12 Cannot Connect to Wi-Fi5 minutes read
 Fix iPhone Battery Drain Error, Notification, Wi-Fi After4 minutes read
 Common Wifi Errors, Wifi Network Errors and How to Fix Them14 minutes read
 Summary of Common Errors on iPhone 6, 6 Plus and How to Fix Errors17 minutes read
 Android Error Wi-Fi Connection Is Flickering, This Is How to Fix4 minutes read
 Instructions to Fix Wi-Fi Connection Error on iOS 63 minutes read
Reader Comments 0
Sign in with email or Google to join the discussion.