Table of Contents
This practical guide explains how to use power saving mode on telegram with clear steps and useful context. It also covers common requirements, potential problems, and the details that can help you get better results.
Instructions for Using Power Saving Mode on Telegram
Step 1:
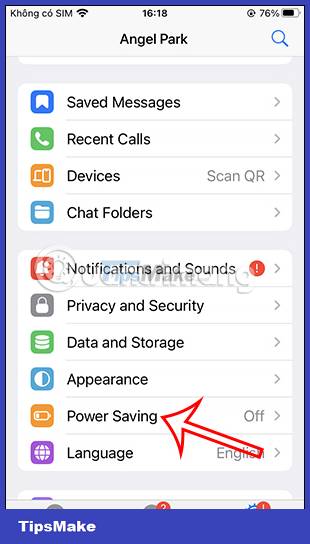
After updating the Telegram application to the latest version, users click on Settings at the bottom of the screen. Switch to the new interface, click next to enter Power Saving mode .

Step 2:
Here, we will see the Power Saving mode adjustment bar turn on when the phone battery is 15%. We can adjust this bar to change the battery percentage we want to activate Power Saving mode on the Telegram application.
The more you pull to the right, the greater the percentage of battery power, the more you pull to the left, the less battery capacity.

Step 3:
Continue to look down below are options for content on Telegram that want to use this Power Saving mode. You do not want to use Power Saving mode for any content, then swipe to the left to turn it off.

Step 4:
On the Telegram iPhone version, there is also a Background Updates option, which quickly updates the chat content when we switch through the open applications on the application. When you use Power Saving mode on Telegram for this Background Updates content, the message content is still updated quickly when we access the application.

Conclusion
Understanding Power Saving Telegram makes it easier to compare options, avoid common mistakes, and apply the information in this guide more effectively. Review the relevant requirements before making changes or choosing a solution.
FAQ
How do you use power saving mode on telegram?
Follow the steps in this guide in order, confirm the required settings or tools, and verify the result before making additional changes.
Is it safe to use power saving mode on telegram?
It is generally safe when you follow the recommended instructions, use trusted tools, and avoid changing settings you do not understand.
What should you do if the process does not work?
Recheck the requirements, restart the device or application when appropriate, and review each step for missed settings or compatibility issues.
Related Articles
 Use Low Power Mode to Save Battery on iOS8 minutes read
 Activate Dark Mode on Telegram7 minutes read
 Adaptive Power and Low Power: Which iPhone Battery Saving Mode Should5 minutes read
 Power Saving Modes in Windows: Explained9 minutes read
 How to Use Power-saving Computers4 minutes read
 Tips to Help Your Computer Use Electricity More Efficiently10 minutes read
Reader Comments 0
Sign in with email or Google to join the discussion.