Table of Contents
To set up Wi-Fi priority mode on Android and iPhone successfully, begin with the right preparation and follow each step carefully. The guide also covers common issues you may encounter.
The phone considers different factors such as signal strength, Wi-Fi security level, network stability, etc. and then connects to the Wi-Fi network that it thinks is best. However, among many Wi-Fi access points, your phone may sometimes have trouble deciding which network connection.
- Install laptop to prioritize wired network connection
How Set up Wi-Fi Priority Mode on Android and iPhone Works
Fortunately, you can control this process by prioritizing the Wi-Fi network, thus ensuring that your smartphone connects to the best available Wi-Fi network. This can help you achieve consistent connectivity and smooth transition between available Wi-Fi networks. The steps below explain how to set up Wi-Fi network priority on Android devices as well as on iPhone.
Android has two ways you can perform depending on the device you have. You can try the built-in installation search and if that doesn't work, try the other option.
Some custom Android ROMs (like CyanogenMod) come in pre-set to set up Wi-Fi network priority mode. To check if you have a ROM, open Settings> Wi-Fi. Touch the menu that appears, then touch Advanced Wi-Fi . If you see the Wi-Fi Priority option, You can specify the Wi-Fi network priority.
The original Android does not have this integration option. But don't worry, you can use third-party applications to do this.
Wi-Fi Prioritizer is a free application that allows you to set up Wi-Fi connection priority on Android devices. It monitors periodically about signal strength and transfers between respective Wi-Fi networks.

After installing the app, open it and enable Enable Scheduled Job . You will see a list of all saved Wi-Fi networks. Networks on the top of the list have a higher priority than networks at the end. Here, you can drag networks in the order you want to connect to them.
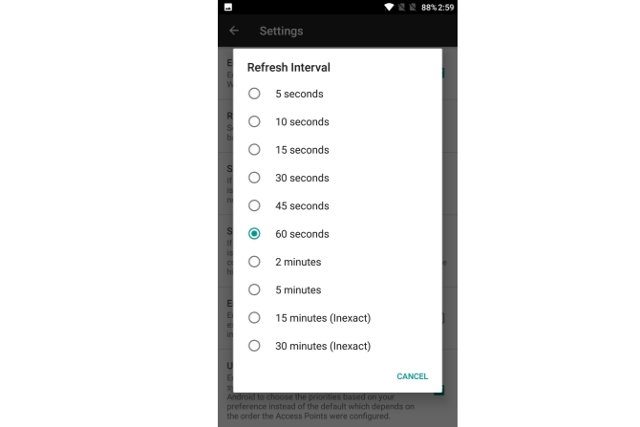
By default, it scans the new Wi-Fi network with every 60 seconds and prioritizes network switching. when needed to change the refresh time, click the menu that appears and then click Settings . Click Refresh Interval And set the time from 5 seconds to 30 minutes. Lower values will allow for faster conversion but will consume battery power.
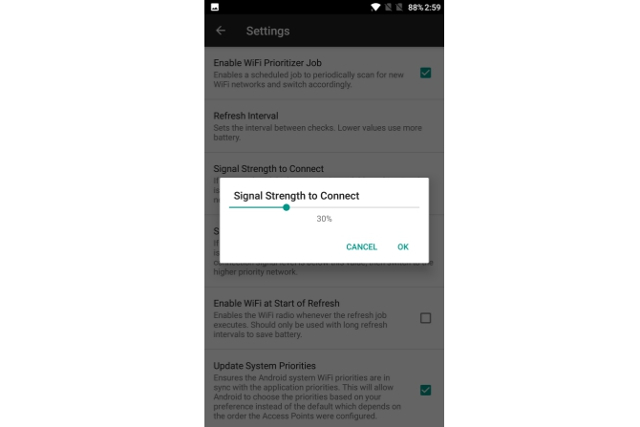
In the same settings, you can change the minimum signal strength to connect to the network. If the network has a higher priority and if a signal is better than this value it will switch to a higher priority network. It can also check Internet connection on the current network. Without an Internet connection on the current network, it will automatically switch to the next available network.
When needed to disable Wi-Fi Prioritizer, you can disable Enable Scheduled Job. To turn it off permanently, simply uninstall the app.
Download : Wi-Fi Prioritizer (Free)
There is no way to set the priority of Wi-Fi network directly on iPhone. However, if you have a Mac, you can prioritize networks on Mac and then synchronize it with your iPhone.
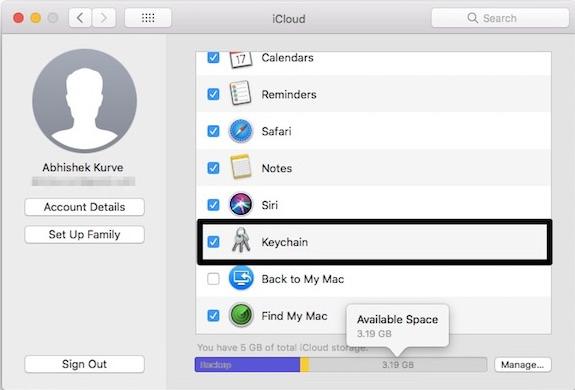
Before continuing, be sure to sign in with the same Apple ID on both devices. Also, make sure iCloud Sync is turned on. To do this, open System Preferences On your Mac. Click ICloud And make sure the Keychain Is selected.
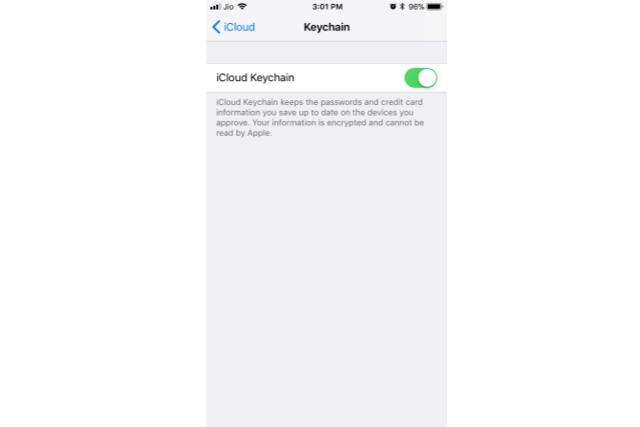
On your iPhone, open Settings And click your account avatar at the top. Navigate to ICloud> Keychain And turn on.
You can refer to the following article to know how to prioritize Wi-Fi networks on Mac: How to set up preferred Wi-Fi connection mode on Mac.
Now, your priority will be saved and then fully synchronized with the iPhone. If you're having trouble syncing them to your iPhone, please review that you're signed in with the same Apple ID on both enabled iCloud Keychain and devices.
Although this method is not too difficult, it depends on the Mac, so it is quite inconvenient. There's no denying that Mac and iPhone work together nicely, but it won't allow iPhone users to use Windows. Hopefully, Apple will soon have a way to change the preferred Wi-Fi network directly on the iPhone.
I wish you all success!
FAQ
What should I prepare before I set up Wi-Fi priority mode on Android and iPhone?
Review the requirements in the guide, confirm that your device or software is compatible, and save important work before changing settings related to set up Wi-Fi priority mode on Android and iPhone.
Why might set up Wi-Fi priority mode on Android and iPhone not work as expected?
The most common causes are incompatible versions, missing permissions, incorrect settings, or an interrupted internet connection. Recheck each step and restart the app or device when appropriate.
Can beginners follow these set up Wi-Fi priority mode on Android and iPhone steps?
Yes. Follow the steps in order, avoid skipping confirmation screens, and compare your interface with the screenshots because labels may differ slightly between versions.
Related Articles
 How to Set Up Preferred Wi-Fi Connection Mode on Mac4 minutes read
 How to Enable Priority Notifications on iPhone - Create Notification Vibration3 minutes read
 How to Play Wi-Fi from iPhone, Android to Laptop4 minutes read
 Change Traffic Traffic Through Priority Mode with Dd-wrt4 minutes read
 5 Steps to Turn Your iPhone into Wi-Fi Hotspot3 minutes read
 How to Easily Share Wi-Fi on iPhone and Android3 minutes read
Reader Comments 0
Sign in with email or Google to join the discussion.