Table of Contents
This updated guide examines How to Arrange Network Connection on Windows 10 and organizes the essential facts, background, and practical takeaways in clear American English.
- Install laptop to prioritize wired network connection
- Instructions to fix yellow exclamation computer network with only 3 steps
- How to set up Wifi priority mode on Android and iPhone
Instructions to arrange the order to connect Windows 10 network via Adapter Settings
Step 1:
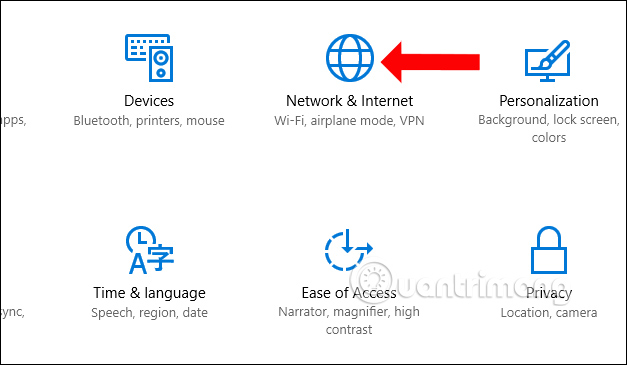
Click the Settings icon and then click Network & Internet .
Step 2:
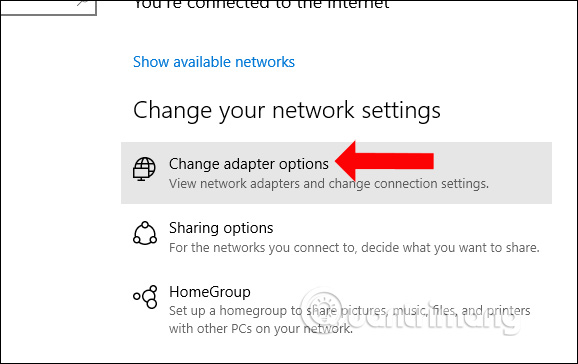
Switch to the new Status section on the left side of the interface, look to the right of the Change your network settings section and click Change Adapter options .
Step 3:
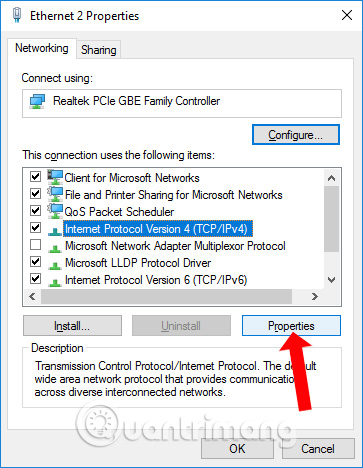
Network connections appear on the computer. You right-click on the network connection to adjust the connection priority mode and select Properties .

Step 4:
In the new interface, select Internet Protocol Version 4 (TCP / IPv4) and then click the Properties button.
Step 5:
At the next interface click on the General tab and then click on the Advanced button .
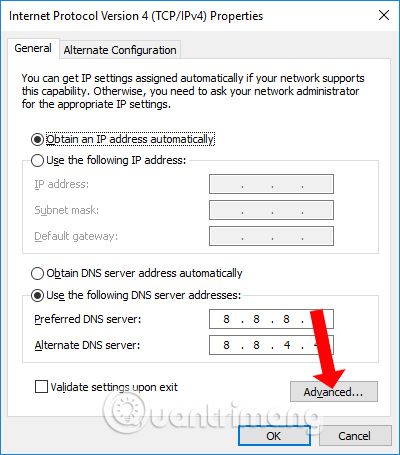
In this new interface uncheck the Automatic metric and then in Interface metric , the smaller the number, the higher the priority of the connection, the higher the lower the priority. If you enter the network connection port 5, which the WiFi connection port is 6, the wired network is prioritized to connect first.
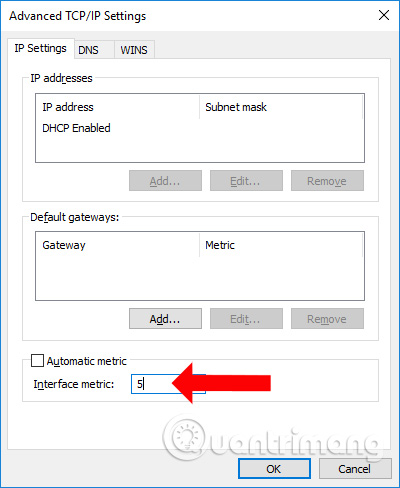
When changing the Interface metric parameter at this network connection, you also change the same parameters on other network connections to prioritize network connectivity on Windows 10. The computer will now connect to the network in order. priority that the user has set.
Use the PowerShell command to change the network connection priority
If you wish, you can also use the PowerShell cmdlet (the shortened command used in the Windows PowerShell environment) to change the priority of the network connection. In fact, if you feel comfortable using PowerShell, this option is easier than the first method. All you have to do is find the interface index (the unique identifier associated with the physical interface or logic) and set the priority level.
1. To change the priority for network connectivity through PowerShell, you need admin rights. Search for PowerShell in the Start menu and select the 'Run as administrator' option .

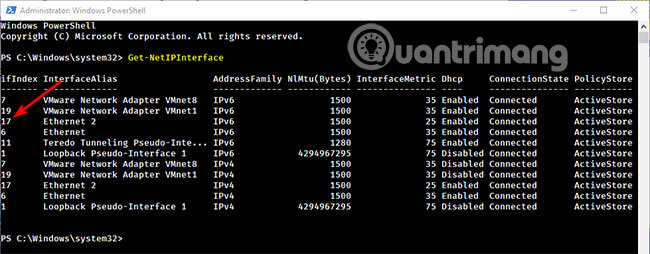
2. We need to find the interface index of the network adapter, by executing the Get-NetIPInterface and PowerShell commands that will list all network adapters. You will see the interface index number under the 'ifIndex' section. Note the number of interface indexes of the network adapter. In this example is 17.
3. Once you have the interface index number of the network adapter, use the command below. Replacement INTERFACE_INDEX equals the actual interface index number and PRIORITY with a specific priority number (less than or equal to 10).
Set-NetIPInterface -InterfaceIndex INTERFACE_INDEX -InterfaceMetric PRIORITY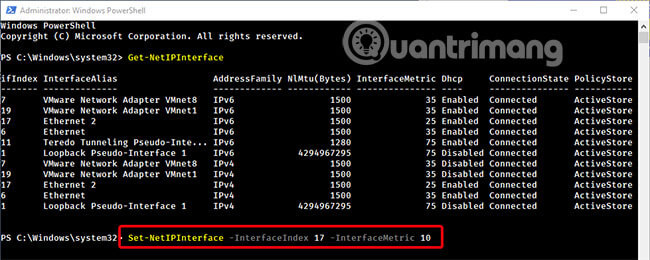
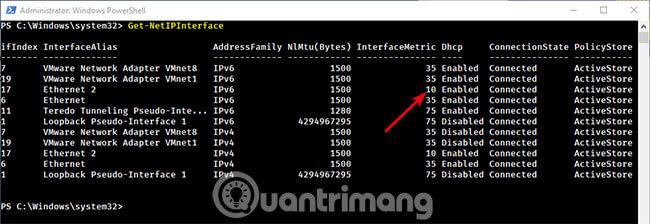
4. To verify changes, execute the cmdlet Get-NetIPInterface. As you can see, the priority for network connectivity has changed from 25 to 10.
5. Restart the system to apply the changes.
6. In the future, if you want Windows to handle network connection priority, just execute the command below. Remember to replace INTERFACE_INDEX with the actual index interface of network adapter.
Set-NetIPInterface -InterfaceIndex 21 -AutomaticMetric enabled:
- How to turn on WiFi on Windows 10
- How to change Wifi password on computer, phone
- Fix Wifi error disconnected on Windows 10, 8, 7 and Vista
I wish you all success!
FAQ
What is How to Arrange Network Connection on Windows 10 about?
It provides a structured overview of wifi connection windows 10, explains the main context, and highlights practical takeaways for readers.
Why does this topic matter?
Understanding the main concepts helps readers evaluate the issue, avoid common mistakes, and make better-informed decisions.
How should readers use this information?
Use the guidance as a practical starting point, confirm details that may have changed, and follow current product, safety, or security recommendations.
Related Articles
 How to Share Internet Connection: Turn Windows 8 Laptop Into4 minutes read
 How Do Private Network and Public Network on Windows Differ?6 minutes read
 Common Network Connection Errors and Solutions5 minutes read
 Some Troubleshooting Tips for Windows Network15 minutes read
 Speed Up 802.11n Connection for Windows XP4 minutes read
 How to Check the Speed of the Network Card on Windows 105 minutes read
Reader Comments 0
Sign in with email or Google to join the discussion.