Table of Contents
This guide explains how to install Miracast Connect App on Windows 10, with clear steps, practical tips, and important checks before you begin.
Previously, the Connect app was pre-installed by default, but starting with Windows 10 version 2004, it is an optional feature that you have to manually install to connect to compatible devices. Miracast.
In this guide, you will learn the steps to install Wireless Display feature to restore Connect apps on Windows 10.
Install the Connect app on Windows 10
To install the optional Wireless Display feature and add the Connect app, follow these steps:
Step 1. Open Settings.
Step 2. Click Apps.
Step 3. Click on Apps & features .
Step 4. Click on the Optional features option .
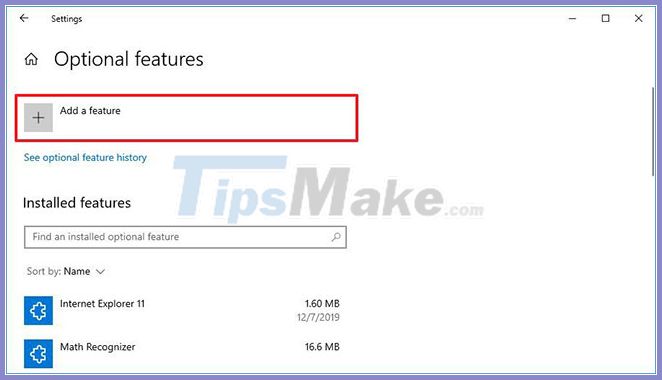
Step 5. Click the Add a feature option .
Step 6. Search for Wireless Display and select an optional feature.
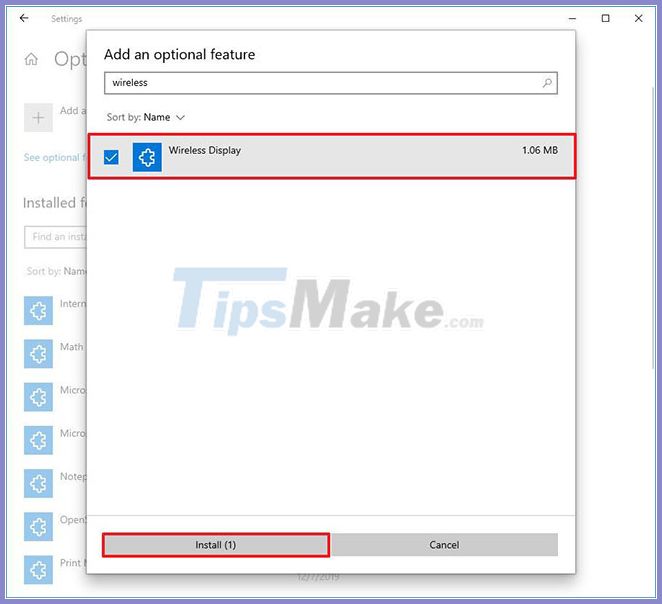
Step 7. Click the Install button .
Once you've completed the steps, the feature will be installed and the Connect app will be restored on Windows 10.
Uninstall the Connect app on Windows 10
To uninstall the Connect app on Windows 10, follow these steps:
Step 1. Open Settings.
Step 2. Click Apps.
Step 3. Click on Apps & features .
Step 4. Click on the Optional features option .
Step 5. Select the Wireless Display option .
Step 6. Click the Uninstall button .

After you complete the steps, the Miracast Connect feature will be removed from Windows 10.
FAQ
What should I know about Install Miracast Connect App on Windows 10?
Focus on the key features, requirements, limitations, and practical use cases explained in this guide.
How do I get the best results with Install Miracast Connect App on Windows 10?
Follow the recommended steps, use current software or information, confirm compatibility, and review settings before major changes.
Are there any risks or limitations?
Potential limitations depend on compatibility, data quality, cost, privacy, support, and how the product or method is used.
Related Articles
 What Is Miracast Connect? on Which Device? Instructions on7 minutes read
 What Is Miracast? How to Use Miracast to Stream Media?10 minutes read
 How to Connect PC to TV Without Wires: Step-by-Step Guide8 minutes read
 What Is the Difference Between Chromecast and Miracast?9 minutes read
 How to Project Android Screen on Windows 10 with Miracast and Connect?8 minutes read
 Check If Your Windows Computer Supports Miracast: Step-by-Step Guide10 minutes read
Reader Comments 0
Sign in with email or Google to join the discussion.