Table of Contents
Overview
This guide explains how to disable or remove hyper-v on Windows 11 in clear, practical terms. It covers the key concepts, recommended steps, common limitations, and useful checks so you can make a better-informed decision.
Hyper-V comes pre-installed on Windows 11 computers. While the virtualization tool isn't available on the Home edition of the operating system, you can install it using a batch script.
Unfortunately, Hyper-V can conflict with third-party applications on your PC. As a result, you may encounter Hyper-V-related errors when trying to launch an application, PC game, or hardware tuning utility.
Fortunately, you can disable Hyper-V in Windows 11 with the help of the classic Windows Features dialog, Command Prompt, and PowerShell.
How to Check if Hyper-V is Running on Windows 11

You can access the System Information application to determine whether Hyper-V virtualization is running. This is useful if you need to verify the status of Hyper-V after disabling it.
To check the current Hyper-V status on your computer:
1. Press Win + R to open Run.
2. Type msinfo32. exe and click OK to open the application.
3. Next, check if the following entry is available at the bottom of the details tab:
4. Hypervisor has been detected. Features required for Hyper-V will not be displayed.
5. If so, you will need to disable Hyper-V, Memory integrity, and Credential Guard features, as discussed below to use other virtualization tools without any trouble.
How to Disable Hyper-V on Windows 11
1. Disable Hyper-V via the Windows Features dialog box
The Windows Features dialog box lets you add additional features that are disabled by default in Windows 11. You can also use this dialog box to disable some advanced features, including Hyper-V.
Note that to fix Hyper-V related errors, you will need to disable Virtual Machine Platform and Windows Hypervisor Platform in addition to Hyper-V.
To disable Hyper-V using the Windows Features dialog box:
B1: Press Win + R to open the Run dialog box.
B2: Type control and click OK to open Control Panel.
B3: In Control Panel, click Programs.
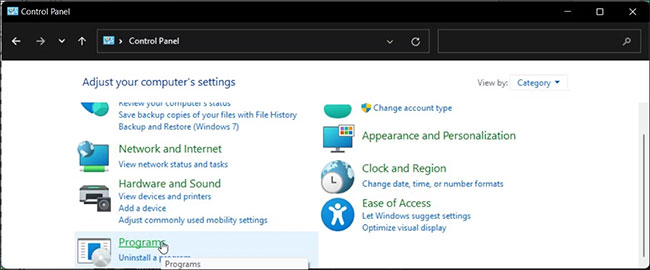
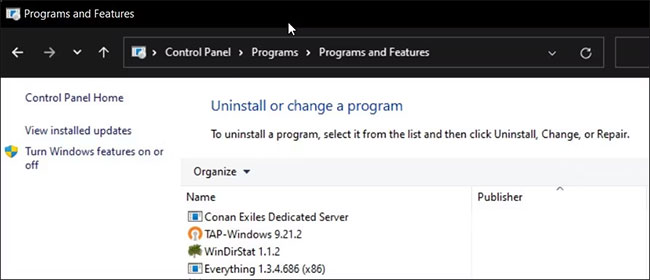
B4: Next, click on Programs and Features.
B5: In the left pane, click Turn Windows features on or off.
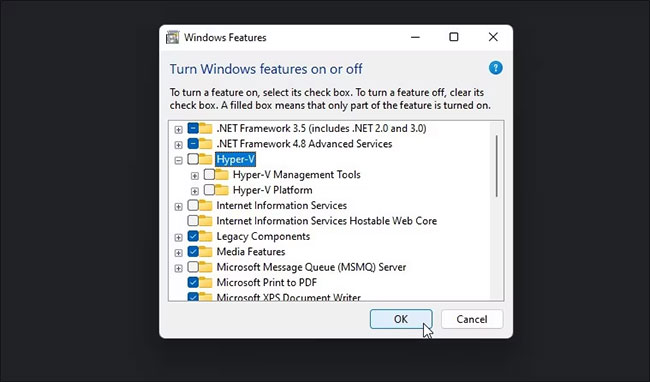
B6: In the Windows Features dialog box, find Hyper-V.
B7: Uncheck the Hyper-V option to disable this feature.
B8: Next, scroll down and look for the Virtual Machine Platform and Windows Hypervisor Platform options.
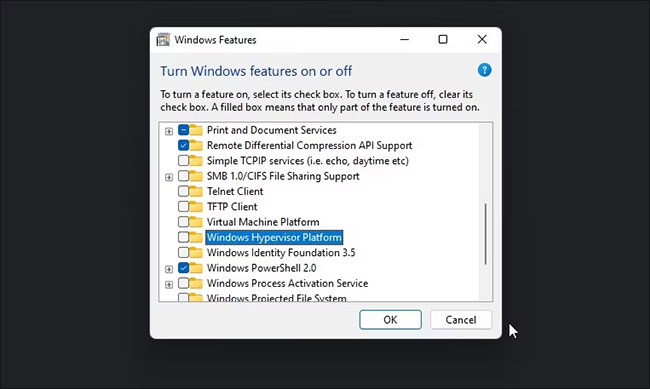
B9: Uncheck both options and click OK.
B10: Windows will uninstall Hyper-V and other features from your system.
B11: Once done, restart your PC to apply the changes.
2. How to disable Hyper-V using BCDEDIT

You can disable Hyper-V in the boot configuration using the BCDEdit tool. Useful if you just want to disable Hyper-V rather than uninstall it completely.
To disable Hyper-V using BCDEdit:
B1: Press the Win key and type cmd.
B2: Right-click on Command Prompt and select Run as administrator.
B3: In the Command Prompt window, type the following command and press Enter:
bcdedit /set hypervisorlaunchtype offB4: When the success message appears, close Command Prompt and restart your PC to apply the changes.
B5: If you need to re-enable Hyper-V, use the following command:
bcdedit /set hypervisorlaunchtype autoB6: Make sure to restart your PC to apply the changes.
Additionally, you can use the BCDEdit tool to perform other advanced tasks, such as removing old boot menu options and adding a Safe Mode shortcut to the Windows 11 boot menu.
3. How to uninstall Hyper-V using Command Prompt
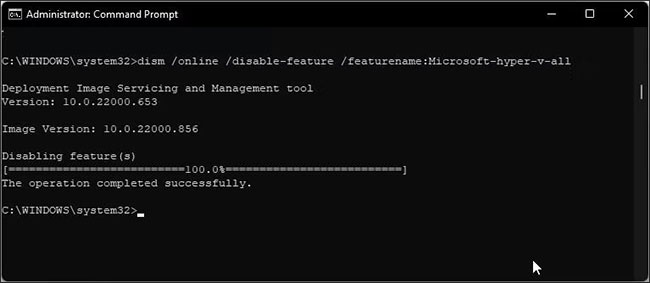
If the Windows Features dialog box doesn't remove Hyper-V, you can use the Command Prompt to disable the hypervisor. Here's how to do it.
Step 1: Open Command Prompt with admin rights.
B2: In the Command Prompt window, type the following command and press Enter:
dism /online /disable-feature /featurename:Microsoft-hyper-v-allB3: After execution, the DISM tool will disable Hyper-V and display a message that the operation has been completed successfully.
B4: Type exit to close Command Prompt and restart your PC.
After rebooting, you should be able to run your game and other hypervisors without errors.
If not, open the Windows Features dialog box, disable the Virtual Machine Platform and Windows Hypervisor Platform options, and then restart your PC.
4. How to disable Hyper-V using PowerShell

If you prefer PowerShell, you can use the WindowsOptionalFeature cmdlet to disable Hyper-V in Windows 11. To do this, you need to launch PowerShell with admin rights and execute the command. Here's how to do it.
B1: Press the Win key and type powershell.
B2: Right-click on PowerShell and select Run as administrator.
B3: Click Yes when prompted by User Account Control.
B4: In the PowerShell window, copy and paste the command below and press Enter:
Disable-WindowsOptionalFeature -Online -FeatureName Microsoft-Hyper-V-AllB5: Wait for the process to complete. Once done, close PowerShell and restart your PC to apply the changes.
Hyper-V is a great utility if you want a modern virtualization solution. However, it is not without its flaws. Many third-party hypervisors, including VirtualBox and WMware Workstations, do not work with Hyper-V enabled.
If you are unsure which hypervisor to use, check out our comparison of three popular virtualization tools below in the additional links section to help you determine the best one.
Key Takeaways
Use the guidance above as a practical reference for disable or remove hyper-v on Windows 11. Check compatibility, follow the steps carefully, and verify important details with official documentation when software, security, accounts, health, or purchases are involved.
FAQ
How do I disable or remove hyper-v on Windows 11?
Follow the steps in this guide in order, confirm each setting before continuing, and save, restart, or reconnect the device when the instructions require it.
What should I check before I begin?
Confirm the correct device, account access, software version, compatibility, and a current backup whenever the process could affect files, settings, or security.
What should I do if the process does not work?
Repeat the steps carefully, check for model or version differences, install available updates, and consult the manufacturer's official support documentation.
Related Articles
 How to Turn Off Hyper-v on Windows 10, Disable Hyper-v4 minutes read
 Disable, Remove Notification Icon Get Windows 104 minutes read
 How to Check If Your Computer Is Running Windows 10 Hyper-v?4 minutes read
 How to Enable and Use Hyper-V on Windows 10: Complete Guide7 minutes read
 How to Fix Hyper-V Error 0x8009030e in Windows8 minutes read
 Create Virtual Machines with Hyper-v on Windows 8 and Windows 1016 minutes read
Reader Comments 0
Sign in with email or Google to join the discussion.