How to fix Hyper-V error 0x8009030E in Windows
Hyper-V error 0x8009030E occurs during failed authentication when attempting to establish a connection between the Hyper-V host and the virtual machine. It is often related to incorrect or mismatched security credentials.
The following article will guide you through various solutions that you can try to fix the error permanently. Before you proceed, however, you should thoroughly verify the credentials you're using to establish a connection to the Hyper-V server. This precaution ensures that the error is not caused by incorrect or mismatched login credentials on your part.
1. Run Hyper-V Manager with admin rights
Some actions in Hyper-V, such as modifying settings, creating virtual networks, or accessing configuration options require admin access to the tool. In some cases, encountering error 0x8009030E may indicate that you lack the necessary privileges.
This is why the article recommends that you start troubleshooting by making sure that you have the appropriate permissions needed to execute the targeted task.
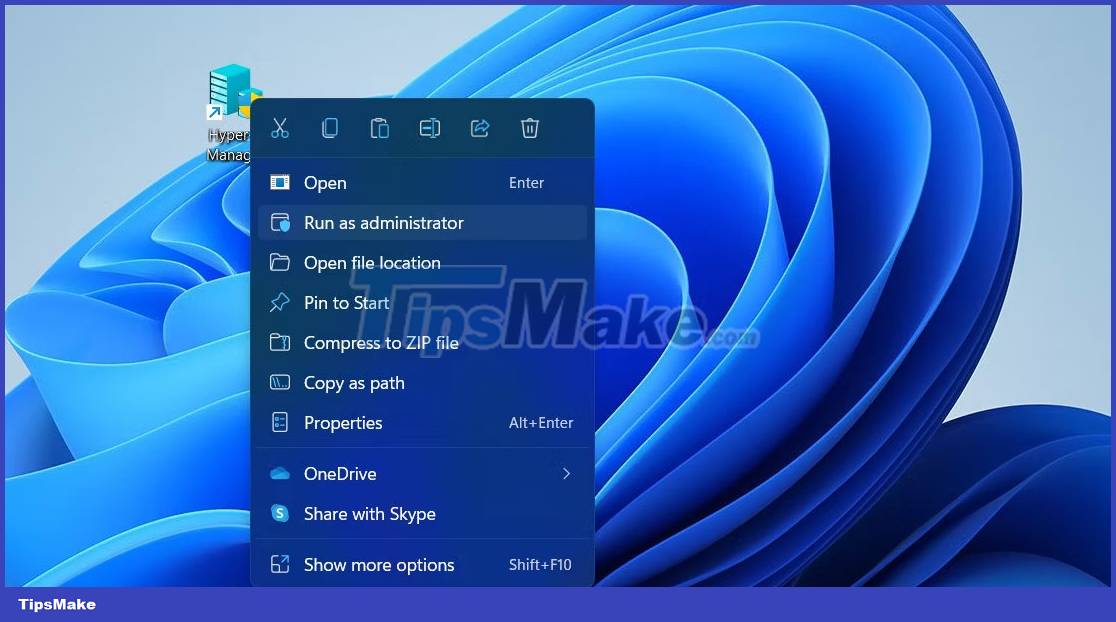
You can do this by logging into Windows with admin rights first if you're currently using a standard account. Once booted, right-click the Hyper-V Manager shortcut and select Run as administrator from the context menu.

Confirm your action in the User Account Control prompt and check if the problem is resolved.
2. Set up Kerberos Delegation
If the lack of admin access isn't causing the problem, the next course of action would be to address authentication-related issues.
To do this, we will configure Kerberos Delegation, which is a feature that allows the program to use the client's security credentials when needed, on behalf of the client. Without the correct Kerberos Constrained Delegation, it can lead to some validation errors just like the current one.
In this method, we will first access the list of all the services and resources for which the computer account is allowed to delegate credentials. If Hyper-V related services are not included in the output, it means that Kerberos Delegation may be missing or not configured properly.
In that case, we will proceed to enable and configure it, before testing the connection again. Follow these steps to continue:
1. Press the Win + S key combination to open the Windows Search utility.
2. Type "Powershell" and click Run as administrator to launch Powershell with admin rights.
3. Click Yes in the User Account Control prompt.
4. Once you are in the Powershell window, execute the command below. Replace ComputerAccount with the name of the computer account for which you want to test Kerberos Delegation.
Get-ADComputer -Identity [ComputerAccount] -Properties msDS-AllowedToDelegateTo | Select-Object -ExpandProperty msDS-AllowedToDelegateTo5. This command will display a list of services or resources for which the selected account is allowed to delegate credentials. Review the output to see if Hyper-V related services are included. If it doesn't include those services, Kerberos Delegation may be missing or misconfigured.
6. In that case, launch the Active Directory Users and Computers management console .
7. Locate the targeted computer account and right click on it.
8. Select Properties from the context menu.
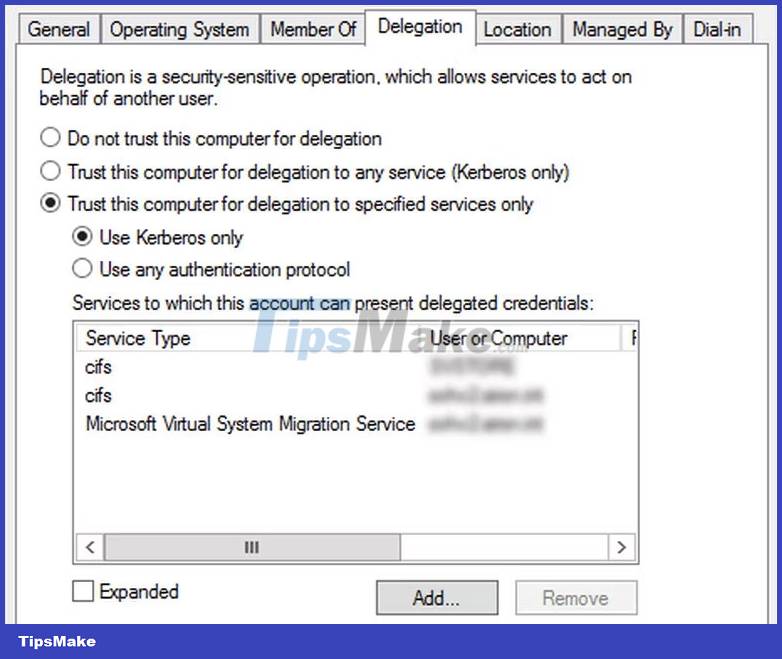
9. Now, go to the Delegation tab and enable the option Trust this computer for delegation to specified services only .
10. Enable Use Kerberos only option .

11. Click Apply > OK to save the changes and repeat the steps for the host computer.
12. Once done, test the connection to see if the problem is resolved.
3. Change account options
You may also experience problems if the Account is sensitive and cannot be delegated option is enabled in the properties of the targeted account.
Here's how you can check if the feature is causing the problem and disable it:
- Access the properties of the targeted account by following the steps described above.
- In the Properties dialog box , go to the Account tab and go to the Account options section .
- Uncheck the option Account is sensitive and cannot be delegated and click Apply > OK to save the changes.

4. Check your firewall and antivirus settings

Firewalls and anti-virus programs are known to be capable of disrupting communication between different components and services. However, this could also be the case with the Hyper-V error you are experiencing.
To resolve this issue, it is important to review your firewall and anti-virus software configuration. These programs may be intercepting network traffic needed for proper authentication and communication between the Hyper-V host and other components.
However, it's important to note that the specific steps to check these settings will vary, depending on the security program you're using. You can refer to the official documentation provided by the developer or contact the official team for support.
If you can't locate these settings, you can also try temporarily disabling Windows Security and then taking the action that caused the initial error. If the problem does not appear after disabling the security program, consider whitelisting Hyper-V and its components in the application to avoid such problems in the future.
5. Updating Hyper-VOR Integration Components
Integration components are a set of drivers and services that help establish functionality and seamless communication between virtual machines (VMs) and Hyper-V hosts.
These services need to be updated to ensure they function properly and are not contributing to the current problem.
Here's how you can do it:
- Launch Hyper-V Manager and select the virtual machine for which you want to update these components.
- Right click on the VM and select Connect .
- Now go to the Action menu and select Insert Integration Services Setup Disk .
- Navigate to the setup file and follow the on-screen instructions to continue.
- Once the installation is complete, restart the VM and check if the problem is fixed.
You should read it
- ★ How to install Hyper Terminal in Ubuntu 20.04
- ★ How to turn off Hyper-V on Windows 10, disable Hyper-V
- ★ How to fix the problem of not being able to start Windows 11 after enabling Hyper-VOR
- ★ Create virtual machines with Hyper-V on Windows 8 and Windows 10
- ★ How to import Hyper-V virtual machines in Windows 10