Table of Contents
Instructions for Using Hyper-v on Windows 8 (Part 1) is easier to understand when the core ideas are paired with practical examples. The sections below explain the topic clearly, highlight useful steps, and point out details that can prevent common errors.
TipsMake.com - One of the new features on Windows that is most noticeable is the Hyper-V virtualization program to meet users' need to create Windows virtual machines. The article will guide readers to activate and use the program on Windows 8.
First of all, the user's computer must support Hyper-V. This means that users need a 64 bit system with compatible hardware and BIOS for virtualization. In addition, we will need at least 4GB of RAM (or as much RAM as possible) if you want to run multiple virtual machines simultaneously. Fortunately, if you want to test a Server operating system, Windows 8 provides a Server Core feature that allows memory savings. In addition, Windows Server 2012 adds support for Hyper-V because users can install and configure the operating system with a GUI but can then remove this GUI and only keep the Server Core system.
Next, we need to configure Windows 8 to allow running Hyper-V. The program is not installed by default when installing Windows 8. Instead, users will need to activate a feature in Windows. First, open the Control Panel and click Programs . Finally, select Turn Windows features on or off .
A dialog box appears along with the available features of Windows. Scroll down to Hyper-V and check the items you want to install.
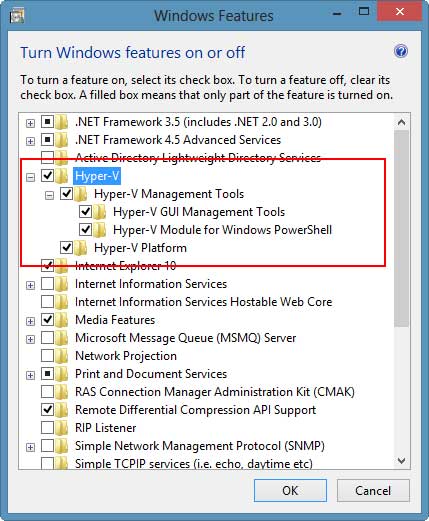
Add or remove other features if needed. Then click OK . The Hyper-V feature will require a reboot.

If you have a version that supports PowerShell, users will see a new module.

After restarting the computer, open Hyper-V Manager .


As you can see in the picture, there are no virtual machines created or configured. Click Hyper-V Settings to check the default configuration.
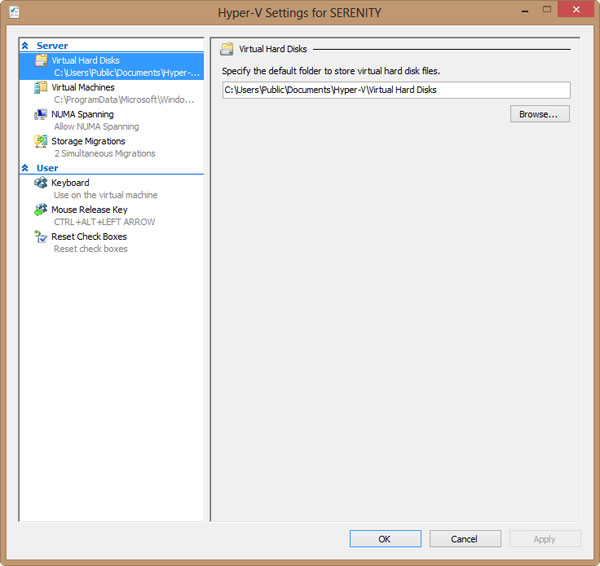
The basic settings that users often change are the default location for VHDs and virtual machines. We can create disks and virtual machines in multiple locations or simply keep as default. One more thing we might want to consider is to choose a path if we do a backup. After changing, click Apply or OK .
In the next lesson, we will explore some additional configurations and create a virtual machine.
FAQ
What is Instructions for Using Hyper-v on Windows 8 (Part 1)?
TipsMake.com - One of the new features on Windows that is most noticeable is the Hyper-V virtualization program to meet users' need to create Windows virtual machines.
Why is Instructions for Using Hyper-v on Windows 8 (Part 1) important?
A clear understanding of Instructions for Using Hyper-v on Windows 8 (Part 1) helps you make informed decisions, avoid common mistakes, and use the relevant tools or techniques more effectively.
How should beginners approach Instructions for Using Hyper-v on Windows 8 (Part 1)?
Start with the fundamental concepts, follow the examples step by step, and test each change in a safe environment before applying it to important systems or data.
Related Articles
 Create Virtual Machines with Hyper-v on Windows 8 and Windows 1016 minutes read
 How to Check If Your Computer Is Running Windows 10 Hyper-v?4 minutes read
 Virtual Network for Hyper-v -- Part 29 minutes read
 How to Turn Off Hyper-V Windows 10 to Help VirtualBox Run Smoothly4 minutes read
 How to Enable and Use Hyper-V on Windows 10: Complete Guide7 minutes read
 How to Fix Hyper-V Error 0x8009030e in Windows8 minutes read
Reader Comments 0
Sign in with email or Google to join the discussion.