How to install a virtual machine on Windows 11 using Hyper-V Manager
If you want to have a separate environment to test some potentially dangerous software, or try out some new versions of Windows without wanting them to be involved with the data on your current computer, then install a virtual machine on your computer. Windows 11 with Hyper-V Manager is the most optimal way to help you solve such problems.
Using a virtual machine is a solution that helps you make changes in the system and test software that is at risk of virus infection without damaging the main machine you are using. If you are using Windows 11 , you can now install a virtual machine yourself without downloading and using other software.
How to use Hyper-V Manager to create virtual machines on Windows 11
I. Instructions for installing virtual machines directly on Windows 11
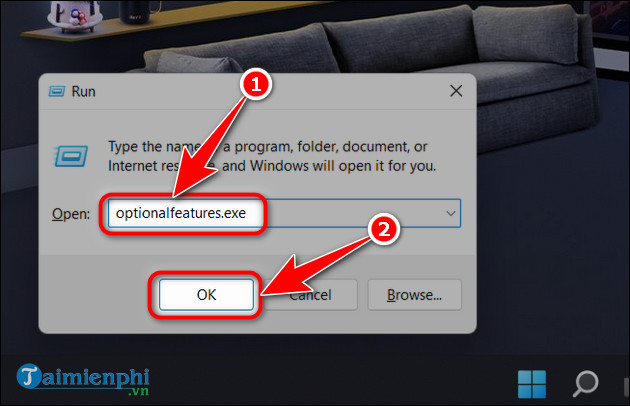
Step 1: Press the Windows + R key combination to open the Run dialog box.
Step 2: Enter optionalfeatures.exe and click OK .
Step 3: In the Windows Features window , select the items in Hyper-V => click OK .

Step 4: Click Restart Now to apply the settings.

Step 5: After the computer restarts. Press the Windows+S key combination , enter Hyper-V => select Hyper-V Manager .

Step 6: Right- click your computer name => select New => Virtual Machine. .

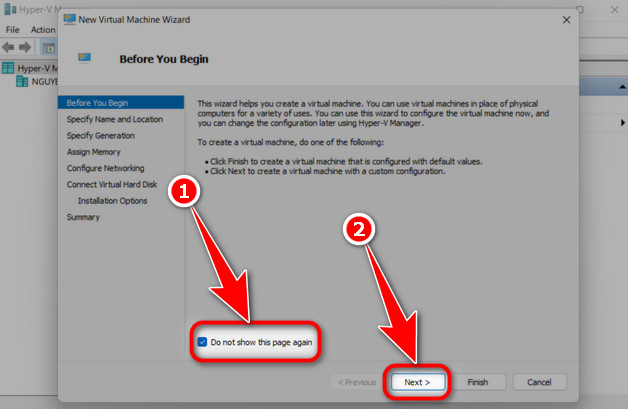
Step 7: The Before You Begin window appears. Click Next to continue.
- Note: You can check the Do not show this page again box to not display this window again the next time you use it.
Step 8: In the Name box , give your virtual machine any name . If you want to change the virtual machine storage location , check Store the virtual machine in a different location => click Browse => Select storage location => Click Next to continue.

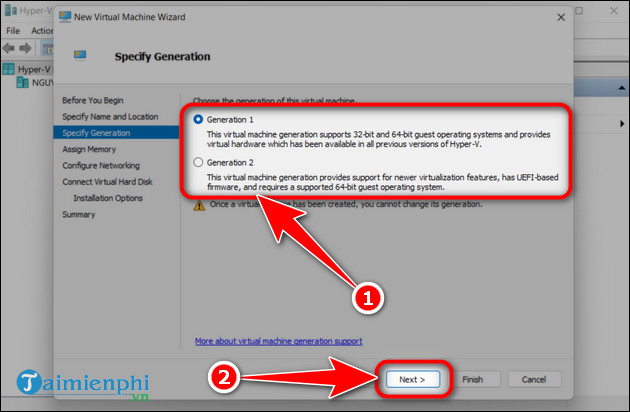
Step 9: You choose 1 of 2 options here => Click Next .
- Generation 1: Virtual machines will support old versions of 32 bit and 64 bit
operating systems. - Generation 2: Virtual Mac will only support the latest 64 bit operating system version.
Step 10: In the Startup memory section , enter the amount of RAM for the virtual machine. Select Use Dynamic Memory for this virtual machine => Click Next .
- Note:
+ You should give the virtual machine at least 2048MB for the virtual machine to operate smoother and more stable. If your computer only has 4GB of RAM, you can use less. + Use Dynamic Memory for this virtual machine
should be checked . This item has the effect of allowing the virtual machine to use more RAM than you initially set in case it is necessary.

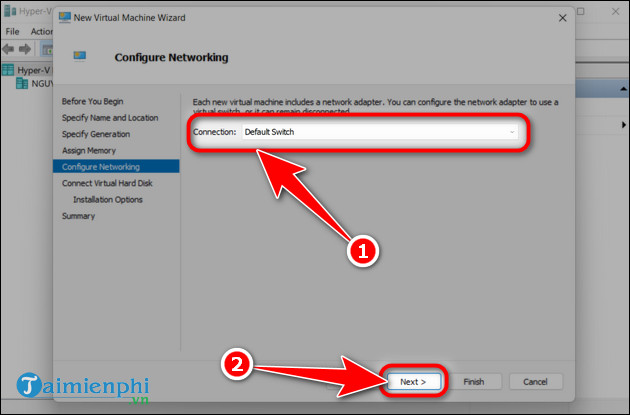
Step 11: In the Connection menu , select Default Switch => Click Next .
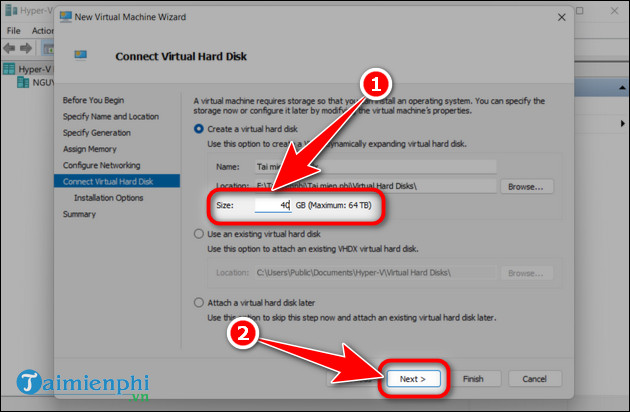
Step 12: Select Create a virtual hard disk . In the Size section , fill in the hard drive capacity you want to share with the virtual machine (maximum 64TB). Click Next to continue.
- Note: The 32-bit version of Windows requires 16GB of disk space, while the 64-bit version requires 32GB . So you need to allocate disk space according to the operating system you plan to install on your virtual machine.
+ Use an existing virtual hard disk: Use a previously created virtual hard drive.
+ Attach a virtual hard disk later: Use this option to temporarily skip this step and want to divide the capacity later.
Step 13: Select Install an operating system from bootable image file => Click Browse to select the Win file to run on the virtual machine => Click Next .
- Install an operating system later: Install the operating system later.
- Install an operating system from a network-based installation server: Install the operating system via the network.

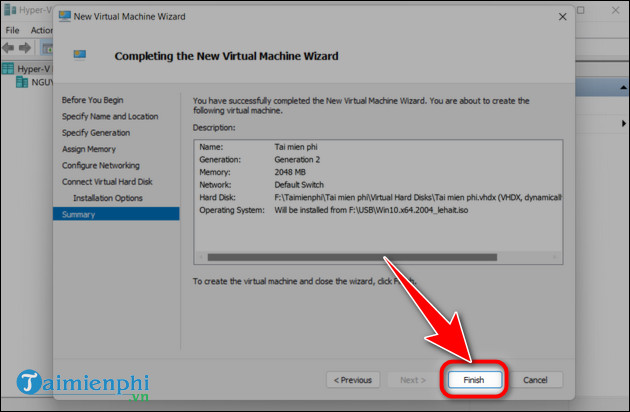
Step 14: Review the detailed parameters of the virtual machine and click Finish to proceed with creating the virtual machine.
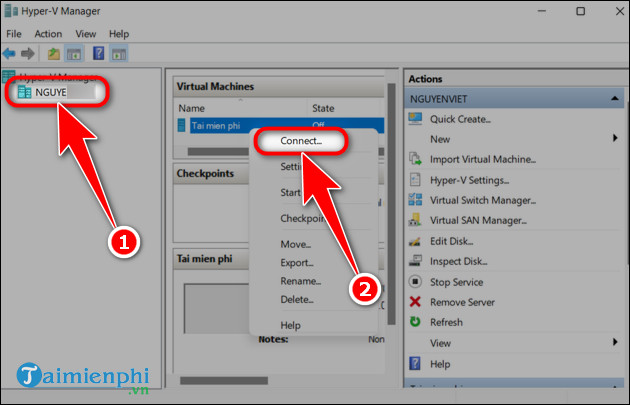
Step 15: After the installation process is complete. Go back to Hyper-V Manager => right click on the virtual machine you just created, select Connect .
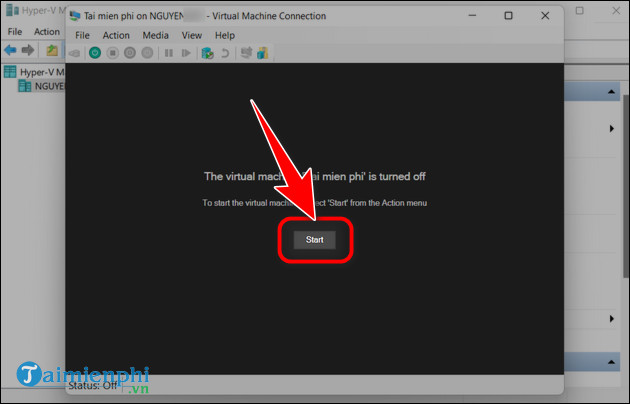
- Click Start to launch the virtual machine.
II. Benefits of using Hyper-V Manager virtual machine on Windows 11
- Cost savings: You do not need to buy additional physical resources but can still use the virtual environment and perform functions on it, just like a real computer.
- Perfect security: Any changes in the virtual machine will be encapsulated and will not affect your main machine. So you can run any potentially malicious program or make high-risk system changes.
- Scalability: You can install and test many different operating systems without worrying about data conflicts. Everything on virtual machines will disappear when you delete them.
III. Notes when using virtual machines on Windows 11
- Data storage: If you store information on a virtual machine, when you delete the virtual machine, it will also delete all information and data on that virtual machine.
- Taking up computer resources: If the computer has a low hardware configuration but installs too many virtual machine programs, the computer will slow down and affect other programs.
- Connectivity between the main machine and virtual machine: Due to focusing on one computer, if the main machine breaks down, all virtual computers set up on it will also be affected.
- Compatibility: For Hyper-V virtual machines, some Windows Home editions will not be available or cannot be used.
So, you have created your own virtual machine. Now you can install applications or change system settings, etc. without affecting your main device. If you cannot use Hyper-V, you can install a virtual machine using VMware so you can use it to do the same things as on a Hyper-V virtual machine.
- Install Ubuntu on Windows 8
- How to import Hyper-V virtual machines in Windows 10
- How to export Hyper-V virtual machines in Windows 10
- Instructions for installing Hyper-V
- Use Quick Migration to move virtual machines between Hyper-V hosts
- How to check if your computer is running Windows 10 Hyper-V?
- Install Hyper-V Virtualization on Windows Server 2008 R2
- Install and configure Hyper-V Tools for remote management
- Steps to change Taskbar position on Windows 11
- Download Ghost Windows 11 Pro Full Soft v1.0 Best New Standard 2021
- How to report Windows 11 errors, suggest Windows 11 features for Insider Preview users
- List of MSI motherboards that support Windows 11
- Steps to open Local Security Policy on Windows 10, Windows 11
- How to use Explorer Patcher, a tool to bring Windows 10 Taskbar to Windows 11
- How to bypass TPM 2.0 requirement when installing Windows 11?
- Download Ghost Windows 11 Pro No Soft v1.0 2021
- How to disable Sleep mode on Windows 11
- How to open multiple images side by side for comparison on Windows 11


-
 How to quickly and easily open the virtual keyboard on your computer.
-
How to enable the virtual Home button on a Samsung phone.
-
How to quickly open the virtual keyboard on a Macbook
-
Sharing data between a physical machine and a virtual machine on VirtualBox.
-
Create a virtual drive using UltraISO on your computer.
-
How to install PowerISO and create a virtual drive on your PC.
 How to quickly and easily open the virtual keyboard on your computer.
 How to enable the virtual Home button on a Samsung phone.
 How to quickly open the virtual keyboard on a Macbook
 Sharing data between a physical machine and a virtual machine on VirtualBox.
 Create a virtual drive using UltraISO on your computer.
 How to install PowerISO and create a virtual drive on your PC.