Table of Contents
This practical guide walks through how to turn off hyper-v on Windows 10, disable hyper-v, explains the main requirements, and highlights common issues that may appear along the way.
1. How to turn off Hyper-V using Control Panel
To disable Hyper-V using the Control Panel, follow these steps:
- Press Windows + R to open Run.
- Click appwiz.cpl and then press Enter to open the Programs and Features editing window.
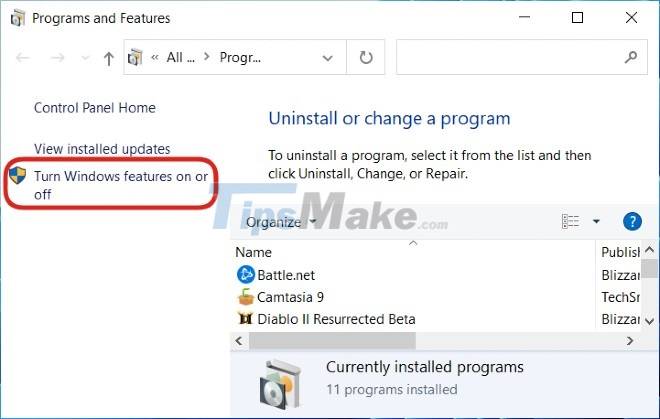
- In this window, find and click Turn Windows features on or off.
- Next, expand the Hyper-V > Hyper-V Platform folder and uncheck Hyper-V Hypervisor. Or you can simply uncheck the Hyper-V folder.
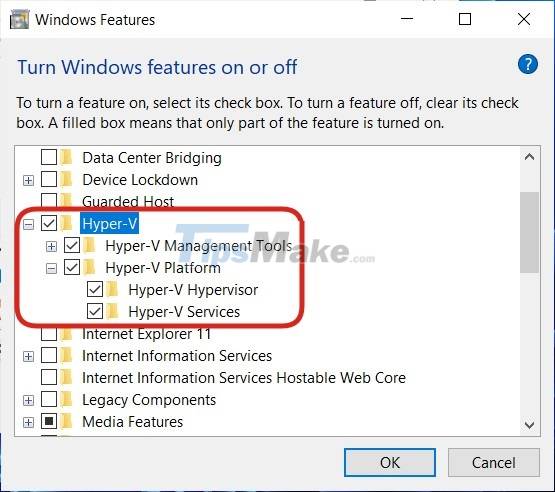
Now exit the Control Panel and restart the computer.
2. Disable Hyper-V using PowerShell
To disable Hyper-V using PowerShell, follow these steps:
- Press Windows + R to open the Power User menu.

- Press A to open PowerShell as admin.
- You copy the following command line and paste it into PowerShell and press Enter:
Disable-WindowsOptionalFeature -Online -FeatureName Microsoft-Hyper-V-Hypervisor
- If you need to re-enable Hyper-V, just replace Disable in the command with Enable.
- You wait for the command to finish running and then restart the computer.

3. How to turn off Hyper-V using Registry Editor
Before interfering with the Registry, you should back it up to make sure that there are no unfortunate problems.
To disable Hyper-V using Registry Editor, follow these steps:
- Press Windows + R to open Run, type notepad and press Enter to open Notepad.
- Copy and paste the following code into Notepad:
Windows Registry Editor Version 5.00 [HKEY_LOCAL_MACHINE|SYSTEM|CurrentControlSet|Control|DeviceGuard] "RequireMicrosoftSignedBootChain"=dword:00000000 [HKEY_LOCAL_MACHINE|SYSTEM|CurrentControlSet|Control|DeviceGuard|Scenarios] [HKEY_LOCAL_MACHINE|SYSTEM|Control|CurrentControl| ] "WasEnabledBy"=dword:00000000 "Enabled"=dword:00000000

- Click File and then select Save As.
- Choose a place to save the file then name the file with the .reg extension, for example Disable_HyperV.reg.
- Select All File from the Save as type list.
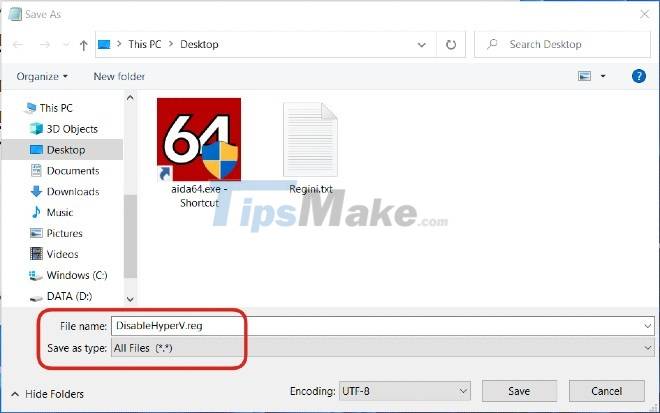
- Double-click the file you just saved to edit the Registry Editor.
- If you need to confirm, click Run > Yes (UAC) > Yes > OK.

- If you like, you can delete the .reg file after you're done.
Above are three ways to disable Hyper-V on Windows 10. Good luck!
Key Takeaways
Use the information above as a practical reference for how to turn off hyper-v on Windows 10, disable hyper-v. Review each step carefully, confirm any requirements, and choose the option that best fits your situation.
FAQ
What does this guide explain about Turn Off Hyper-v on Windows 10, Disable Hyper-v?
It explains the main concepts, practical considerations, and useful steps related to turn off hyper-v on Windows 10, disable hyper-v without requiring advanced knowledge.
Who can benefit from learning about Turn Off Hyper-v on Windows 10, Disable Hyper-v?
This information is useful for readers who want a clear overview, practical guidance, and reliable steps related to turn off hyper-v on Windows 10, disable hyper-v.
What should I check before applying this information?
Review the requirements, confirm that your device, software, or situation matches the instructions, and back up important data before making major changes.
Related Articles
 How to Disable or Remove Hyper-V on Windows 11: Step-by-Step Guide7 minutes read
 How to Check If Your Computer Is Running Windows 10 Hyper-v?4 minutes read
 How to Turn Off Hyper-V Windows 10 to Help VirtualBox Run Smoothly4 minutes read
 How to Enable and Use Hyper-V on Windows 10: Complete Guide7 minutes read
 How to Fix Hyper-V Error 0x8009030e in Windows8 minutes read
 Create Virtual Machines with Hyper-v on Windows 8 and Windows 1016 minutes read
Reader Comments 0
Sign in with email or Google to join the discussion.