How to Disable Internet Connection Sharing in Windows 11
When Internet connection sharing is enabled on a computer, any other computer on the LAN can access the Internet. While this is a great feature for sharing Internet, it also poses some risks to users..
When Internet connection sharing is enabled on a computer, any other computer on the LAN can access the Internet on the computer without permission or any specialized software. While this is a great feature for Internet sharing, it also poses risks to users in some cases. Here is a guide to disable Internet connection sharing in Windows 11.
Disable Internet Connection Sharing via Control Panel
Step 1:
Press the Windows + R key combination and enter the keyword ncpa.cpl to access.

Step 2:
Display the Network Connections interface . Right-click on the connected network adapter and select Properties .

Step 3:
Display the new interface, the user clicks on Sharing . Then we uncheck Allow other network users to connect through the computer's internet connection and click OK below.

How to Disable Internet Connection Sharing via Windows Services
Step 1:
You enter the keyword Services in the search bar and then click on the displayed result to access Windows Services.

Step 2:
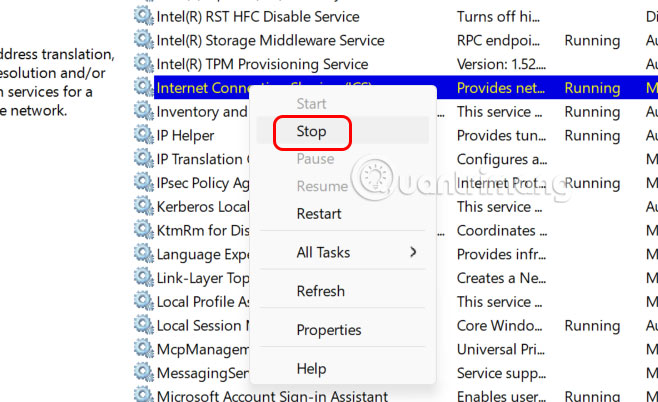
In the newly displayed interface, users look for the Internet Connection Sharing (ICS) service .

We will right - click on this value and select Stop in the displayed list.
Step 3:
Continue double-clicking on Internet Connection Sharing Policy and selecting Disabled in the Startup type section. Finally, click Apply to save the settings.

Disable Windows 11 Internet Connection Sharing via Local Group Policy Editor
Step 1:
Enter the keyword Local Group Policy Editor in the search bar and click on the search result.

Step 2:
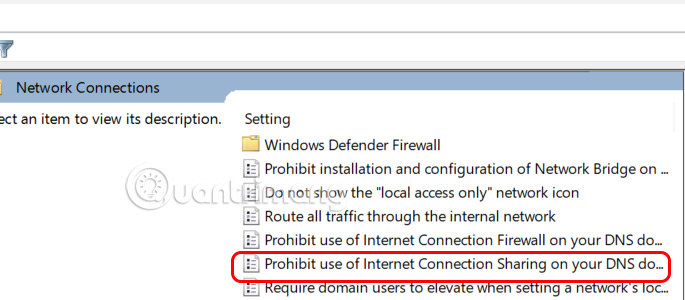
In the Local Group Policy Editor, navigate to Computer Configuration > Administrative Templates > Network > Network Connections .

Look at the content on the right, double click on Prohibit use of internet connection sharing on your DNS domain network .
Step 3:
Then you need to click Enabled in the interface and then click Apply to apply.

This will immediately disable internet connection sharing on your Windows 11 computer.