Create a wireless connection between two laptops
For computer users, there will be times when you need to share a file or connect two laptops together to share internet connection.Understanding the user's psychology, Windows Vista and Windows 7 have been integrated by Microsoft to create a wireless connection between two laptops.
>>> Share Internet connection via ad hoc network in Windows 7
Set up ad hoc network
First of all, open the Control Panel and click on Network Sharing Center as shown below.

A dialog box opens, click Setup a new connection or network near the bottom of the dialog box.

In the new link dialog box that opens, scroll down and select Setup a wireless ad hoc (computer - to-computer) network .

On the next screen, it will explain the ad hoc network definition and tell you if you are connected to a wireless network, you may be disconnected. Click Next to continue.

Now Windows requires you to provide the network name, security type and security key. For a security key, you can choose one of three options: no authentication, no WEP or WPA2-Personal. By default it will be WPA2-Personal, this is the strongest security key. Click Next and then you will receive a screen that displays the network message that has been set up. Note that if you don't check the Save this netwwork box, when you disconnect the ad hoc network, the network disappears. If you want to use it again, you will have to start from scratch.
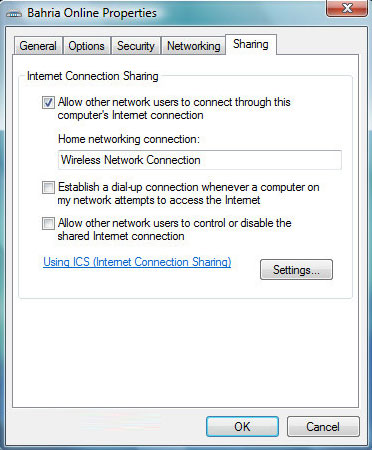
In case you want to share an Internet connection, right-click the Internet connection and select Properties.
Next, switch to Sharing tab and check the Allow Other Network Computers To Connect Through This Computer's Internet Connection checkbox. At the bottom of the Home Networking Connection , select Wireless network Connection and then click OK.
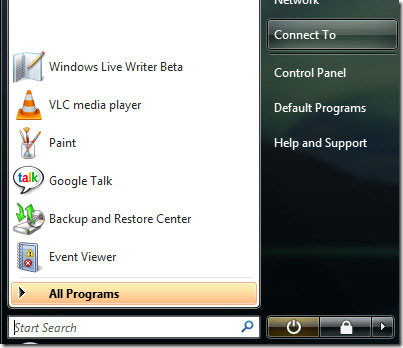
Now your connection is ready to work. To activate this wireless connection on the other device, simply click Start and select Connect To.
A list of wireless network connections will appear, select the connection you want and click OK.
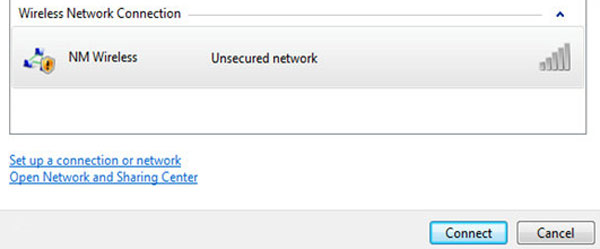
You should see a message appear as shown below, you will have to type the password to access the wireless network if required.
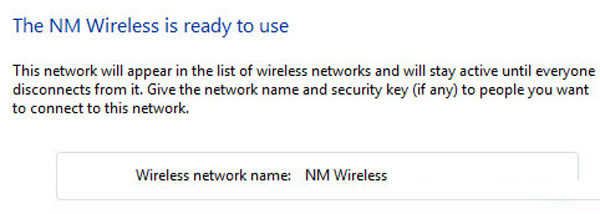
Your connection will be displayed in the Wireless Network Connection section of another device. Now you can connect and share data between two laptops without having to use a 3rd party cable or software. See how to share data between computers below.
Share data via ad hoc network
Now that you have set up the ad hoc network, continue and use another client connected to the network. You will have several ways to share data between computers. We will have the following cases:
- If all computers are running Windows 7 or later, you can use the Homegroup feature right inside Windows. This feature allows you to share music, videos, documents, photos and printers easily.
- If all computers are running Windows, but there are Windows XP or Windows Vista clients, you must connect all computers to the same Workgroup group and make sure that the parts that search the network and share files and printer is activated.
- If computers are not the same operating system as Windows and Mac, then you need to rely on permissions and file sharing. The most important thing here is that the user account in Windows must have a password (otherwise you cannot connect to file sharing) and allow file sharing on non-Windows operating systems.
Set up Homegroup feature
The easiest way to share data between Windows 7 and computers with higher operating systems is to use HomeGroup. You don't have to worry about manually sharing folders or files, configuring firewalls or adding passwords to user accounts. To get started, go to Control Panel and click on HomeGroup.
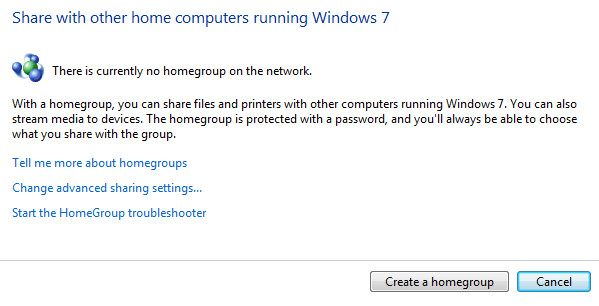
If there is already a computer connected to the Homegroup on the ad hoc network, it will display and you can connect or click on the Create a homegroup button .
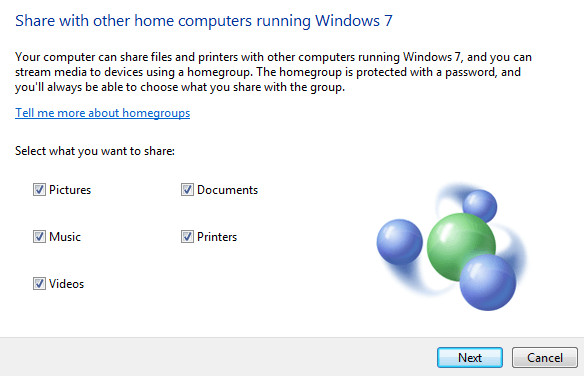
On the next screen, you can select the items you want to share such as photos, music, videos, documents and printers. Click Next and enter the Homegroup password.
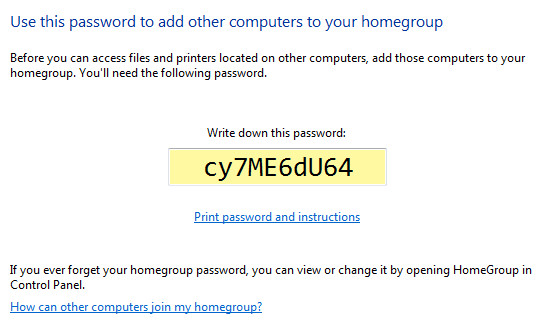
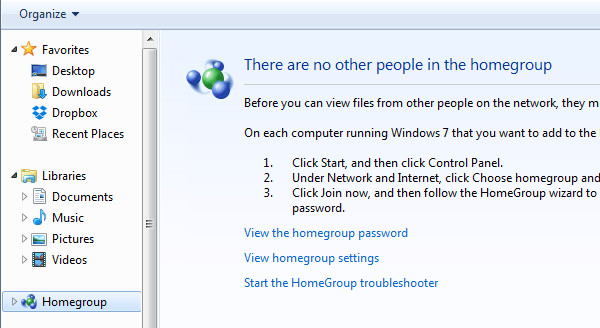
Now, on other computers, the same steps are done, but the link with the existing Homegroup is not created. You can then open Explorer and click on the Homegroup in the left menu. When other people join the homegroup, shared data folders will appear there and any data you put into these folders will be visible to everyone in the Homegroup.
Share via Workgroup
If you have a computer running Windows XP and Vista, sharing via Homegroup will not work. In this case, you still have other options. First, if you connect from an XP or Vista machine to a Windows 7 or higher, you need to set up something on your Windows 7 or higher.
First, you need to make sure the ad hoc network is set to its network type Home or Work. To do so, open Network and Sharing Center and click the link below the wireless network name. If it is a Home network, then you don't have to set anything up. However, if not, you must click it to set it to Home. That will allow sharing on the network with other computers.

Next, make sure all computers are in the same Workgroup. This is especially important for Windows XP and Windows Vista computers that you want to access through Windows 7 or later. By default, most Windows machines are in WORKGROUP, so you don't have to change anything, but you should check.
On Windows XP, click Start , right-click My Computer and select Properties . In System Properties , click the Computer Name tab and then click Change if you need to change the Workgroup name.
On Windows Vista machines and machines with higher operating systems, click Start , right-click Computer, and then click Properties . In the Computer name, domain, and workgroup settings section , select the Change settings button if you want to change the name.
Now the last thing you need to do applies to Windows 7 and above. Access Explorer and click Network on the left menu.
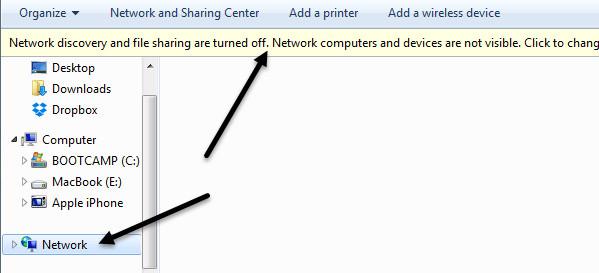
After that, you may see a pop-up bar saying that Network discovery and file sharing are turned off. Máy ảnh và thiết bị không được hiển thị. Click to change. Go ahead, click that and select Turn on network discovery and file sharing . Once you have selected it, you will see all other computers are on the ad hoc network, but make sure that the network search and file sharing sections are enabled. On Windows 7 or higher operating system, simply follow the steps above.
For all advanced sharing options, go to Network and Sharing Center from Control Panel and click Change advanced sharing settings .
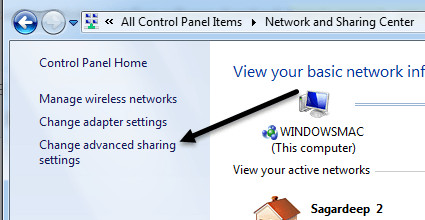
Here you will find all the options to share and make sure you are installing Home or Work and not Public.
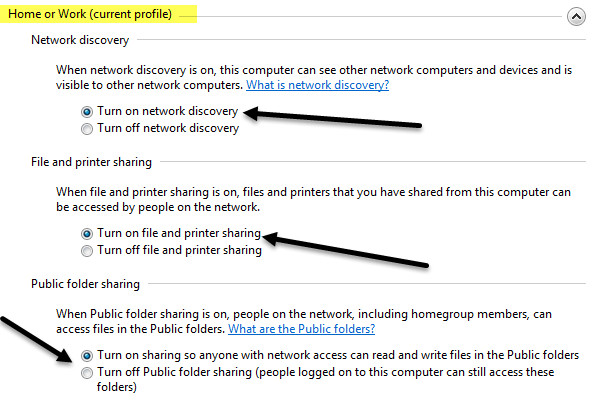
Select network discovery sections and file and printer sharing and select public folder sharing if you want to allow others to access these folders over the network. If you are doing this on an ad hoc network, then just turn it on.
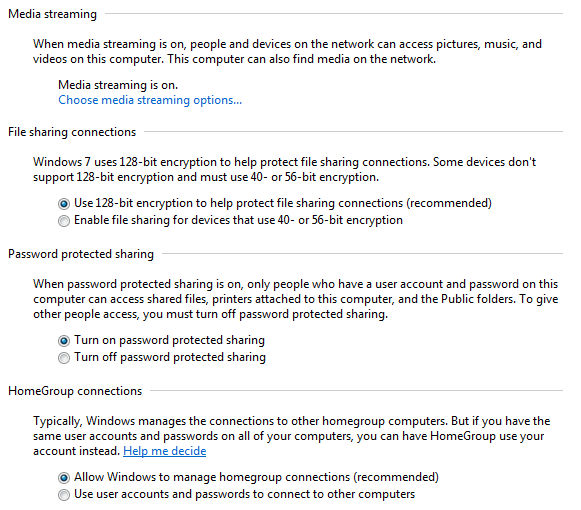
Streaming allows others to play content from your computer, but you can disable this feature and still share data between computers. File sharing connections are set to use 128-bit encryption by default. This password protected sharing feature requires that the user have a username and password of the computer they are accessing to be able to view shared folders or files. If you don't want to do that, then you can turn off this option. Finally, the Homegroup group connection will be accepted by default and those connections do not require a password to connect.
Share between different operating systems
Finally, to share between Windows and Mac or some other operating system, you still need to follow all the instructions above for Windows machines. The only problem is that you must create a password for the Windows user account to connect. You can try turning off the password protected sharing feature mentioned above, but sometimes other operating systems still require you to enter a password.
If you are trying to connect from a Windows machine to another operating system like OS X, then you will have to enable file sharing on these operating systems separately. For example, on a Mac, go to System Preferences and then click Sharing or File Sharing, then add the folders you want to share and the appropriate user rights.
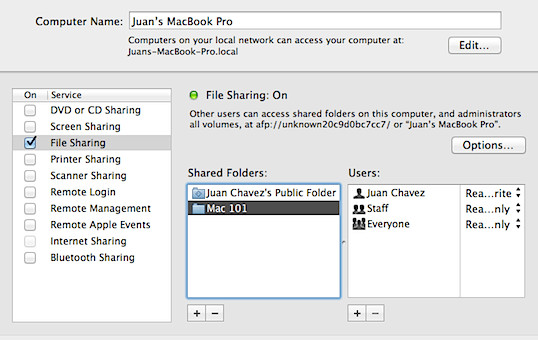
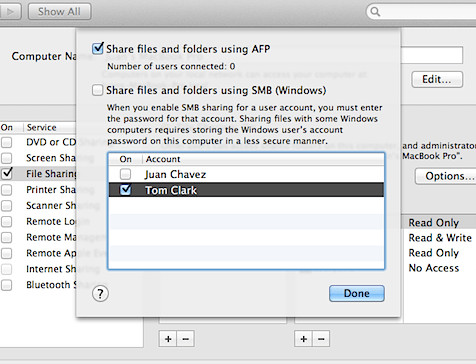
To access the files on your Mac from your Windows machine, you must click Options and then check the Share files and folders box using SMB (Windows).
Good luck!
You should read it
- ★ 'AirDrop' for Windows: How to Use Nearby Sharing in Windows 11
- ★ How to turn off Internet Connection Sharing on Windows
- ★ Set up Ad Hoc wireless network to play WiFi without software from your laptop
- ★ How to invite friends to 'use Viettel 4G sharing' every month to save
- ★ Internet connection sharing - Internet Connection Sharing