Table of Contents
This practical guide explains how to delete microphone usage history on Windows 11. Follow the steps in order, review the requirements first, and use the troubleshooting notes when a setting or option does not work as expected.
Delete Windows 11 microphone usage history via Registry Editor
Step 1:
You open the Run dialog box , type regedit and press OK to access. Then we access the path below.
ComputerHKEY_CURRENT_USERSoftwareMicrosoftWindowsCurrentVersionCapabilityAccessManagerConsentStoremicrophoneNonPackaged
Step 2:
Right- click on the NonPackaged folder and select Delete to delete and confirm the operation. Finally, restart your computer to save the changes.

How to delete Windows 11 microphone usage history via PowerShell
Step 1:
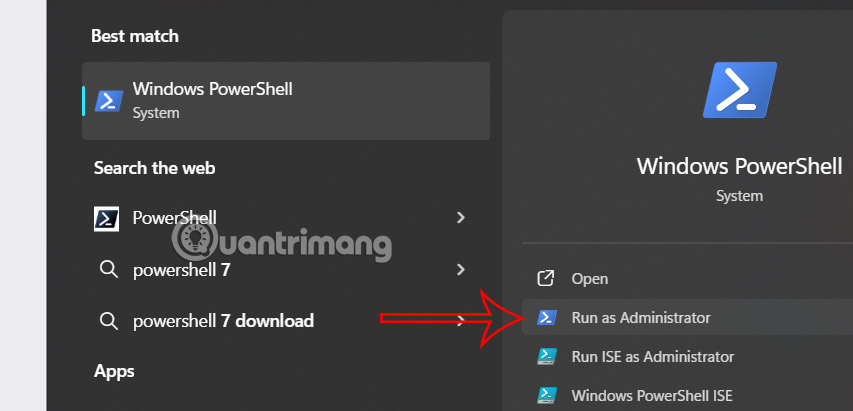
You type the keyword PowerShell in the search bar and then open it as Administrator .
Step 2:
Next run the command below and press Enter to execute the command.
Remove-Item -Path 'HKCU:SoftwareMicrosoftWindowsCurrentVersionCapabilityAccessManagerConsentStoremicrophoneNonPackaged' -Recurse -ForceThen also restart your computer to apply the changes.
FAQ
What should you know about delete Windows 11 microphone usage history via Registry Editor?
You open the Run dialog box, type regedit and press OK to access. Then we access the path below.
How to delete Windows 11 microphone usage history via PowerShell?
You type the keyword PowerShell in the search bar and then open it as Administrator.
What does this guide cover?
This guide explains delete microphone usage history on Windows 11, including the main steps, important details, and practical considerations.
Related Articles
 Click: How to Delete Your Usage History Tracks in Windows9 minutes read
 Grok Chat History Deletion Guide4 minutes read
 How to Delete Browsing History on Coc Coc?3 minutes read
 How to Test the Windows 10 Microphone: Step-by-Step Guide4 minutes read
 How to Delete Location History on Windows 115 minutes read
 How to Delete Netflix History3 minutes read
Reader Comments 0
Sign in with email or Google to join the discussion.