How to Capture Gaming Screenshots
Method 1 of 3:
Using Steam
-
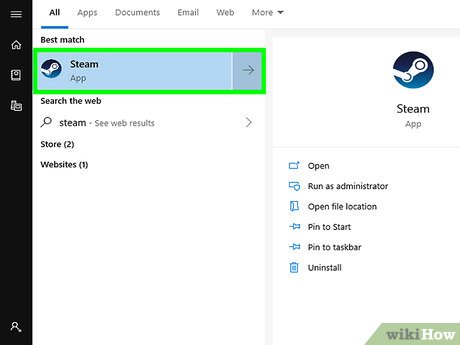
 Start Steam. Using Steam to take screenshots is the easiest way if you're already playing the game on Steam. Steam has a built-in screenshot function that you can use for any Steam game. If you don't use Steam to play games, see the method for using MSI Afterburner.
- You can find Steam in the All Apps section of your Start menu or screen in Windows. On Mac computers, you'll find Steam in the Applications folder. In most Linux distributions, Steam will be listed in the Applications menu.
-
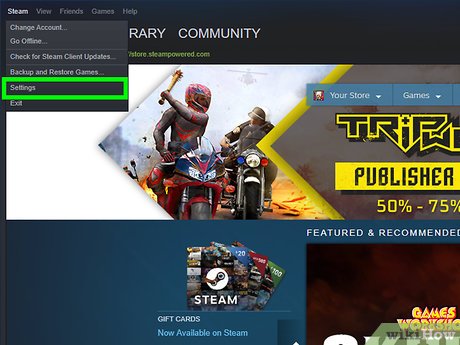
 Click the "Steam" menu and select "Settings." This will display the Steam settings menu.
 -
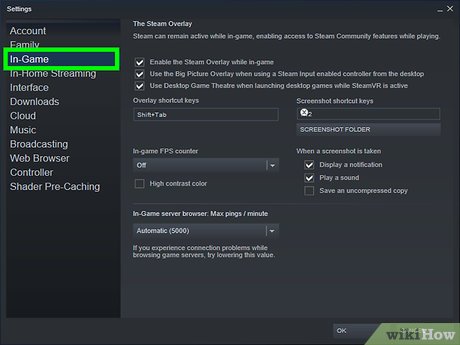
 Click the "In-Game" tab. This will display settings for the Steam overlay.
 -
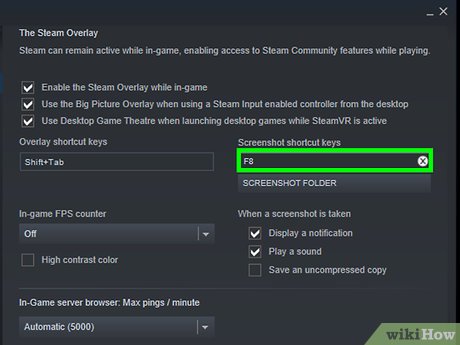
 Click the "Screenshot shortcut keys" field. This will allow you to set a new key for screenshots. By default, it is F12.
 -
 Press the key or combination you want to use. You can press a single key, or hold Ctrl/⌘ Command, Alt/⌥ Opt, or ⇧ Shift and then press a key to create a combination.
 -
 Click the "Screenshot Folder" button. This will let you change the location that your screenshots are saved. Select the folder that you want to use.
 -
 Choose your other screenshot options. You can have Steam show a notification, play a sound, and save an uncompressed copy. The uncompressed copy will be an exact replica of your screen in the game, but the file size will be much larger.
 -
 Click "OK" to save your changes. You'll be able to take screenshots with your new settings.
 -
 Start the game you want to take screenshots of. You can use the screenshot key for any of the games you play in Steam.
 -
 Take a screenshot while you're playing. Press the key or combination you set to take your screenshot. If you enabled notifications, you'll hear or see it immediately.[1]
Method 2 of 3:
Using MSI Afterburner
-
 Download the MSI Afterburner installer. MSI Afterburner is a graphics card utility that, among other things, can take screenshots of your games. You can download it for free from gaming.msi.com/features/afterburner.[2]
- The file will download in ZIP format. Double-click it to open it, then click "Extract" to extract the installer file.
-
 Run the installer. Double-click the extracted installer to start the installation process. Keep the settings at their default and proceed through the prompts to install.
- A second installation for RivaTuner will start after the initial install. Follow the prompts for this as well.
-
 Launch MSI Afterburner after installing it. This will open the main interface. There's a lot here, but don't worry about everything you see. Taking screenshots will be very straightforward.
 -
 Click the Settings button at the bottom of the window. This will allow you to configure some of your settings before taking screenshots.
 -
 Click the "Screen capture" tab at the top of the Settings window. This will display the screenshot settings.
 -
 Click the "Screen capture" field that currently says "None." The next key you press will become your screenshot key.
 -
 Press the key or key combination you want to use to take screenshots. You can use any key on your keyboard, but make sure you don't pick a key you use in your games. If you hold Ctrl, Alt, or ⇧ Shift you can create a combination shortcut.
 -
 Select your screenshot format. The "bmp" format will be the most accurate, but will take up the most space and likely need to be converted before you upload or share it. The "png" format offers the best compression-to-quality ratio. The "jpg" format will offer the smallest size but at noticeably reduced quality.
- The "jpg" format offers a "Quality" slider, but the other two do not.
- The "png" format is the most commonly used format for publishing and posting screenshots.
-
 Select a screenshot folder. You can change the folder you want your screenshots to be saved in. Click the "Browse" button to open the file browser and navigate to the folder you want to use.
 -
 Save your settings. Click the "OK" button at the bottom of the Settings window to save your settings.
 -
 Start a game with MSI Afterburner running. You can minimize it if you'd like. MSI Afterburner is very lightweight, and you shouldn't notice a performance decrease with it running.
 -
 Press your screenshot key or combination while playing. Your screenshot will be saved immediately to the folder you specified.
Method 3 of 3:
Using The Xbox App for Windows 10
-
 Open the Xbox app in Windows 10. You'll find this in your Start menu. You can also press ⊞ Win and type "xbox."
- You can use the Xbox app to take a screenshot of any game running in Windows 10.[3]
-
 Click the Settings button. You'll find this in the menu on the left side of the screen.
 -
 Click the "Game DVR" tab at the top of the menu. This will display the DVR and screenshot settings.
 -
 Toggle the DVR on if it is off. The Game DVR will need to be enabled in order to take screenshots with the app. Click the slider to toggle it on.
 -
 Set a custom screenshot shortcut (optional). When the Game DVR is enabled, the built-in shortcut is ⊞ Win+Alt+PrtScn. You can click the empty field next to this and set your own custom shortcut if you want.
 -
 Click the "Open Folder" button in the "Saving captures" section. This will open the folder that your screenshots will be saved in.
 -
 Move up one directory and then move the Captures folder to another location. If you want to change where your screenshots are saved, you'll need to move the Captures folder to that location. Screenshots will automatically save to the Captures folder, wherever it is.
- For example, to move it to your Pictures folder, move up one directory and then drag the Captures folder to the Pictures folder in your sidebar.
-
 Start a game that you want to take screenshots in. The Xbox app does not need to be open to use the screenshot feature.
 -
 Press your screenshot key or combination to take the screenshot. It will be saved to the Captures folder that you may have moved earlier.
Share by
Marvin Fry
Update 04 March 2020


