9 Default Windows Settings to Change Now
Windows works great out of the box, but some default settings are silently slowing you down or invading your privacy. Here are nine things you should change right now for a faster, smoother, and more secure experience.
Table of Contents
Windows works great out of the box, but some default settings are silently slowing you down or invading your privacy. Here are nine things you should change right now for a faster, smoother, and more secure experience.
1. Show extension to identify file type
Windows hides file extensions by default, but that shouldn't be the case. Showing file extensions makes it easier to identify malicious files that you might mistake for safe documents. It's also helpful to quickly identify and change the file type when needed.

To show file extensions in Windows 11 , open File Explorer , navigate to View > Show , and select File name extensions . Once enabled, all files in File Explorer will display their full name, including the extension.
2. Power Mode Configuration
Windows has three Power Modes: Best performance, Balanced, and Best power efficiency. If your PC feels sluggish despite having good hardware, it may be stuck in a power-saving mode that prioritizes battery life over speed.

To change Power Mode, go to Settings > System > Power and Battery , then click Power Mode . For Plugged in , select Best Performance . Similarly, for On Battery , select Balanced or Best Performance to minimize throttling when using your laptop unplugged. The exact settings here will vary depending on whether you're working on a desktop or a laptop.
3. Higher refresh rate for smoother images
A high refresh rate display will provide smoother visuals. Unfortunately, Windows doesn't always use the maximum supported refresh rate. It often uses 60Hz to save battery or optimize performance, which means you'll miss out on smooth visuals even on a high refresh rate display.
To change your screen refresh rate, go to Settings > Display , then click Advanced display under Related settings . Click the Choose a refresh rate drop-down menu and select your preferred refresh rate from the available options.
If your monitor supports at least 120Hz and VRR (Variable Refresh Rate), you can turn on Dynamic Refresh Rate (DRR). With DRR turned on, Windows will automatically adjust the refresh rate based on what you're doing.
4. Turn off Windows advertising
Ads are annoying everywhere, but especially on your Windows 11 PC. Microsoft loves to bombard you with Xbox notifications and push suggested apps right into the Start menu by default.
Unfortunately, that's just the beginning. You'll also see ads all over the Settings page promoting Copilot+ and Office 365, in File Explorer, on the lock screen, and even in the search bar.
Luckily, you can remove ads from the Start menu and search bar in Windows 11 from the Settings page. Here are the steps to disable more ads:
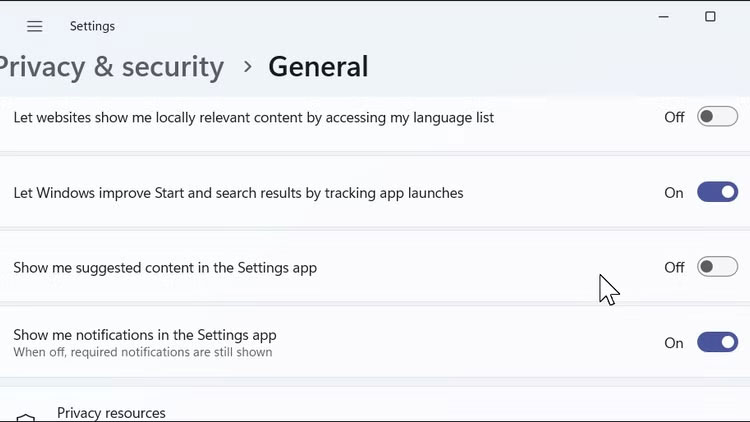
- Settings app : Go to Settings > Privacy and security > General . Turn on the switch to turn off Show me suggested content in the Settings app .
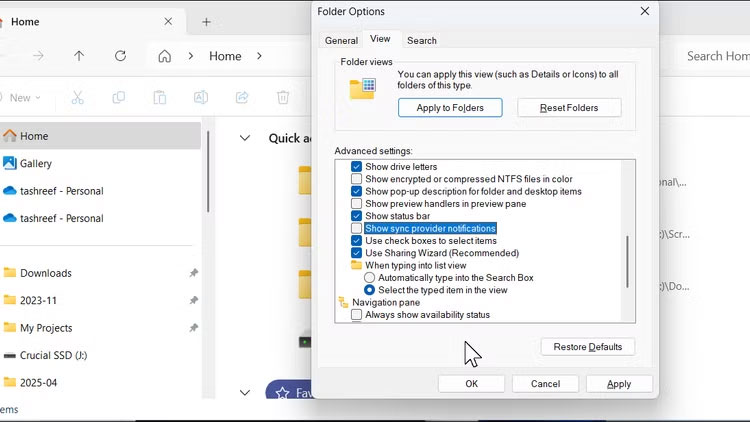
- File Explorer : Open File Explorer, click the three-dot menu on the toolbar, and select Options . Open the View tab , scroll down, and uncheck Show sync provider notifications . Click Apply > OK to save the changes.
- Widgets : Right-click the Taskbar and select Taskbar settings . Under Taskbar items , turn off the Widgets switch.
- Clean up the Start menu : Open the Start menu and delete all pinned app shortcuts. Most of these shortcuts are placeholder shortcuts that only install the actual apps when you click on them.
If you use Edge, turn off News Feed to remove the viral nonsense on the start page every time you launch the browser.
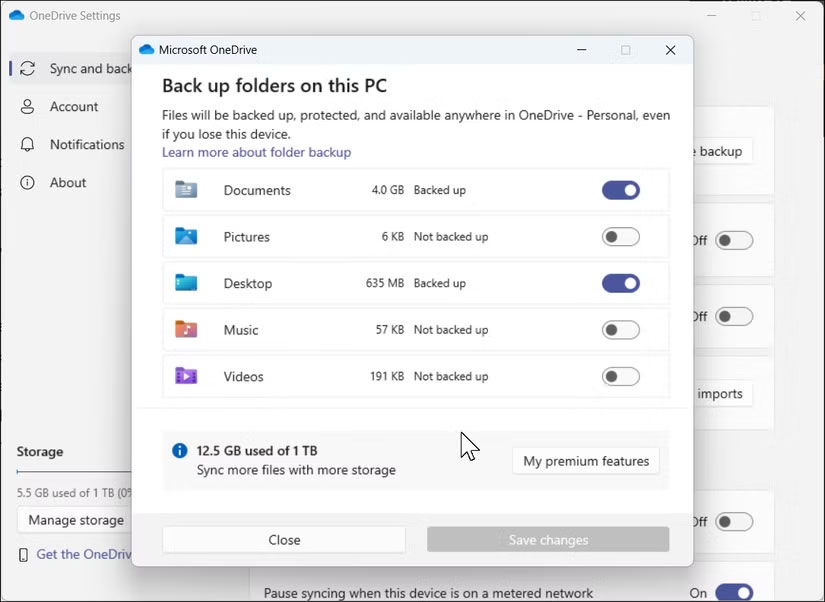
5. Change OneDrive sync settings
If you have an Office 365 subscription with 1TB of OneDrive storage, this is a great way to keep your documents and files in sync across multiple devices. But even with that much space, many people still prefer not to back up everything from Known Folders (like Pictures, Videos, and Documents). If you're on the free plan, that tiny 5GB limit will fill up before you know it.
Instead of letting OneDrive automatically choose what to sync, you can manually select which folders to back up. Here's how:
- Make sure OneDrive is running.
- In the system tray, click the OneDrive icon.
- Click the gear icon and select Settings .
- In the Sync and backup tab , click Manage backup .
- Turn off any folders you don't want to sync ( Documents, Pictures, Desktop, Music , or Videos ).
- Finally, click Save changes to apply your preferences.
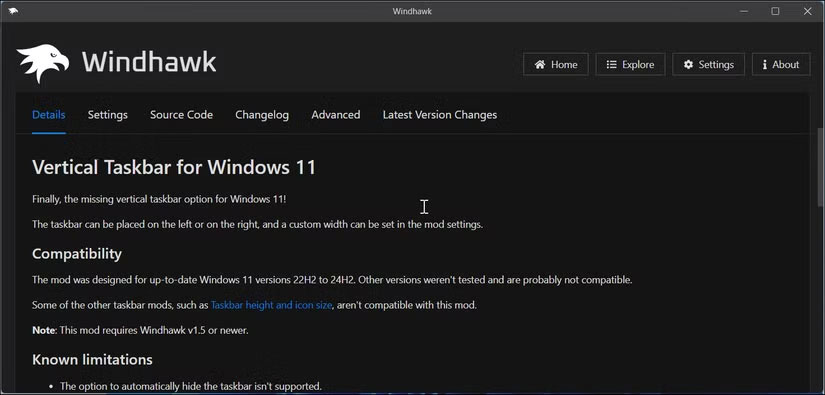
6. Customize Taskbar
While you can still move the Taskbar from the center to the left, Windows 11 no longer lets you position the Taskbar at the top, left, or right of the screen. To get that flexibility, you can use Windhawk's Vertical Taskbar for Windows 11 , a third-party tool that adds a number of improvements to the Windows experience. Windhawk also restores the ungrouping and labeling options, allowing you to display separate buttons for each app window.
Since you can quickly access Windows Search with the Win key , it makes sense to hide the search bar on the Taskbar. The same goes for the Task View button, which is easily accessible with the Win + Tab shortcut . To hide these items, right-click on the Taskbar, select Taskbar settings , and toggle the Search and Task view options .
7. Enable and calibrate HDR
If you have an HDR-compatible display but aren't impressed with the quality of HDR content on Windows 11, calibrating your display for HDR can help. Microsoft has a dedicated HDR calibration app for Windows that lets you calibrate your HDR display and optimize it for HDR games and other content on your Windows 11 PC. Here's how you can get the most out of HDR on Windows 11 1.
8. Change default search engine
Microsoft may think Bing competes with Google, but many of us disagree—and some even prefer privacy-first alternatives like DuckDuckGo . Bing, however, remains the default engine in both Microsoft Edge and Windows Search.
Changing your default search engine in Edge is easy, but removing Bing web results from the Start menu requires a little more work. You'll need to tweak a registry setting to disable it completely. To do this:
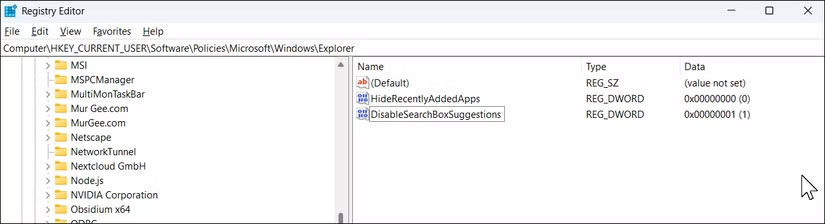
- Press Win + R , type regedit and click OK to open Registry Editor . Then, go to the following path:
HKEY_CURRENT_USER > Software > Policies > Microsoft > Windows > Explorer- Right-click the Explorer folder, select New > DWORD (32-bit) Value and name it DisableSearchBoxSuggestions.
- Double-click the new entry, set the Value data to 1 , and then click OK.
- Close Registry Editor.
To apply the change, open Task Manager , go to the Processes tab , find File Explorer and click Restart task from the toolbar. Your screen may go blank for a moment while File Explorer restarts, but when it comes back, Bing results will no longer appear in the Start menu.
9. Install PowerToys
This isn't necessarily a change to the default settings. PowerToys are a collection of utilities that can enhance and extend the functionality of your Windows computer.
One of our favorites is PowerToys Run , a powerful launcher you can access by pressing Alt + Spacebar to quickly open apps and files. Another gem is Awake , which keeps your PC awake indefinitely without messing with your Sleep settings. Want to launch a bunch of apps to specific locations with just one click? Workspaces has you covered. And Color Picker is a lifesaver when you're doing UI design work—it lets you grab any color on the screen instantly.
If you haven't already, take some time to explore everything PowerToys has to offer. It's packed with smart tools that make everyday tasks faster and smoother.
Whether you want more performance, less clutter, or some improvements, these tips will help you fix the problematic default settings that Microsoft ships with Windows.
Was this article helpful?
Your feedback helps us improve.
Related Articles
 Fixed a bug that could not change the default application or browser on Windows 104 minutes read
 10 Windows Settings You Should Never Leave as Default7 minutes read
 Default settings in Excel should be changed5 minutes read
 How to change the default browser on Windows 103 minutes read
 How to change the default web browser on Windows 114 minutes read
 Change these 6 settings on One UI 7 now!6 minutes read
Reader Comments 0
Sign in with email or Google to join the discussion.