50 Registry tricks to help you become a true Windows 7 / Vista 'hacker' (Part 5)
In previous versions, on the Windows Desktop, an Internet Explorer icon appeared so users could easily access Internet Explorer. However, in Windows 7, the Internet Explorer icon no longer appears on the Desktop. However, you have a restore tab so that this icon appears on the Desktop.
Table of Contents
On previous versions, on the Windows Desktop, an Internet Explorer icon appears so users can easily access Internet Explorer. However, in Windows 7, the Internet Explorer logo no longer appears on the Desktop. However, you have a restore tab so that this icon appears on the Desktop.
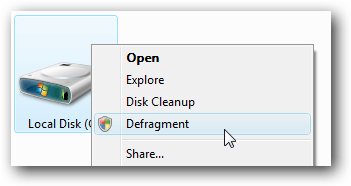
19. Add Defragment to any right-click menu
19.1. Edit the Registry manually
Open regedit.exe through the Search Start Menu pane or on the Run command window. Then on the interface of the Registry you navigate to the key:

Next under the Shell key you create a new key and name this key Runas, then set the Default value to Defragment.
Next create a new key in the runas key and name this key as command and set the value for the command as the value below:
defrag% 1 -v

19.2. Download the available Registry
This way is very simple, just download the ZIP AddDefragToDriveMenu Registry Hack file to your computer and extract it, then double-click the AddDefragToDriveMenu.reg file to add Defragment to the right-click menu or double-click the AddDefragToExtendedDriveMenu.reg file to hide it. Defragment after Shift.
Download AddDefragToDriveMenu Registry Hack to your computer and extract it here.
20. Run any file format under Admin on Windows 7 or Windows Vista
20.1. Edit the Registry manually
Open regedit.exe through the Search Start Menu pane or via the Run command window. On the interface of the Registry you navigate to the key:
Note:
Replace .zip with the file extension you are looking for.
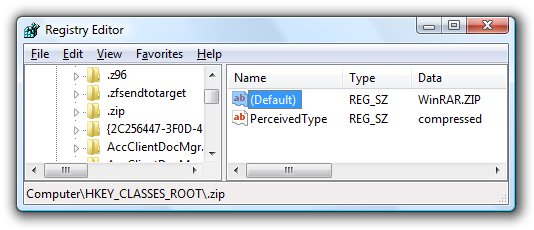
The next step you need to do is note the data value in the (Default) section. This value tells you if the application installs this file type format and the location to find it in the Registry.
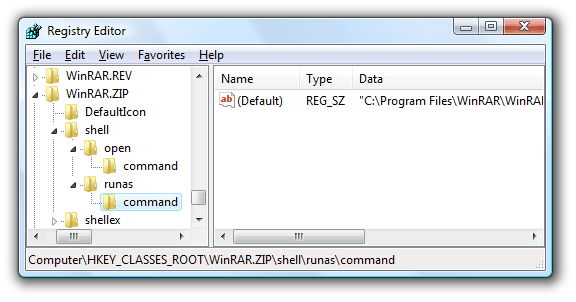
In the above illustration, in the Data frame display is WinRAR.ZIP, so you must browse the Registry key below:
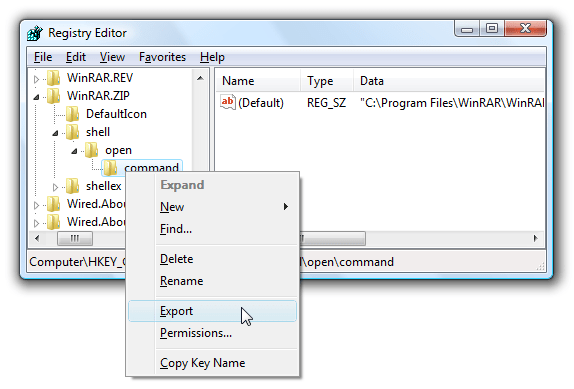
What you need to do next is copy shellopencommand section to shellrunascommand . The easiest way to right click on Command and click Export .
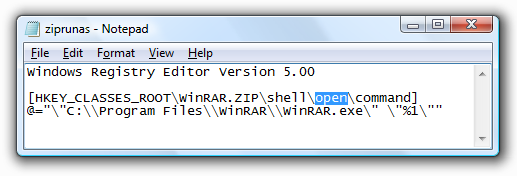
Next open the Regitry Export file in Notepad and edit the "open" to "runas" as shown below and close the Notepad file again.
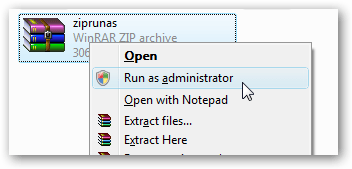
Double click on the file to fill in the Registry. You should now see the Run as option:
From now on, just right-click the file and open the file under Admin.
21. Enable or disable Task Manager

21.1. Edit the Registry manually
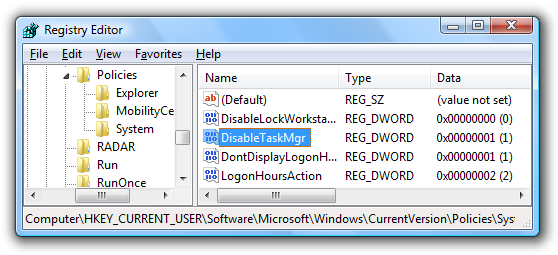
First open regedit.exe via the Search Start Menu pane or via the Run command window, then navigate to the following key:
In the list of values in the right pane, you find the 32-bit REG_DWORD value named DisableTaskMgr , double-click it and set 1 of the 2 values below:
- 1: Disable Task Manager.
- 0: Activate Task Manager.
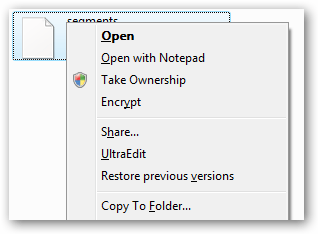
22. Disable Send To Folder on Context Windows Explorer Menu
22.1. Edit the Registry manually
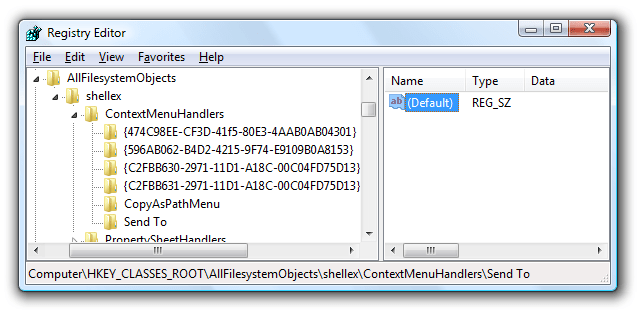
Open regedit.exe through the Search box on the Start Menu or through the Run command window. Then on the interface of the Registry you navigate to the key:
Find the value (Default) in the right pane, double-click it and delete the text from the value frame, leaving the value blank.
22.2. Restore the Send To Menu option
Follow the same steps and enter the following Registry key:
22.3. Use the built-in Registry
Just download the ZIP DisableSendTo Registry Hack file to your computer, unzip and then double click the file DisableSendTo.reg.
If you want to restore the Send To option, double-click the RestoreSendTo.reg file.
Download the ZIP DisableSendTo Registry Hack file to your computer and extract it here.
23. Ignore the dialog window "Use the Web service to find the correct program"
When you double-click on a file with an unknown extension, Windows will display a message dialog box as shown below:
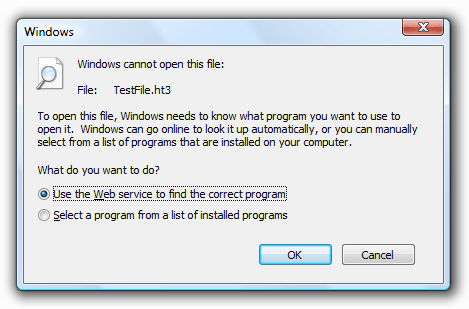
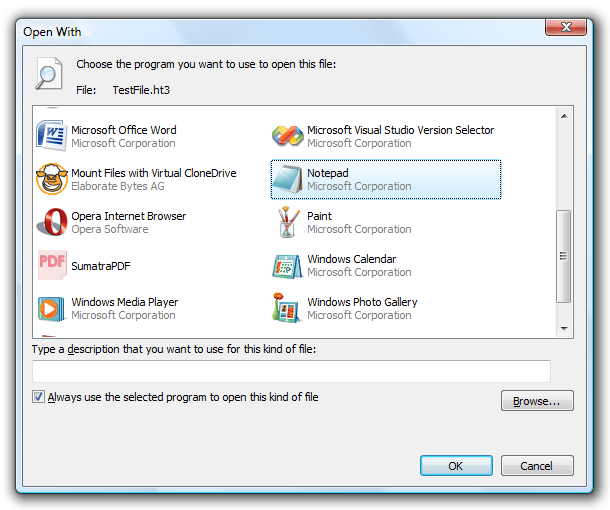
When you select the option Select a program from a list of installed programs , the screen will display a dialog with the programs you can choose to open the file.
However, you can reset the Registry to display only the dialog box with the programs you can choose to open the file.
23.1. Edit the Registry manually
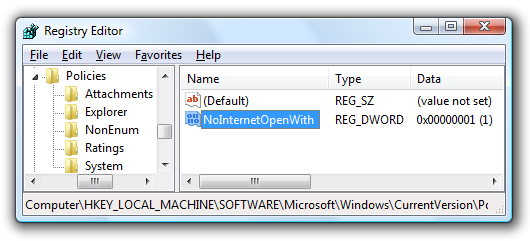
Open regedit.exe through the Search box on the Start Menu or through the Run command window. Then on the interface of the Registry you navigate to the key:
Note: If the keys do not exist, you can create the keys yourself.
Next in the right pane, you create a 32-bit DWORD value and name this value NoInternetOpenWith , set the value in the Value data frame to 1.
If you want to go back to the default settings, take the same steps and change the Value value to 1 or delete the NoInternetOpenWith key.
Note: You do not need to restart the computer after applying changes.
23.2. Use the built-in Registry for Windows XP and Windows Vista
Just download the OpenWith Registry hack ZIP file for Windows XP / Vista to your computer and extract it, then double-click the file DisableInternetOpenWith.reg and fill it in the Registry.
Download the ZIP file OpenWith Registry hack for Windows XP / Vista to your computer and extract it here.
24. Restore Internet Explorer icon on Desktop Windows 7 screen
In previous versions, on the Windows Desktop, an Internet Explorer icon appeared so users could easily access Internet Explorer. However, in Windows 7, the Internet Explorer icon no longer appears on the Desktop. However, you have a restore tab so that this icon appears on the Desktop.
24.1. Edit the Registry manually
First open Regedit.exe via the Search box on the Start Menu or through the Run command window, then navigate to the following key:
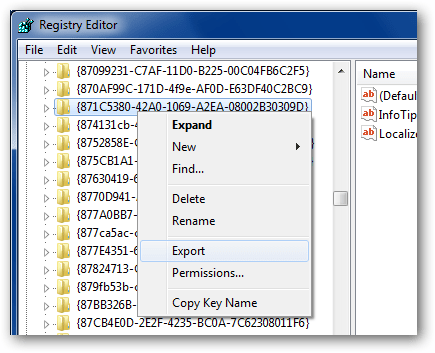
Next right-click on the {871C5380-42A0-1069-A2EA-08002B30309D} key in the left pane and then select Export and save it as a .REG file .
Open the .REG file with Notepad.
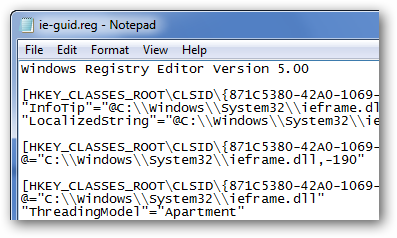
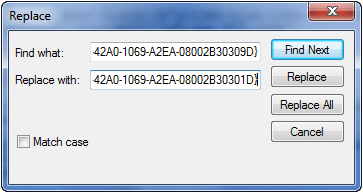
From the Edit Menu, click Replace and replace the string GUID {871C5380-42A0-1069-A2EA-08002B30309D} with a custom GUID string, such as {871C5380-42A0-1069-A2EA-08002B30301D}.
Save the REG file and close Notepad, then double-click the file to import content into the Registry. Open the Registry again, or use the F5 key to refresh the changes (this step is quite important).
Next, navigate to the key:
Double click on the (Default) key in the right pane and set the data to:
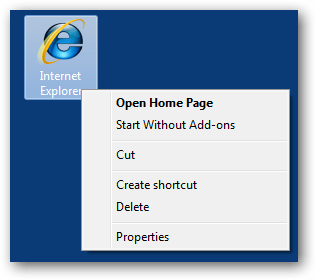
Once you're done, on the Desktop, press F5 to refresh, and you'll see the Internet Explorer icon appear on the Desktop.

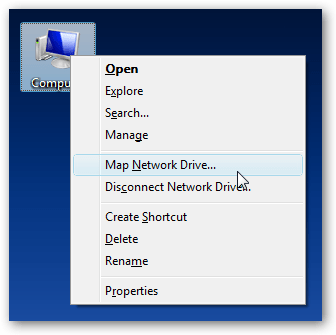
25. Remove Map Network Drive from Menu Items on Windows XP and Windows Vista
25.1. Edit the Registry manually
Open regedit.exe through the Search box on the Start Menu or through the Run command window, then navigate to the key:
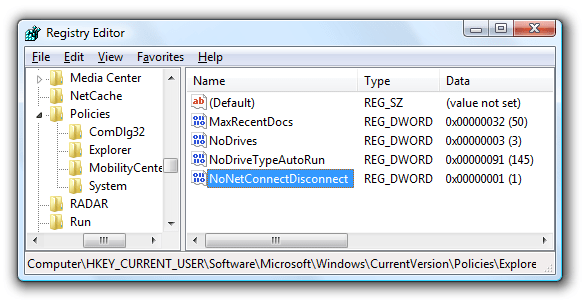
HKEY_CURRENT_USERSoftwareMicrosoftWindowsCurrentVersionPoliciesExplorer
In the right pane, you create a 32-bit DWORD value, then name this value NoNetConnectDisconnect and set the value in the Value frame to 1 .
You can check if the Map Network Drive option has been deleted by right-clicking Computer to check.
25.2. Use the built-in Registry
Just download the RemoveMapNetworkDrive Registry Hack ZIP file to your computer and unzip, then double-click the file RemoveMapNetworkDrive.reg to import the information into the Registry is done.
Download the ZIP file RemoveMapNetworkDrive.reg to your computer and extract it here.
Refer to some of the following articles:
- Unlock and improve Windows 10 features with 5 Registry tricks
- 50 Registry tricks to help you become a true Windows 7 / Vista "hacker" (Part 1)
- 50 Registry tricks to help you become a true Windows 7 / Vista "hacker" (Part 2)
Good luck!
Was this article helpful?
Your feedback helps us improve.
Related Articles
 50 Registry tricks to help you become a true Windows 7 / Vista 'hacker' (Part 1)7 minutes read
 50 Registry tricks to help you become a true Windows 7 / Vista 'hacker' (Part 3)6 minutes read
 50 Registry tricks to help you become a true Windows 7 / Vista 'hacker' (Part 4)8 minutes read
 50 Registry tricks to help you become a true Windows 7 / Vista 'hacker' (Part 2)7 minutes read
 10 tips to change the registry in Windows XP and Vista9 minutes read
 Learn about the Windows Registry - Part I9 minutes read
Reader Comments 0
Sign in with email or Google to join the discussion.