Table of Contents
This practical guide walks through 5 ways to transfer photos from iPad to external hard drive, explains the main requirements, and highlights common issues that may appear along the way.
Way 1. Transfer Photos from iPad to External Hard Drive via File Explorer
File Explorer, formerly known as Windows Explorer, is a file manager application to help users easily access file systems. When you connect your iPad to computer, it will take your device as a storage device. You can open your device to find photos/videos and copy them to external hard drive. However, you can only find photos saved in Camera Roll.
- 1. Connect iPad device to computer via USB cable. Enter passcode on device to trust the computer.
- 2. Click This PC or Computer > Find your device under Devices and drives > Double-click to open your device.
- 3. Go to Internal Storage > Click DCIM > You will see one or more folders, labeled 100APPLE, 101APPLE, 102APPLE, etc.
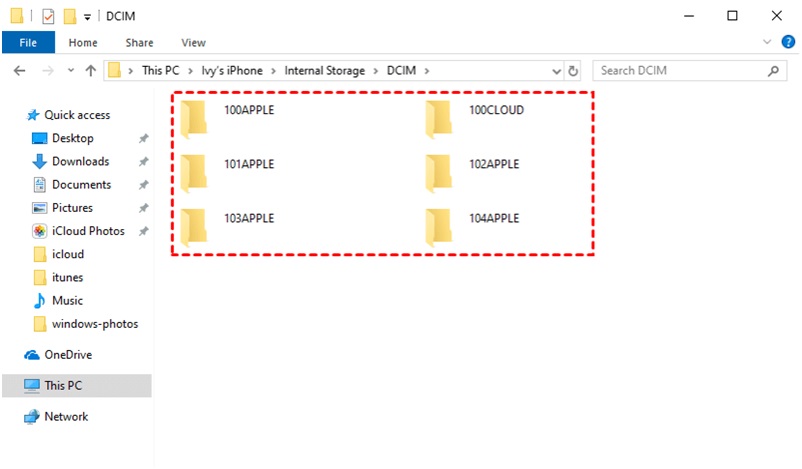
- 4. Open these folders to find the needed photos > Copy and paste photos to external hard drive.
Way 2. Transfer Photos from iPad to External Hard Drive via Photos App
Photos app is one built-in photos manager for Windows 10 PC. It can help users export camera roll photos from iPad to PC. To help you free up iPad storage space, it is able to delete photos from device after they have been transferred to computer.
- 1. Connect your iPad to computer via USB cable > Tap Trust or enter passcode on device if asked.
- 2. Open Photos > Click Import option > Select F rom A USB device .
- 3. Click Import Settings to select the destination and other options.
- 4. Uncheck photos and videos that you do not want to transfer to computer.
- 5. Click Import Selected to start the transfer.

Way 3. Transfer Photos from iPad to External Hard Drive via AOMEI MBackupper
AOMEI MBackupper is one professional iOS backup tool specially designed for Windows PC users. Besides, it also supports data transfer between iPhone/iPad and computer. Whether it is File Explorer or Photos, they can only help you transfer photos stored in Camera Roll. To transfer photos saved in other albums, you can let AOMEI MBackupper help you achieve the goal.
- 1. Download, install and launch AOMEI MBackupper.
- 2. Plug in your iPad. Enter passcode on home screen so that the software can access your device.
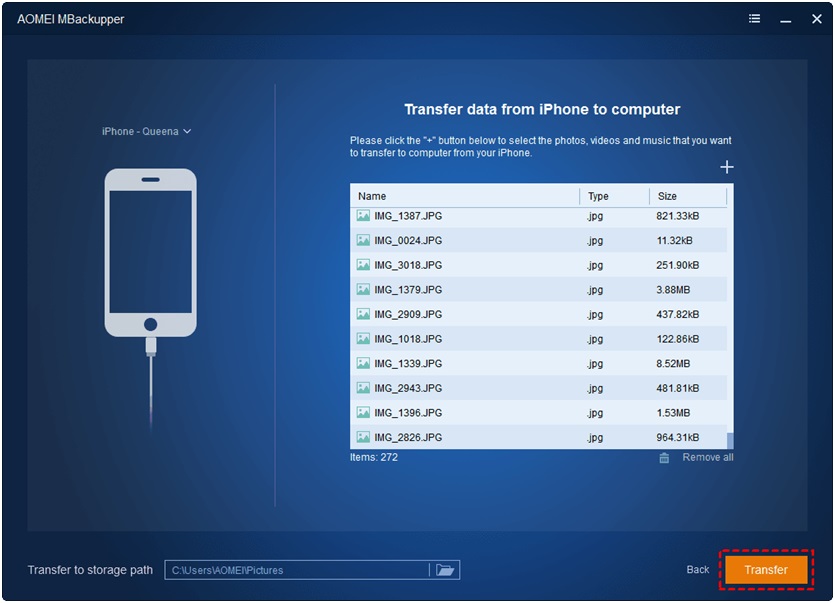
- 3. Click Transfer to Computer option> Choose the photos you want to transfer to external hard drive > Click OK to continue.
- 4. Choose your external hard drive as the destination to save your photos > If everything is OK, click Transfer to make it.
Way 4. Transfer Photos from iPad to External Hard Drive via Files App
Files is a file management app that allows users to browse local files stored on iPad and files stored in cloud storage services. Users can save, open and organize files within it. In addition, since iOS 13/iPadOS 13, Files app can help users transfer files between iPad and external hard drive directly.
- 1. Connect external hard drive to iPad using a lightning to USB adapter.
- 2. On your iPad, open Files app > tap Browse to have a check whether your external hard drive has been connected to device.
- 3. Open Photos app > Choose the photos you need > Tap the Share
- 4. To select photo options, just tap Options .
- 5. Tap Save to Files > Choose your external hard drive as the destination > Tap Save .

Way 5. Transfer Photos from iPad to External Hard Drive via Google Drive
Google Drive is a file storage and synchronization service. It allows users to store files in the cloud and the files can be accessed on any device. We can take this advantage to transfer photos from iPad to external hard drive. First upload photos to Google Drive on iPad > Then download photos from Google Drive on computer > Finally, copy and paste photos to external hard drive.
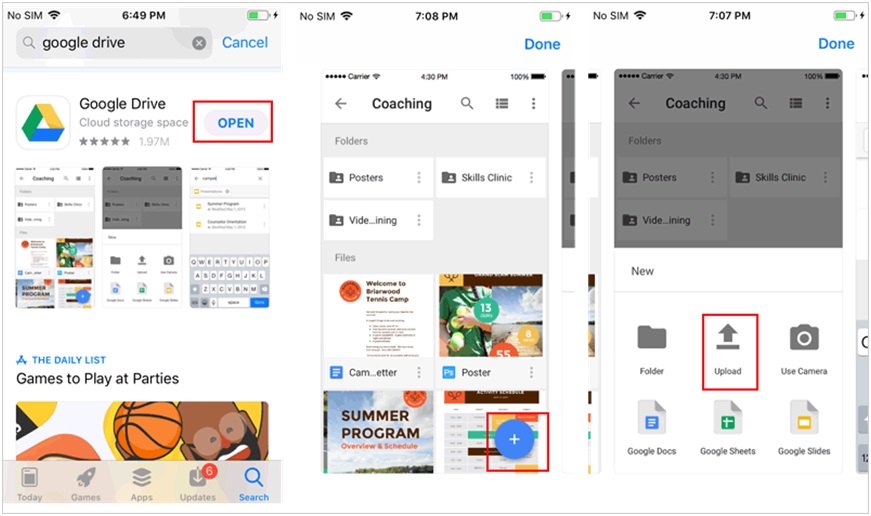
- 1. Download Google Drive from App Store > Open it and log in with your account.
- 2. Tap the Plus icon > Tap Upload > Tap Photos and Videos > Choose the photos you need.
- 3. On your computer, open a browser and go to Google Drive website > Download the photos you uploaded before.
Key Takeaways
Use the information above as a practical reference for 5 ways to transfer photos from iPad to external hard drive. Review each step carefully, confirm any requirements, and choose the option that best fits your situation.
FAQ
What does this guide explain about 5 Ways to Transfer Photos from iPad to External Hard Drive?
It explains the main concepts, practical considerations, and useful steps related to 5 ways to transfer photos from iPad to external hard drive without requiring advanced knowledge.
Who can benefit from learning about 5 Ways to Transfer Photos from iPad to External Hard Drive?
This information is useful for readers who want a clear overview, practical guidance, and reliable steps related to 5 ways to transfer photos from iPad to external hard drive.
What should I check before applying this information?
Review the requirements, confirm that your device, software, or situation matches the instructions, and back up important data before making major changes.
Related Articles
 7 Best External Hard Drives9 minutes read
 Pros and Cons of Using an External Hard Drive for PS49 minutes read
 How to Use an External Hard Drive with Ipad Pro Running iOS 136 minutes read
 5 Best External Hard Drives of 20267 minutes read
 How to Use an External Hard Drive with a Chromebook7 minutes read
 Causes and Ways to Fix External Hard Drive Slow on Windows 1011 minutes read
Reader Comments 0
Sign in with email or Google to join the discussion.