5 Linux tools to recover data from damaged drives
The computer screen is just an abysmal black color, the laptop hangs without a warning, which is two of the few signs that your computer's hard drive has problems.
- Signs that you should replace the hard drive
When the hard drive fails, it will often be unusable, but don't hurry to throw it away immediately, try the 5 Linux tools introduced by TipsMake.com to restore the data. and put your digital life back on track.
1. ddrescue
Although ddrescue is not a data recovery tool, you will need to use it before recovering the file. Ddrescue creates an image of a damaged drive or partition so that users can analyze the copy of the drive.
Copy the drive to a separate image file before performing data recovery with the tools listed in the article. The more you use the damaged drive, the worse it will be.

The image above is part of the result when ddrescue makes a copy. In the first command, it copies the entire drive to the "backup.img" file. The second command only copies block blocks, ignoring those blocks three times to try to read them.
When running the same commands, always use logfile. You may take hours or days to complete disk copying and if there is no logfile, any interruptions will occur, you will have to redo this process from scratch.
When the copy process is complete, you can mount the copied image file and use the following tools to extract the file from it. Continuing to use other Linux recovery tools in this article will help get the data from the "backup.img" file created here.
Download : ddrescue
2. Foremost
Foremost uses the data structure of common file types to retrieve data. You can get all or specific file types in backup.img.

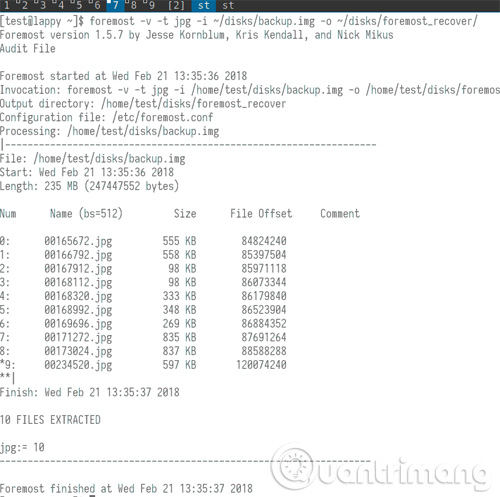
The image above shows you the output of Foremost in verbose mode ( -v option). The -t option is to search for jpg file and option -i and -o to mark the corresponding input and output files.
You can see that Foremost analyzes the image file ddrescue created in the previous step to find the JPEG file. Foremost has found 10 JPEG files and when finished, it will copy these 10 files to the mentioned output directory.
Download : Foremost
3. scalpel
Scalpel, originally based on Foremost, it uses multithreaded and asynchronous input / output to search through images effectively. In addition, it provides users with the ability to determine the number of footers and headers that they want to use to recover files.
Users can also specify the types of files they want to recover by editing the scalpel configuration file. The default configuration produces many results, even without verbose mode (-v parameter).

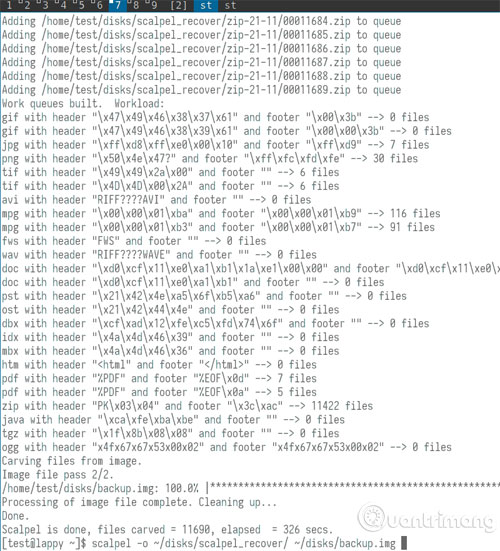
In this screenshot, you can see the final analysis of scalpel on "backup.img". The basic command (listed at the bottom of the screenshot) requires only one output folder and one image for analysis.
Download : scalpel
4. PhotoRec
PhotoRec differs from other tools as it focuses on restoring images, videos and text documents. It also acts as an interactive utility inside the console.

Initially use the PhotoRec command to specify the backup.img file, then PhotoRec will take the user to the graphics environment. The screenshot here shows the size of the image file. In the following screens it requires the partition type of the drive and asks if the user wants to search the file on the entire image.
Download : PhotoRec
5. grep
The final data recovery tool is grep. This tool is not as simple as other recovery options, but it can find lost or deleted text files by searching for existing strings on the block or disk image.
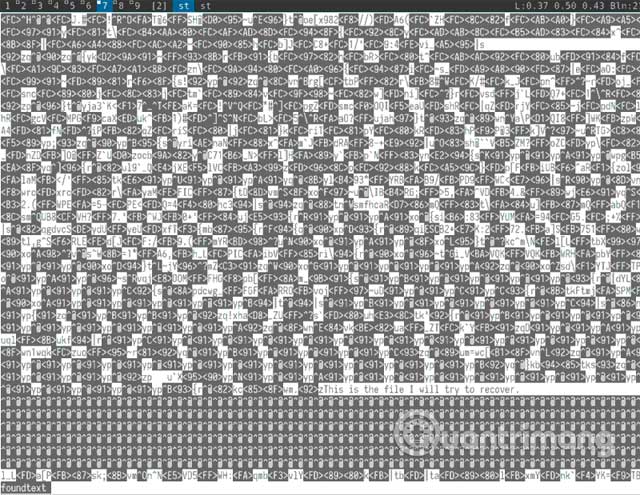
A file exists in backup.img called " myfile ." It contains only one line of text: " This is the file I will try to recove r '(This is the file I will try to recover.")
Grep uses that string as a starting point for file recovery. Along with some other parameters, you can see that, in this example, it will put the found string into a new binary file named " foundtext ".

Specifically, you will need to pay attention to and modify the -C parameter , which allows you to print more context around the string in the original command. In the example, this command requires grep to find a previous line of text and a text line after the string is provided.
Starting with -C 200 , grep will find 200 lines before and after a string. Such an approach is not necessary here, but it may be important for larger text files with hundreds of lines. Of course, you will need to know the file's text so that grep has a starting point to start searching.
Grep will return a binary file. However, some human readable parts such as the text line at the end of the screen shot in this example, then the user will have to filter the data he needs.

Download : grep
In short, be sure to first copy your drive or partition with ddrescue, then work on that copy with any Linux recovery tool you need. Don't be afraid to try many tools, especially if the first choice doesn't find the data you want.
See more:
- Instructions for restoring old CDs with Ubuntu Live CD
- 10 Linux tools for rescue, restore Linux, Window, Mac
- Restore NTFS partition in Ubuntu
You should read it
- ★ Easy data recovery guide with Easeus Data Recovery Wizard
- ★ iTop Data Recovery - Tool to easily fix hard drive errors, recover deleted files
- ★ How to use Recoverit to recover data on your computer
- ★ Top 5 data recovery software, computer data rescue, hard drive, USB best
- ★ Top 5 best data recovery software