Table of Contents
This article provides a clear overview of Turn Off the Office Upload Center Feature, with the main facts, useful context, and practical details organized for easy reading.
This feature is quite useful but if you do not use it, you should turn off this feature to avoid slowing down the internet speed and computer speed.
this guide shows you how to turn off the Office Upload Center feature in Word 2013.
Step 1: Turn Off the Application.
If the application is running, you need to disable it by: Right-clicking on the Taskbar and selecting Start Task Manager (Task Manager).
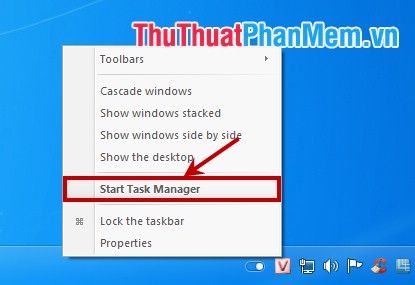
In the Windows Task Manager window select Processes , in the Image Name section you find and select the file name MSOSYNC. EXE and click End Processce to end the process.
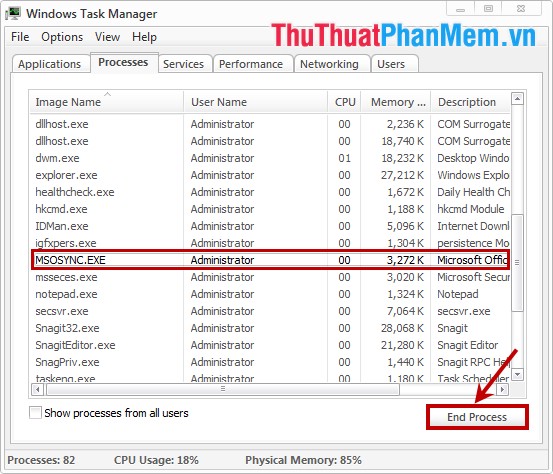
If not, you skip this step and follow Step 2 .
Step 2: Rename the File MSOSYNC. EXE and File MSOUC. EXE .
You need to go to the Office installation file, the default is the path:
C: Program Files Microsoft OfficeOffice14 of Office 2010.
C: Program Files Microsoft OfficeOffice15 of Office 2013.
Or you go to the installation file in the drive where you choose to install Office.
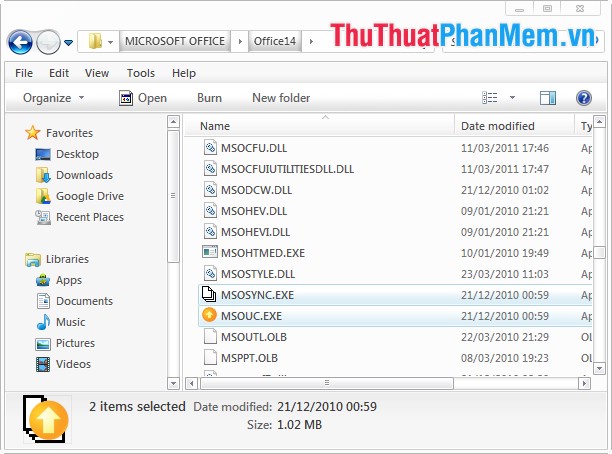
Here you need to rename 2 files MSOSYNC. EXE and MSOUC. EXE to new arbitrary names, but you should not change the same name with other files in the directory.
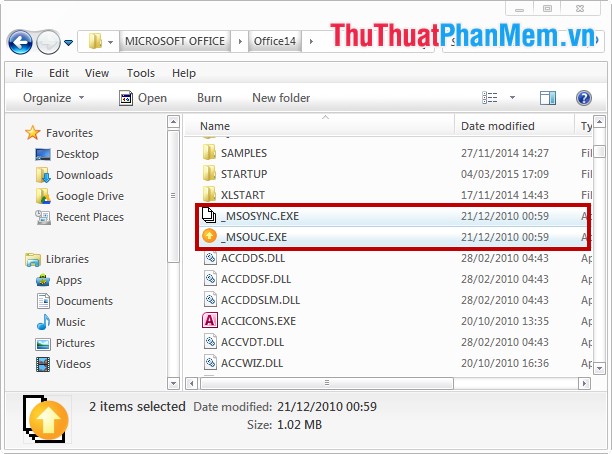
So you have off Office Upload Center permanently.
FAQ
What is the main focus of Turn Off the Office Upload Center Feature?
The article explains the most important facts, context, and practical details related to Turn Off the Office Upload Center Feature.
Who may find this information useful?
It is useful for readers who want a clear overview, practical context, and a better understanding of the subject.
What should readers verify before taking action?
Check current product versions, official requirements, regional availability, and any details that may have changed since the original publication.
Related Articles
 What Is the Microsoft Office Upload Center? How to Disable This8 minutes read
 This Is How to Customize and Disable (Turn Off) Action Center on8 minutes read
 How to Turn Off the Notification Center on Windows 10?3 minutes read
 3 Ways to Turn Off Annoying Notifications from Game Center on iOS3 minutes read
 Instructions to Turn Off Protected View Feature in Office 20134 minutes read
 How to Turn on Night Shift Night Mode on iOS 11 for iPhone5 minutes read
Reader Comments 0
Sign in with email or Google to join the discussion.