Self-assembling computers, build desktops (P2): Assembling hardware
In the previous part of this series, we showed you how to select and choose the hardware components needed to build a computer. In part two of this series, we will show you how to assemble those component devices together..
In the previous part of this series, we showed you how to select and choose the hardware components needed to build a computer.In part two of this series, we will show you how to assemble those component devices together.
Before you start, you should take a look at how to set up a good working area.Choose the tables that fit your physique.Make a table in the light and airy areas of the room and another important thing is time.Make sure you have at least half a free day to finish our work today, that is, assembling hardware devices together.
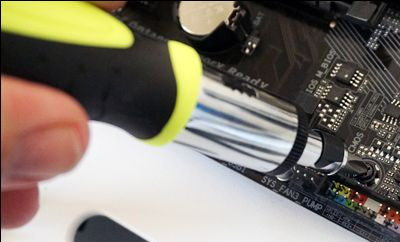
Prepare the necessary tools
This can be considered one of the most important steps of the whole process.It directly affects whether or not you can get the job done smoothly.First, it is indispensable to have a screwdriver with many heads of different sizes and edges.You may need an extra anti-static bracelet (pictured below).These small metal clamps can be clamped to the computer case to be grounded manually while you are working, avoiding short-circuit and electric shock.Honestly, it is rare for a static shock to actually damage parts of the PC.However, being cautious, if your family is available, then the crime is not used!

The tape will of course be indispensable, and you should also prepare a small bowl, or preferably a refrigerator ice tray with small boxes to place the screws in each size.In addition, you should also prepare an electric tester to ensure your safety.
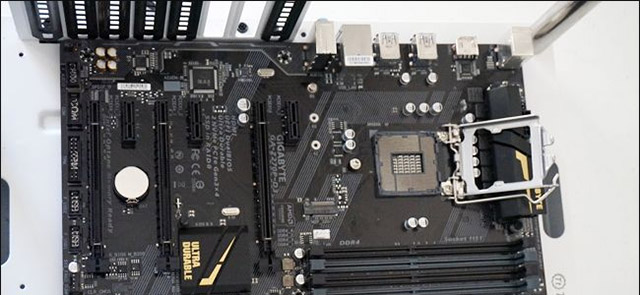
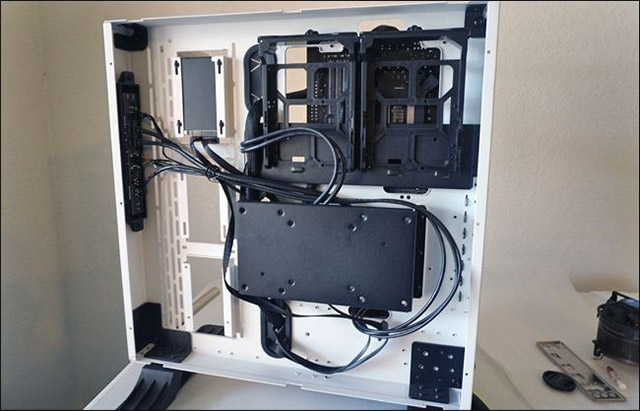
First step: Check your computer tree
First, carefully examine your computer tree.For what?In order for you to understand the layout of the computer compartment, see what is the main compartment containing the motherboard, where to place the hard drive (HDD) and SSD, or the back slot for the motherboard and compartment port. Where exactly does the graphics card extension . In summary this step is also very important, giving you a general overview and then gradually forming ideas.If you are unsure about any location on the computer tree, check the instructions that came with it (or download the soft copy on the manufacturer's website, or refer to the information on the Internet). If necessary, prepare additional pen and paper to make note of the points to be aware of.

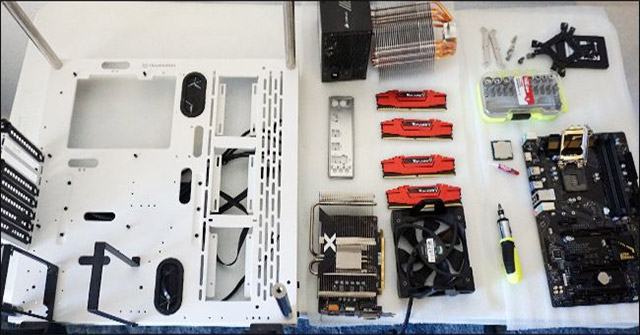
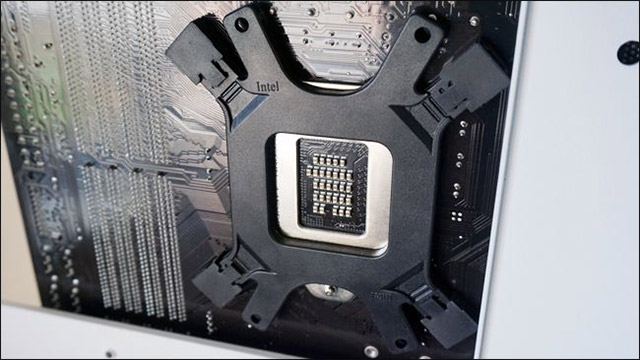
You may notice that the computer tree being used as an illustration in this article may seem strange.That's actually the Thermaltake P3 computer plant.It has a slightly monotonous design with an acrylic case, designed to reveal, or rather to show off all the components in the system and especially very breathable, you won't need any wings. What is the radiator fan.The reason for choosing this 'expose' CPU is to make it easier for you to understand the components of the CPU tree and how they are installed in the correct position.
Step 2: Install the CPU
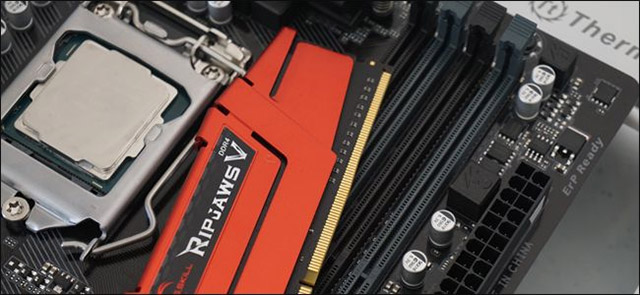
Let's get started on the job.Now, we will insert the CPU and RAM into the motherboard before installing the motherboard into the tree, simply because doing so is easier than installing the CPU and RAM after the motherboard has been fixed. right place.Remove your motherboard from the box, place it on a smooth surface, do not access the channel, and make sure the motherboard plane is completely uncharged.
Since the CPU is quite small, in this step you will also need to be very careful and focused, and remember to try not to touch the electrical contacts at the bottom of the chip.
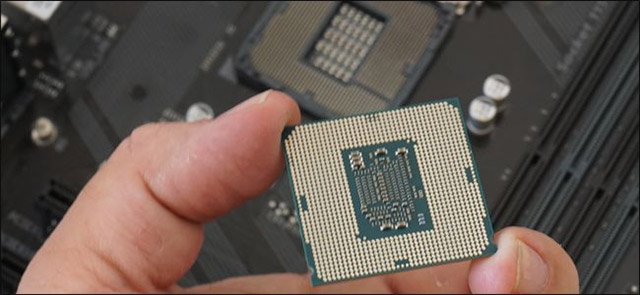
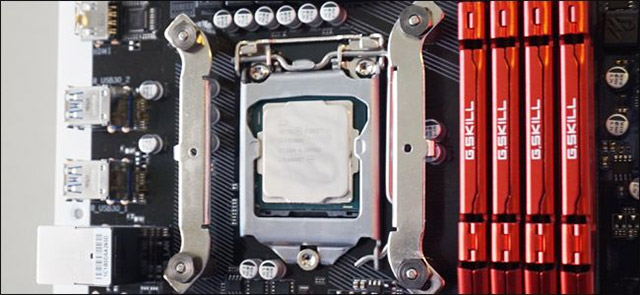
Normally, the CPU will be placed in a plastic case or some other protective object when you take it out of the box.Please keep the CPU there, you should consider the location of the CPU sockets on your motherboard first, you can refer to the article "This is a list of all CPU Socket" for us. More details.Often these sockets will be located in the upper left corner of most common motherboard designs.Most will also have an additional plate up and down on the hinge (on the Intel board), and a lever can be pressed down and cut into the motherboard for safety (on Intel and AMD boards).Take a second to see how these mechanisms work on the specific model you have on hand, the possibility of a slight difference between different processors and manufacturers.
Now, take the CPU out of its protective box.Look closely at the top and bottom (do not touch the electrical contact layers) and see how they can be inserted into sockets.Most CPUs will also have a small arrow in the corner (as in the image below, it is located on the bottom left of the chip).This arrow will correspond to a similar arrow in the socket, so you just need to put them together so that it is correct.
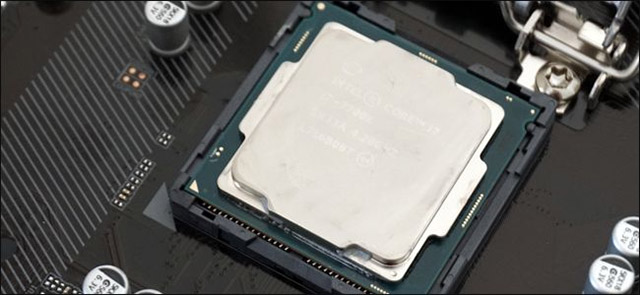
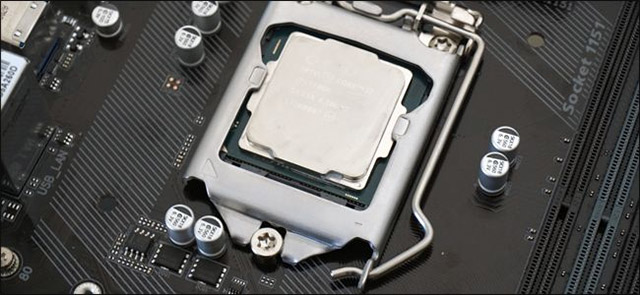
When you are sure you know how to fit the CPU into the corresponding sockets, be gentle, slowly slide it in.If the CPU cannot slip into the sockets, absolutely not try to press.Remove it and check it from the beginning.
Step 3: Install RAM
Next, it's time to install the memory modules.In general, you should set up RAM on the motherboard before installing the cooler for the CPU, as some coolers will override the edges of the RAM, making it impossible to mount the RAM.
RAM slots are long, shallow slots with clamps fixed on both sides, often these slots will be on the right side of the processor from your current perspective.Smaller boards may have only two RAM slots, while larger and more expensive models may have up to 8 RAM slots.In this example, four RAMs (DIMMs) will be plugged into the corresponding slots on the motherboard.
Consider your RAM modules and choose the corresponding slots so that they are reasonable.Again, you will notice that there will only be one way to install RAM in the slot.Look at the midpoint of RAM's gold-colored contact pins, then align it so that it matches the plastic tabs that rise in the RAM slot.This principle is the same regardless of which RAM generation you are using: DDR3, DDR4 or something newer.If for some reason your RAM is not suitable, it may be because it is not compatible with your motherboard.
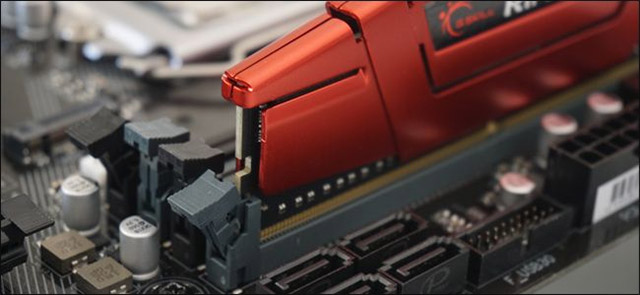
If you are ready to install RAM, open the clamps at the top and bottom of the slot.Put the RAM in, slowly, gently and then press it down firmly with moderate force until you feel sure, not wobbly.Now, close the clamps to fix the RAM again.
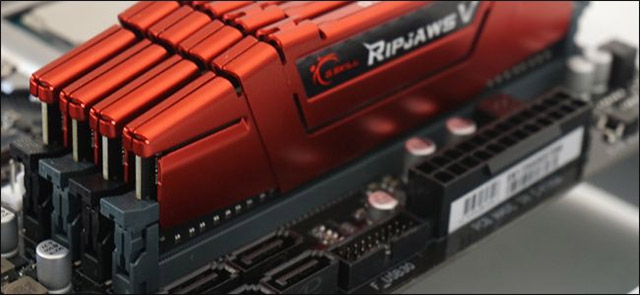
Repeat this process for all the RAM modules you have.Take note of RAM plugging locations.On many motherboards, RAM slots are denoted by color, usually black and gray.That's because the way they are designed to work with memory channels goes to the processor.In short, use only the same color slots before moving to another slot.For example, if there are 2 gray slots on the board and you only have 2 RAM slots, plug it into the 2 slots, not a black and gray one.
- Instructions on how to upgrade RAM on computers and Laptops
Step 4: Install the motherboard
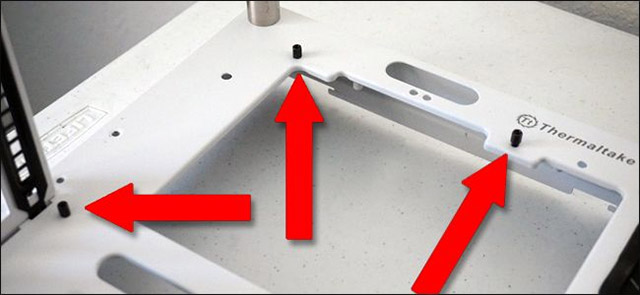
Place your computer on the table so that it is solid, not to the channel, with the front panel pointing to your right.Unscrew the edge of the tree and look inside, you will find a large metal plate, large steel or aluminum plate where you will install your motherboard (after installing CPU and RAM into the motherboard).
The first thing you need to do is to install the risers of the motherboard, which are small racks that help separate the motherboard and chassis.The standard ATX motherboard used in the illustration has 6 racks of this type.Usually, they will come with your motherboard or in the product case, if you feel unclear, check the user guide.You will be able to fix the risers into their respective mounting holes by swirling by hand.Try to twist your hands so that the motherboard is completely fixed.
NOTE: Some computer trees do not have a large cut near the top of the motherboard placement, as shown in the image above.If you are trying to install a cooling device while your computer tree does not have this cut-off point, you will have to install the cooler before installing the motherboard.
Before you put the motherboard in the tree, install the I / O plate.This is a small piece of aluminum, designed to fit on the back of the computer tree, containing all the communication ports on the back of the motherboard.You will be able to slide and push it in without any tools, press slowly with moderate force.

Now, take the screws that came with your motherboard and tighten them on the risers with a screwdriver ready.As mentioned, you only need to swirl slowly until you feel sure your hand is okay.Do not twist too tight to crack the circuit board.
When you are finished, the motherboard will be firmly positioned on racks about a quarter of an inch across the frame of the computer tree.
Make sure your I / O plate is compatible with the different computer and ports on the motherboard, bend the metal prongs if necessary.
Step 5: Install cooling fan (if any)
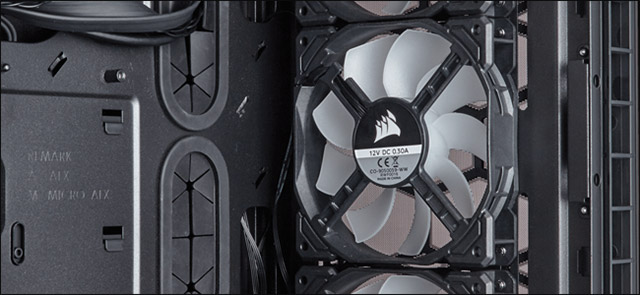
Next, install the cooling fan for the motherboard.(If they are already installed in your CPU tree, you can skip this step).In general, you should also invest in installing a separate radiator fan, which will be very beneficial in the long run.Normally, you will only need to twist the fan positioning screw into the frame of the CPU tree.However, on some CPUs dedicated to gaming, the texture may be slightly different.In this case, refer to your CPU user manual for more information.
Next, remember that the position where you place the radiator fan as well as the direction of the air that the fan pushes out is also an important consideration.
Step 6: Install cooling system for CPU
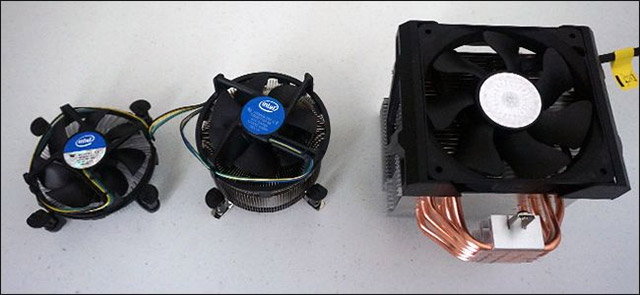
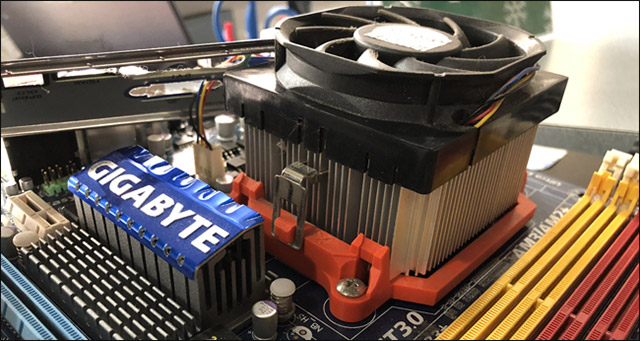
If you designate the use of the cooler that comes with your processor (most of them put one in the box), the installation will be very easy.The coolers that come with the CPU usually include thermal glue, used for splice sections.As for the removable cooling systems, it is endless, from simple to complex, cheap to expensive, depending on your needs.
- What is CPU heat sink and how does it work?
Cooling part of Intel chip
You will see four mounting holes about a few millimeters across all four corners of the CPU.You just need to remove the cooler from the box and turn them into place.On older Intel coolers, the screws will be made of plastic and mounted on springs, you don't even need any tools to fix them.
After the cooling device is positioned correctly and safely, you will need to plug in the power cable.There is a small three or four-pin power port on the motherboard, very close to the CPU socket, plug it into short cables to power the cooling fan.
Cooling unit of AMD chip (and some other types of removable)
AMD motherboards usually come with two pieces of plastic on either side of the CPU, and AMD's integrated coolers will be hooked up to these parts (like some removable devices) to fix.Straighten the square metal hooks on the heat sink with the plastic grooves on the motherboard, then push the lever down to lock it into a fixed position.
Some cooling systems may require you to screw down the hooks instead of pressing down the lever, but ultimately it is still to ensure certainty.
Removable cooling devices
If you want to install an Intel-based removable cooler (or some AMD chips, depending on the cooler), this process is much more complicated.This type usually contains a panel and you will have to fix them using four holes mounted on the motherboard (If you are using an AMD board, you will have to remove the plastic pieces to be able to use the holes this).
To mount the panels, place the computer stand up vertically and remove the rear panel to access the bottom position of the motherboard.
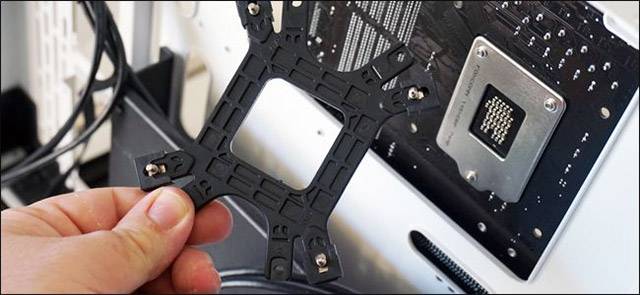
Assemble cladding for removable coolers.This is necessary because the size and weight of these coolers are larger than the ones that come with the CPU, so they need to have a safer stand to avoid bending the motherboard.
Most removable coolers have separate instructions and parts to use for different Intel and AMD sockets.
After fixing the panel, rotate the computer tree to the top position of the motherboard.Install risers with screws on the cooling plate.You may need to "hug" the computer tree with one hand to keep the mounting plate fixed while you twist the risers with the other hand.

After the coolers and risers are properly installed, you put down your computer tree in the original work position (the front panel will point to your right).
Keep following the instructions to install your cooler.In our example, the remaining tasks include screwing the steel racks and fixing them with the nuts and wrench included, then attaching the set screw to the cooler.
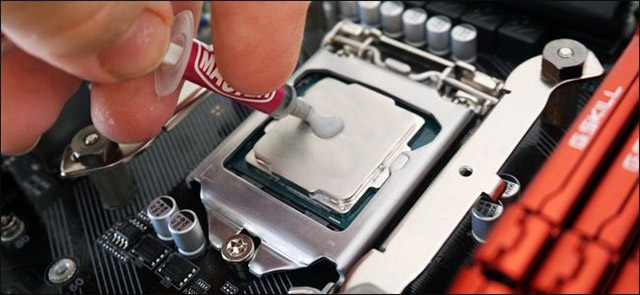
Before you put the cooler in place, you will need to apply the thermal paste to the top of the CPU.There are a lot of different technical opinions that are appropriate here, but the easiest and most reliable way is to "just need a small amount of glue with a bean in the middle of the CPU."
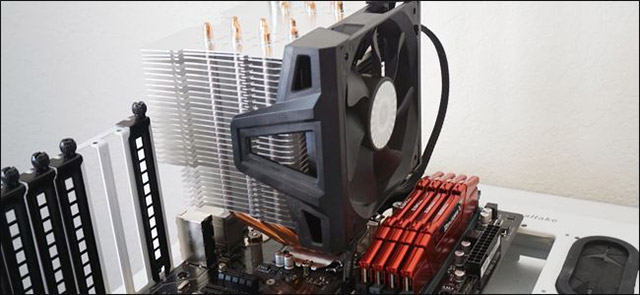
Next, place the cooler in the correct position on the stand (see illustration).

Finally, attach the fan to the cooling plates (some coolers may already have fans installed).
Once completed, plug the fan into the motherboard, using the same three or four-pin power port used for the built-in cooling fan.
Step 7: Install storage drives and optical drives.
Whether you use any type of storage hard drive, installing them is quite simple.Your computer will have either a fixed or sliding position (caddies) that allow you to slide the drive into a slot for ease of removal and replacement.The same is the location of the optical drive.If you don't see these locations, check your computer's user manual.
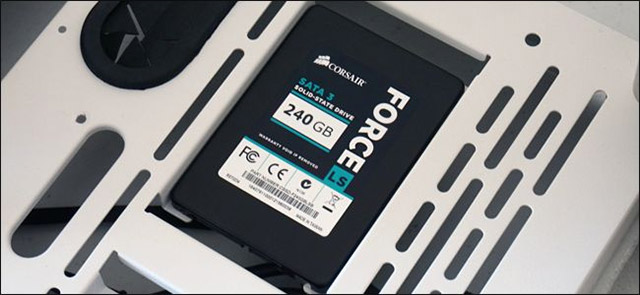
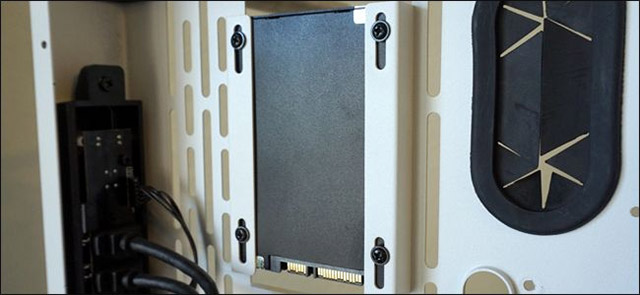
In the example, the SSD is attached to a small groove on the side of the case.You set up the computer to the vertical position again, then insert and tighten the screws from the back, so easy!In addition, the computer tree in the example also has larger frames for 3.5-inch hard drives but is not used in this case.
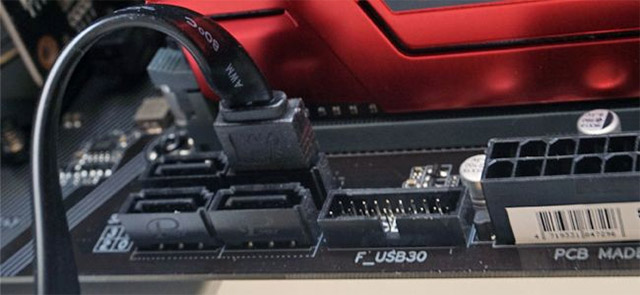
When your storage drive has been fixed in place, connect the SATA data cable to the SATA port on both drives.The cable can only fit properly if you have the right type, so don't try to use force.
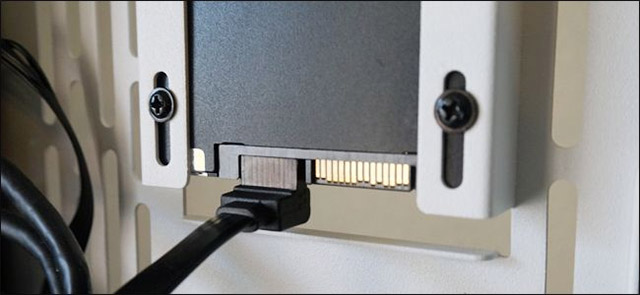
Then, plug the cable into the SATA port on the motherboard.Repeat this process for many SSDs or hard drives that you plan to use.
Installing optical drives is also very simple.On cheaper computers and simpler designs, simply slide it into place in the 5.25-inch wide optical drive bay on the front and screw the included screws to fix it.For expensive and complicated computer trees, there is one more step: Twist the screws inside the grooves on the side of the drive, then slide the drive into place.Like slides for SSDs and hard drives, this mechanism makes it easier to replace and repair drives in the future.
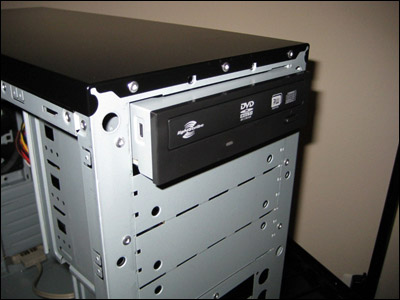
Finally, plug the SATA data cable into the drive and motherboard, just like you did for the hard drive and device ready to use!
- Best SSD hard drive for Windows 2018 computer
Step 8: Install the graphics card (and other PCI-e accessories)
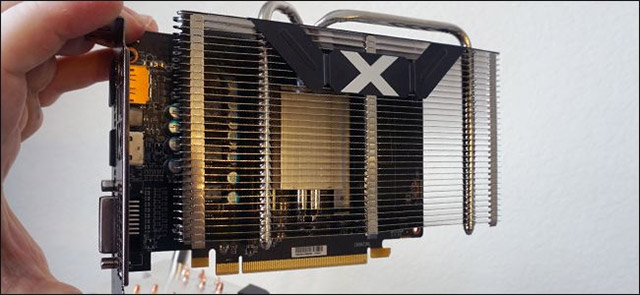
If you need to use discrete graphics to play games, now is the time to install this device.Graphics cards will often use PCI-Express slots (abbreviated PCI-e, PCIe or sometimes just PCI), open outside the case to be used as an extension port and are almost always searched. see below the CPU socket on the motherboard.
First, determine which PCI-e ports use x16 lanes.It must be named PCIEX1_16 or another similar name.It will be the slot that is closest to the CPU and has the longest size.
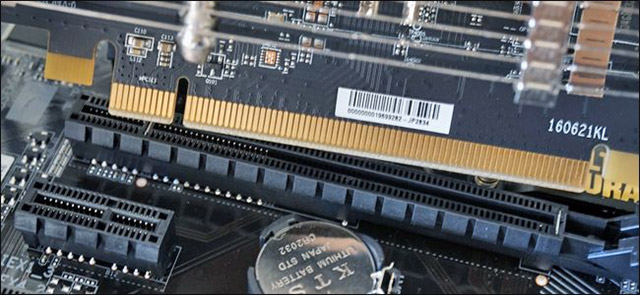
Now remove the back cover of that slot.These small pieces of metal or plastic are only there to protect and avoid dirt trapped inside for unused PCI-E slots.Now lower the plastic at the end of the slot (this removable mechanism is quite similar to the RAM modules, but only one side instead of two like RAM).Next, slide the graphics card into the slot, starting from the closest side to the outside of the case.Stress down until the plastic piece locks into place.
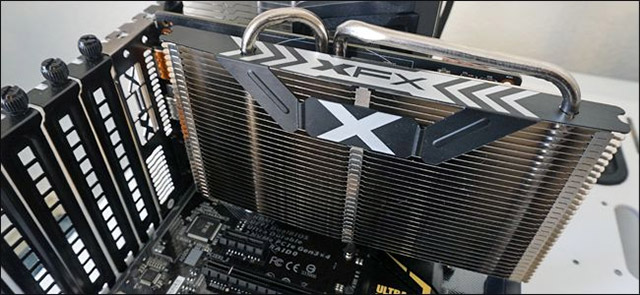
After that, put the screws back in place, making sure the graphics card is completely fixed.

- 7 things you need to know about integrated and dedicated graphics cards
Step 9: Install the power supply unit
Come on, our work is about to be completed!You must now install the power supply into the compartment or rack bar according to the type of tree you use.The position of a three-dimensional power cable (cable plugged into the wall outlet) must be threaded to the back of the tree and can be easily viewed and touched from outside.

Depending on the design of the computer you might want to mount it so that the heat sink fan in the power supply is up or down.The position for the fan to power the preferred source is to face the outside of the tree (the fan radiator will usually point up if the power supply is located at the top of the tree, and vice versa if it is located at below), making air flow easier.But to be honest, the location of the power supply will not make too big differences.Rest assured that your power supply will not overheat unless you choose an unsuitable power supply for your system.Therefore, just choose the location of the power supply that you find most reasonable, please note that you must leave a little space between the fan and the fan front surfaces if available.
Different computer plants have different layouts to fix the power supply, but usually you will have to use at least four screws.Sometimes you may need a fixed screw for the power supply from the outside surface of the tree.
When the power supply is firmly installed, it's time to plug it into all the components that need to be powered in the system.Note that cables should not be tangled or stuck on the fan.Here is how to connect the cable heads in the system.
Largest to smallest words:
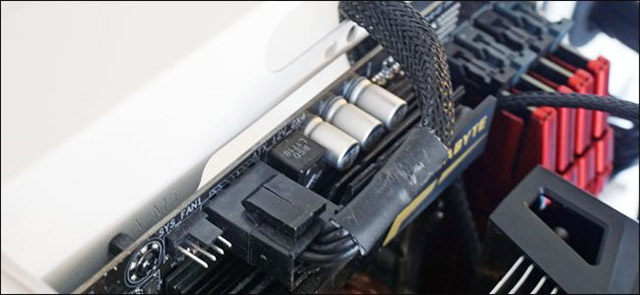
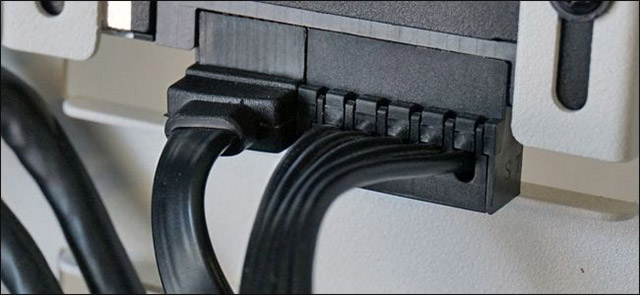
Motherboard: 24-pin cable (or sometimes more).It is usually located on the right hand side of the motherboard in its mounted position.Look at the plastic molds around the pins, you will see only one way to connect this type of jack.
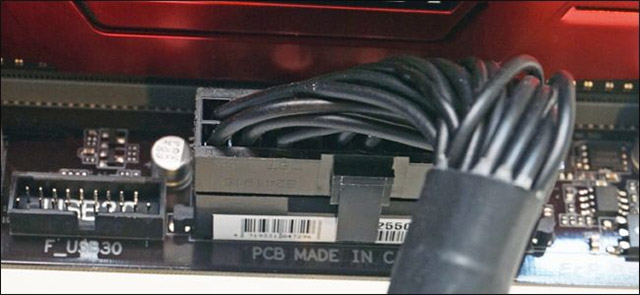
CPU: 4, 6 or 8 pins connected (sometimes more).This port is also on the motherboard, but it is somewhere near the CPU socket, usually on the top left.There will only be one way to connect this type of jack
Storage drive and DVD drive: Use SATA power cable (type L-shaped connector).Most modern power supplies will include at least one SATA power cable, usually with multiple drive sockets that you can use at the same time.
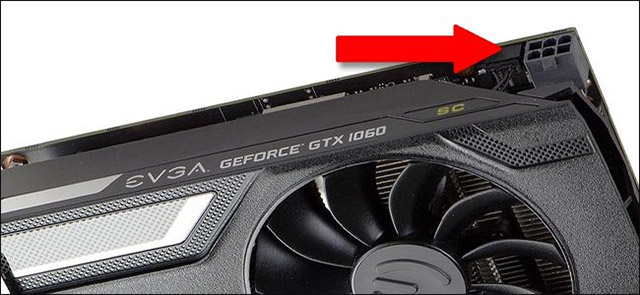
Graphics card: 6, 8, 12 or 14 pins, depending on the power it provides.The type used in the example is an energy-saving model, which only requires electricity from the motherboard and does not need to be connected directly to the power supply.For more powerful graphics cards, you may need to use multiple power cables for a split connection, but again, each individual cable will have only one connection.
Blowers, coolers, and radiators: Some fans with four-pin connectors can be attached directly to the motherboard, but others need to be plugged into the power supply to get enough power to work.You may need a molex adapter or SATA adapter if you have more than two or three fans, but in general, the power supply will provide enough cables for the fans on most basic computer systems.
Other devices, such as peripherals, can use electricity from the motherboard, but do not need to be connected directly to the power supply.
The final stages
Our work here is about to be completed.Before you close the computer lid, check carefully to ensure that no power cable or data cable is placed too close to the cooling fan and that everything is firmly fixed.
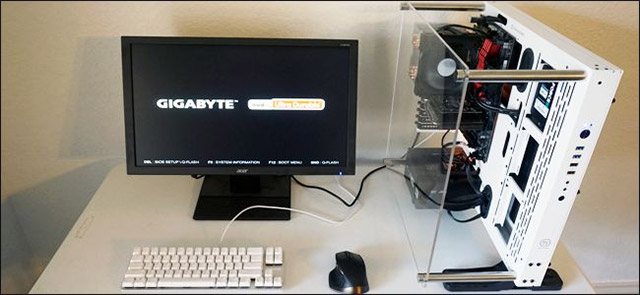
Plug the power cable into the power source, then the monitor, keyboard and mouse.Press the power switch.If you can see the light from the power indicator on the case, and hear the fan operating, it means that your system is ready to install the operating system and go into use.Congratulations, you've successfully assembled your own PC!
If for some reason the system cannot boot, remove the PC and accessories, then check the following common issues carefully:
- Have you plugged the power cable into the motherboard?Usually a 24-pin jack and a 4-pin jack.
- Have you installed the fan for the CPU and have you plugged the power cable into the fan?
- Have you plugged in RAM memory firmly and safely?
- You plugged the power cable into the drive (hard drive and DVD).What about SATA drive cables?
- Do you remember catching four screws next to the hard drive and DVD drive?
- Do you remember snatching the motherboard?
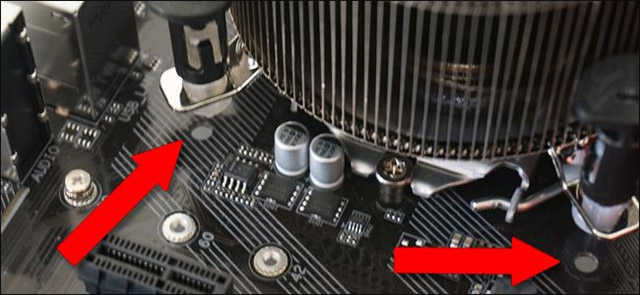
- Have you plugged all the wires from the computer tree to the motherboard?
- Is there still a cable stuck to your fan?
After checking the list above, you can close the computer and try to restart.Good luck!
See more:
- 4 simple ways to check the configuration and hardware information of computers and laptops
- 5 mistakes when upgrading computers
- Which upgrade will improve your computer's performance the most?
- Learn to use lesson 9 computer - Set up a computer