Replace Domino with Exchange 2007 (Part 2)
In the first part, we went over the Microsoft Transporter Suite for Lotus Domino and created a new Directory Connector for the process of starting the sample situation where Contoso (using Exchange 2007) wants to use the combination. with Fabrikam (using Domino 7).
In this second part, we will configure the Directory Connector, then make sure both systems are synchronized with the address book.
Domino decentralization
Before proceeding to configure the Directory Connector, remember that the authorization process must be done on Domino. As mentioned in Part 1, we will use the default Domino admin account that has all the necessary privileges. If you want to use another Domino account, Microsoft stresses that the account must have at least Editor access to the Domino directory as in Fabrikam's case, names.nsf. In addition, this account will also require UserCodor and UserModifier roles as well as the ability to delete documents. The method of configuring Domino's default admin account is shown in Figure 1, showing the access control list name. As you can see, by default the Domino admin account has Manager access, which is higher than Editor access.

Configure the Directory Connector
Now let's go back to the Transporter Management Console and configure directory synchronization. In the Transporter Suite main window you will see the Directory Connector just created. Configuring the Directory Connector is more complicated than the initialization process. Let's first take the following steps to synchronize Contoso with Fabrikam.
1. Select the Directory Connector you just created, right-click it and select Properties . Or, you can select Properties from the Action menu.
2. The properties of the Directory Connector are displayed and you will see 4 tabs will be configured. The Contoso configuration screen is shown in Figure 2. The General tab contains many different settings configured as follows.
a. Sync Schedule . This is a drop-down selection list with many predefined options for the declaration area from 15 minutes to 24 hours, as well as a Never option . Of course, you will want to choose an option that allows you to schedule updates to the address book. Let's say Every 15 Minutes section for the Schedule field.
b. Global Catalog . This is a Global Catalog server that will be used for Active Directory references when performing directory synchronization. Click the Browse button and select the Global Catalog server to use.
c. Domino Server . Obviously this is the name of the Domino server you want to connect to to perform directory synchronization. In our example this is DOMINO / FABRIKAM .
d. Notes Password. Here you enter the Notes ID password for the accounts configured on the workstation installed on the server containing Transporter Suite. When you are using a Domino admin account, you will have to enter the password of that account here.

3. Sync to Active Directory tab controls which Domino folders are synced in Exchange. Options to configure include:
a. Source Domino Directory . To configure this option, we first need to click the Add button that appears in the New Source Domino Directory Entry window. The fields in this window are configured as follows:

b. Target Active Directory . This option is used to select the target OU that will be used to store mail-enabled accounts of Domino users. Remember, we created the Domino Users OU to use for this task so you need to use that dedicated OU here. You just need to click the Browse button and browse to this OU.

4. Sync to Domino tab is used to configure directory synchronization from Exchange to Domino. These configuration options include:
a. Source Organizational Units . Here, select the OUs in Active Directory that store Exchange user accounts, groups, or contact lists to perform synchronization in Domino. In Contoso 's case, the Head Office OU is selected, the results are all objects in this OU and all objects in the sub-OUs of the Head Office OU are also added (Figure 4). To select an OU, click the Add button and browse to the OU to use in the New Source OU Entry window.
b. Target Domino Directory Names and Addresses (NSF) File . This field is used to select the name of the Domino Directory that accepts Exchange users, user groups, and contact lists configured in the previous step. By default, this name will be set to names.nsf , but you can choose another Domino Directory if necessary. In our example Fabrikam requires Exchange information to be synchronized in names.nsf so we keep the default name.
c. Routable Exchange Domains . Here we perform Contoso's SMTP contoso.com domain configuration as an Exchange navigation domain. If Contoso has many other additional domains like contoso.org , you must also configure those additional domains. To add these domains, simply click the Add button and enter the SMTP domain name to import in the Add Routable Exchange Domain Entry window.

5. The final configuration tab is the Advanced tab (Figure 6). Note the options to select user group synchronization and contact list. You can also select a list of groups that do not want to sync in Active Directory. In this article we will keep the default values.
6. The configuration process for the Directory Connector is now complete. Click OK to return to the Transporter Suite main window.

You can also simultaneously create and configure a Directory Connector through the New-DominoDirectoryConnector cmdlet. Syntax syntax sections in Figure 7 show the names of the parameters. Many parameter names are explained because they can link to the options you saw in the Transporter Management Console . However, if you are not sure, you can check back in the Transporter Suite help.

Perform synchronization
After the Directory Connector has been configured, this service must be started before performing the synchronization process. The name of this service for Lotus Domino is the Microsoft Exchange Directory Connector Service. You need to remember that by default the boot parameter of this service is set to Manual, so you need to change this parameter to Automatic. Failure to start the service will see a timeout error (Figure 8) when trying to synchronize folders.

You can wait for the synchronization process to start according to the installed schedule or start immediately in case you first install the Directory Connector. In the Console window, right-click the Directory Connector in the Transporter Management Conccole and then select Synchronize Now (this option is in the context menu of the Action table). When you do this, you will see the Synchronize Directories Now wizard, which includes the following tutorial screen:
1. The Synchronization Options screen. Here you will see different types of synchronization, such as Update Synchronization or Full Synchronization, along with a number of options for implementing them. If this is the first time you have done the directory synchronization process between the two systems, you should choose the Full Synchronization option and the third option Full two way synchronization . Then you will perform a synchronization process. completely new, so you should not perform this process regularly if not really necessary. This synchronization process will remove all objects of the previous synchronization process and re-create them. The option to choose is Update Synchronization (only updating or editing objects). If this is the first time to perform directory synchronization, you should choose to synchronize two way synchronization (Figure 9). After you've selected the options, click the Next button.
2. After that, the Progress screen will appear. On this window, click on the Synchronize button. The connector will start the synchronization process. After you finish, click the Finish button to close the wizard.

You can use Shell to perform the above operations via the following simple cmdlet command:
We have completed directory synchronization. But we need to perform additional checks to confirm the synchronization process is successful. First, check the Domino Users OU content (Figure 10). As you can see, Domino Users currently stores email-enabled contacts that represent the Fabrikam Domino users and groups. Similarly, checking the Domino Directory , we see that it contains the Exchange user and group list (Figure 11).


Check the record
The Transporter Suite can store information in the Event Log while performing data synchronization that you can use when the synchronization process fails. The DominoDirectoryConnector application has three different types, including Service , Controller and DirSync . Run the Get-TransporterEventLogLevel command | fl to see them.

You will also find that the two types are set to Low by default. If you want to upgrade those two types, you will have to use the Set-TransporterEventLogLevel cmdlet with the -Identity parameter . In Figure 11, the DirSync type is set to High - high, this is the result of the following cmdlet (note the format of the -Identity parameter and this format includes the application name of DominoDirectoryConnector):

Conclude
In this second part of the series, we completed the directory synchronization process to where Contoso and Fabrikam shared the address book. That means users from each group can easily send emails to other groups by selecting names from the address book. In the next section, we will perform the Free / Busy Connector installation so that users can exchange schedules.
In this second part, we will configure the Directory Connector, then make sure both systems are synchronized with the address book.
Domino decentralization
Before proceeding to configure the Directory Connector, remember that the authorization process must be done on Domino. As mentioned in Part 1, we will use the default Domino admin account that has all the necessary privileges. If you want to use another Domino account, Microsoft stresses that the account must have at least Editor access to the Domino directory as in Fabrikam's case, names.nsf. In addition, this account will also require UserCodor and UserModifier roles as well as the ability to delete documents. The method of configuring Domino's default admin account is shown in Figure 1, showing the access control list name. As you can see, by default the Domino admin account has Manager access, which is higher than Editor access.
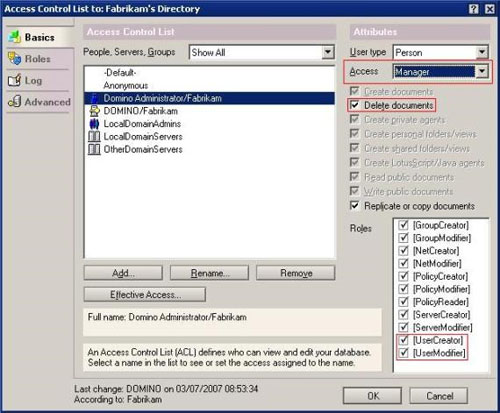
Figure 1: List of Domino Directory access control.
Configure the Directory Connector
Now let's go back to the Transporter Management Console and configure directory synchronization. In the Transporter Suite main window you will see the Directory Connector just created. Configuring the Directory Connector is more complicated than the initialization process. Let's first take the following steps to synchronize Contoso with Fabrikam.
1. Select the Directory Connector you just created, right-click it and select Properties . Or, you can select Properties from the Action menu.
2. The properties of the Directory Connector are displayed and you will see 4 tabs will be configured. The Contoso configuration screen is shown in Figure 2. The General tab contains many different settings configured as follows.
a. Sync Schedule . This is a drop-down selection list with many predefined options for the declaration area from 15 minutes to 24 hours, as well as a Never option . Of course, you will want to choose an option that allows you to schedule updates to the address book. Let's say Every 15 Minutes section for the Schedule field.
b. Global Catalog . This is a Global Catalog server that will be used for Active Directory references when performing directory synchronization. Click the Browse button and select the Global Catalog server to use.
c. Domino Server . Obviously this is the name of the Domino server you want to connect to to perform directory synchronization. In our example this is DOMINO / FABRIKAM .
d. Notes Password. Here you enter the Notes ID password for the accounts configured on the workstation installed on the server containing Transporter Suite. When you are using a Domino admin account, you will have to enter the password of that account here.
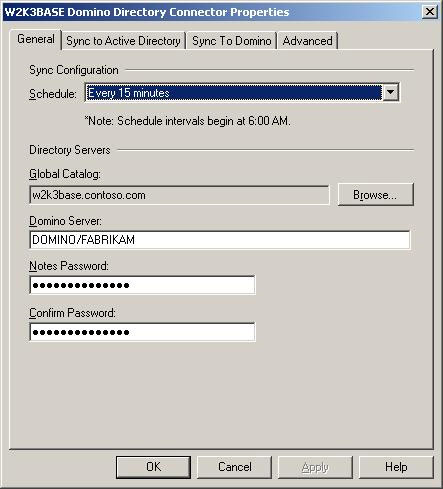
Figure 2: The Directory Connector's General Tab.
3. Sync to Active Directory tab controls which Domino folders are synced in Exchange. Options to configure include:
a. Source Domino Directory . To configure this option, we first need to click the Add button that appears in the New Source Domino Directory Entry window. The fields in this window are configured as follows:
- In the Domino Directory field, enter names.nsf. This is the name of the default Domino Directory that contains the user account of System 2. These are user accounts that need to be synchronized in Active Directory.
- In the Domain Name field, the Domino domain of System 2 has been entered, in this case System 2.
- In the SMTP Domain field, the SMTP address space of System 2 is entered, which is system2.com.
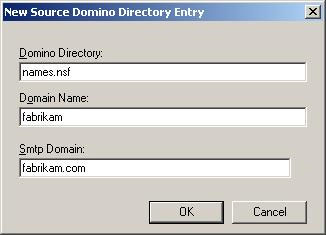
Figure 3: New Source Domino Directory Entry configuration window.
b. Target Active Directory . This option is used to select the target OU that will be used to store mail-enabled accounts of Domino users. Remember, we created the Domino Users OU to use for this task so you need to use that dedicated OU here. You just need to click the Browse button and browse to this OU.
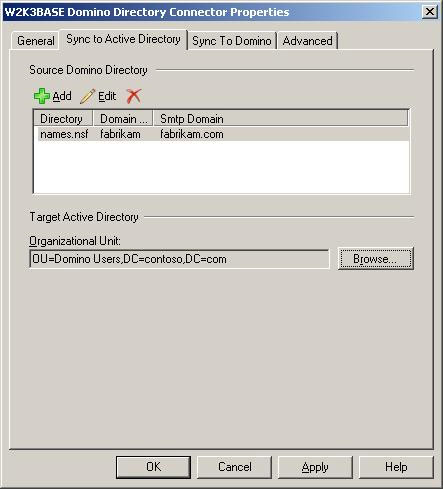
Figure 4: Directory Connector's Sync to Active Directory Tab.
4. Sync to Domino tab is used to configure directory synchronization from Exchange to Domino. These configuration options include:
a. Source Organizational Units . Here, select the OUs in Active Directory that store Exchange user accounts, groups, or contact lists to perform synchronization in Domino. In Contoso 's case, the Head Office OU is selected, the results are all objects in this OU and all objects in the sub-OUs of the Head Office OU are also added (Figure 4). To select an OU, click the Add button and browse to the OU to use in the New Source OU Entry window.
b. Target Domino Directory Names and Addresses (NSF) File . This field is used to select the name of the Domino Directory that accepts Exchange users, user groups, and contact lists configured in the previous step. By default, this name will be set to names.nsf , but you can choose another Domino Directory if necessary. In our example Fabrikam requires Exchange information to be synchronized in names.nsf so we keep the default name.
c. Routable Exchange Domains . Here we perform Contoso's SMTP contoso.com domain configuration as an Exchange navigation domain. If Contoso has many other additional domains like contoso.org , you must also configure those additional domains. To add these domains, simply click the Add button and enter the SMTP domain name to import in the Add Routable Exchange Domain Entry window.
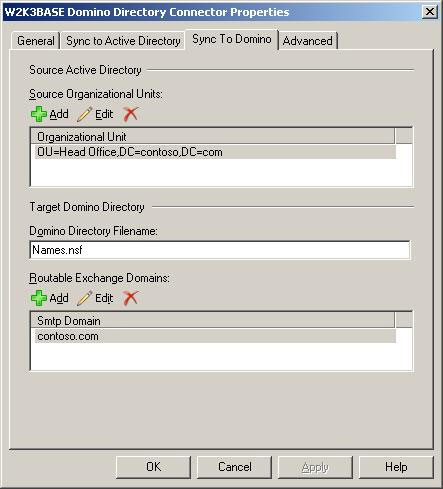
Figure 5: The Directory Connector's Sync to Domino tab.
5. The final configuration tab is the Advanced tab (Figure 6). Note the options to select user group synchronization and contact list. You can also select a list of groups that do not want to sync in Active Directory. In this article we will keep the default values.
6. The configuration process for the Directory Connector is now complete. Click OK to return to the Transporter Suite main window.
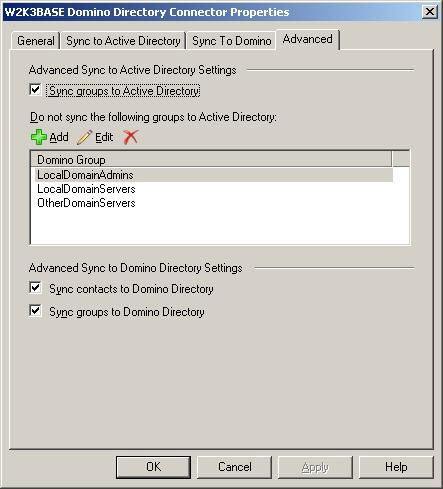
Figure 6: Advanced Tab of the Directory Connector.
You can also simultaneously create and configure a Directory Connector through the New-DominoDirectoryConnector cmdlet. Syntax syntax sections in Figure 7 show the names of the parameters. Many parameter names are explained because they can link to the options you saw in the Transporter Management Console . However, if you are not sure, you can check back in the Transporter Suite help.
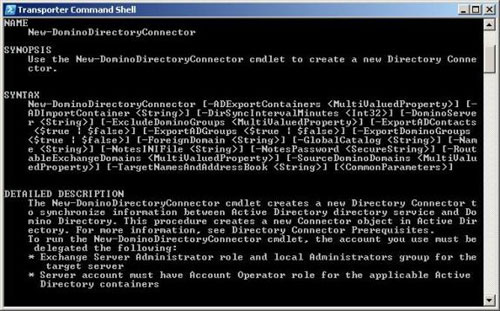
Figure 7: New-DominoDirectoryConnector Syntax
Perform synchronization
After the Directory Connector has been configured, this service must be started before performing the synchronization process. The name of this service for Lotus Domino is the Microsoft Exchange Directory Connector Service. You need to remember that by default the boot parameter of this service is set to Manual, so you need to change this parameter to Automatic. Failure to start the service will see a timeout error (Figure 8) when trying to synchronize folders.
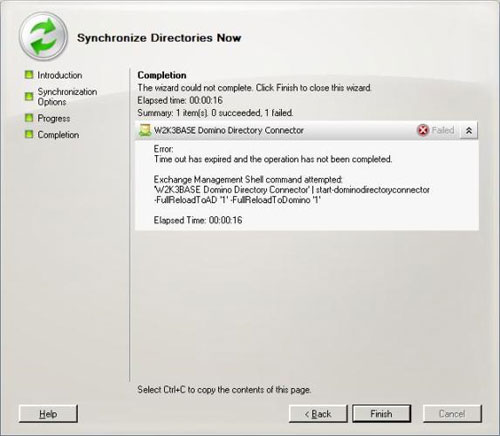
Figure 8: Timeout error in the Directory Connector.
You can wait for the synchronization process to start according to the installed schedule or start immediately in case you first install the Directory Connector. In the Console window, right-click the Directory Connector in the Transporter Management Conccole and then select Synchronize Now (this option is in the context menu of the Action table). When you do this, you will see the Synchronize Directories Now wizard, which includes the following tutorial screen:
1. The Synchronization Options screen. Here you will see different types of synchronization, such as Update Synchronization or Full Synchronization, along with a number of options for implementing them. If this is the first time you have done the directory synchronization process between the two systems, you should choose the Full Synchronization option and the third option Full two way synchronization . Then you will perform a synchronization process. completely new, so you should not perform this process regularly if not really necessary. This synchronization process will remove all objects of the previous synchronization process and re-create them. The option to choose is Update Synchronization (only updating or editing objects). If this is the first time to perform directory synchronization, you should choose to synchronize two way synchronization (Figure 9). After you've selected the options, click the Next button.
2. After that, the Progress screen will appear. On this window, click on the Synchronize button. The connector will start the synchronization process. After you finish, click the Finish button to close the wizard.
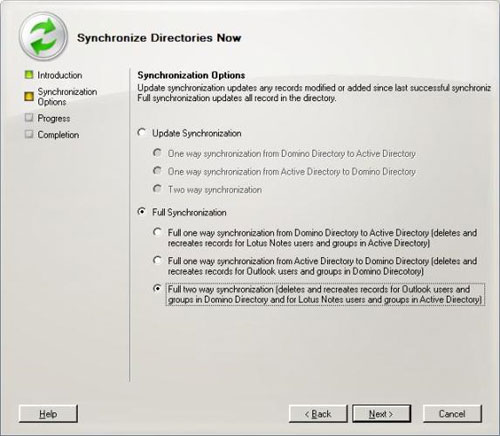
Figure 9: Synchronize Directories Now Wizard.
You can use Shell to perform the above operations via the following simple cmdlet command:
Start-DominoDirectoryConnector -FullReloadToAD -FullReloadToDominoYou do not need to use the -Identity parameter in this case because there is only one Directory Connector, but you can use UpdateToAD and UpdateToDomino parameters to perform Update Synchronization .
We have completed directory synchronization. But we need to perform additional checks to confirm the synchronization process is successful. First, check the Domino Users OU content (Figure 10). As you can see, Domino Users currently stores email-enabled contacts that represent the Fabrikam Domino users and groups. Similarly, checking the Domino Directory , we see that it contains the Exchange user and group list (Figure 11).
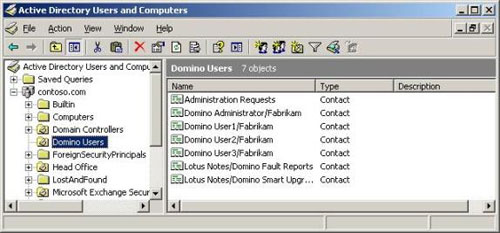
Figure 10: Domino user in the Notes Users OU.
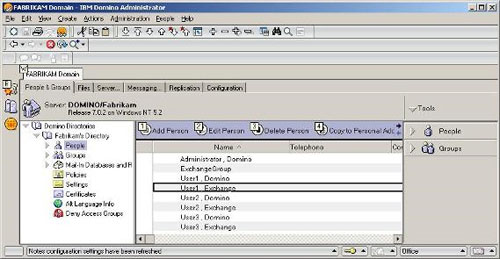
Figure 11: Exchange Users in the Domino Directory.
Check the record
The Transporter Suite can store information in the Event Log while performing data synchronization that you can use when the synchronization process fails. The DominoDirectoryConnector application has three different types, including Service , Controller and DirSync . Run the Get-TransporterEventLogLevel command | fl to see them.
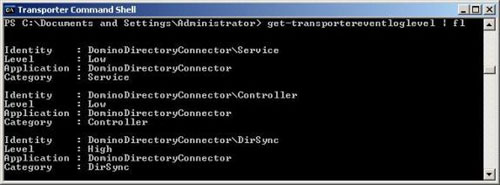
Figure 12: Output information of Get-TransporterEventLogLevel command.
You will also find that the two types are set to Low by default. If you want to upgrade those two types, you will have to use the Set-TransporterEventLogLevel cmdlet with the -Identity parameter . In Figure 11, the DirSync type is set to High - high, this is the result of the following cmdlet (note the format of the -Identity parameter and this format includes the application name of DominoDirectoryConnector):
Set-TransporterEventLogLevel -Identity DominoDirectoryConnectorDirSync -LoggingLevel High
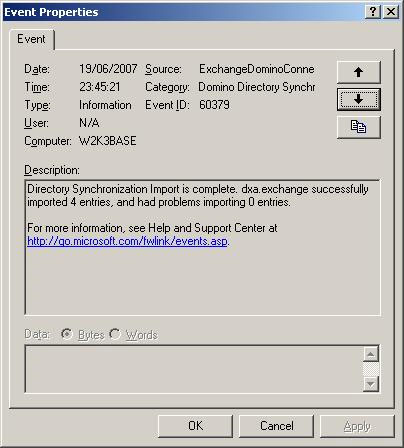
Figure 13: DirSync Logging information template.
Conclude
In this second part of the series, we completed the directory synchronization process to where Contoso and Fabrikam shared the address book. That means users from each group can easily send emails to other groups by selecting names from the address book. In the next section, we will perform the Free / Busy Connector installation so that users can exchange schedules.
Share by
Lesley Montoya
Update 26 May 2019