Replace Domino with Exchange 2007 (Part 3)
In Part 1 and Part 2 of this series, we learned about Transporter Suite for Lotus Domino, installing this application, performing directory synchronization between the two systems.
In part 1 and part 2 of this article series, we learned about Transporter Suite for Lotus Domino, installed this application, performed directory synchronization between two Contoso systems (using Exchange 2007) and Fabrikam (using Lotus Domino 7).
>> Replace Domino with Exchange 2007 (Part 1)
>> Replace Domino with Exchange 2007 (Part 2)
Now the address books have been synchronized, our next step is to ensure that every user on each system can check the schedule information of others. Sharing the address book is quite useful, but the ability to query free / busy information on schedule is much more useful.
Free / Busy Connector
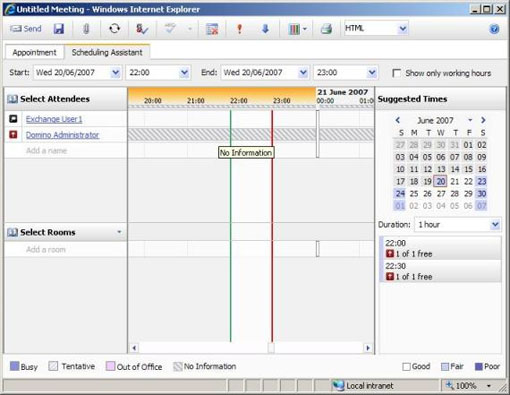
The Directory Connector does not allow for Free / Busy information queries between the two systems, but you can do this via the Free / Busy Connector . With this tool Contoso and Fabrikam users can view the address book and schedule work together. Suppose a user in Contoso system named Exchange User 1 wants to schedule a meeting with the Fabrikam user called Domino Administrator via Outlook Web Access . Without using the Free / Busy Connector, Contoso users will not see any information when querying Free / Busy information as shown in Figure 1.
Before installing the Free / Busy Connector, there are a few things to note about this tool:
Prepare for Domino system
First we will initialize the Foreign Domain Document on the Domino Fabrikam server using the Domino Administrator application. Follow these steps:
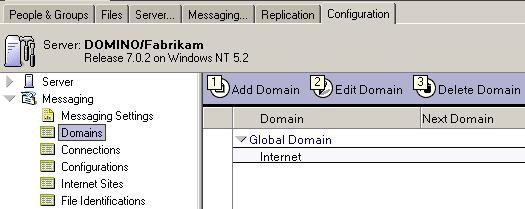
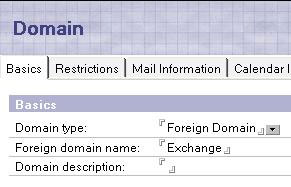
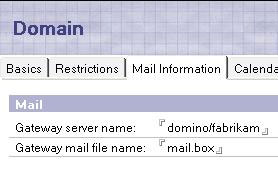
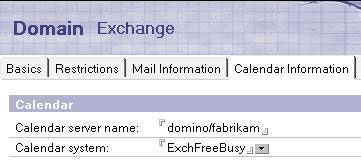
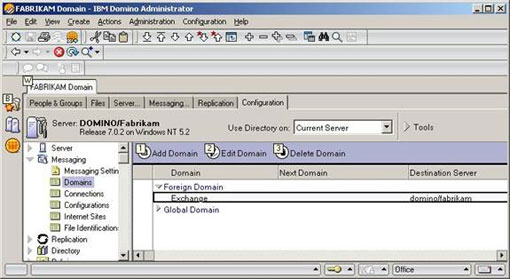
Figure 7: The screen appeared after the successful creation of Foreign Domain.
Install Excalcon.exe
While in the Domino configuration area, you can also perform some other Domino configuration steps before installing excalcon.exe. This application needs to be installed on Fabrikam's Domino server by running the transport.msi file (or transporter32.msi file if you are using a 32-bit version) on the Domino server. Follow these steps:
The selected line in notes.ini (Figure 9) needs to be changed to contain the excalcon.exe process. The additional command that needs to be applied to this notes.ini file is in the following format:
After saving the changes to the notes.ini file, you can choose to restart the Domino server application or call the excalcon.exe process without having to restart Domino by entering the command with the following syntax Domino server console:

Conclude
In this article, we have done the first preparation for the process of creating and configuring a Free / Busy Connector between Exchange 2007 and Lotus Domino. These operations focus on the preparation process on Domino systems. In the next section, we will do some preparation on the Exchange system, and then create and configure the Free / Busy Connector.
>> Replace Domino with Exchange 2007 (Part 1)
>> Replace Domino with Exchange 2007 (Part 2)
Now the address books have been synchronized, our next step is to ensure that every user on each system can check the schedule information of others. Sharing the address book is quite useful, but the ability to query free / busy information on schedule is much more useful.
Free / Busy Connector
The Directory Connector does not allow for Free / Busy information queries between the two systems, but you can do this via the Free / Busy Connector . With this tool Contoso and Fabrikam users can view the address book and schedule work together. Suppose a user in Contoso system named Exchange User 1 wants to schedule a meeting with the Fabrikam user called Domino Administrator via Outlook Web Access . Without using the Free / Busy Connector, Contoso users will not see any information when querying Free / Busy information as shown in Figure 1.
Figure 1: Cannot query Free / Busy information without using Free / Busy Connector.
Before installing the Free / Busy Connector, there are a few things to note about this tool:
- A separate process of the Transporter Suite , excalcon.exe, must be launched on the Domino server to allow for Free / Busy queries.
- Need to create a domain document in addition to storing Free / Busy information (the Directory Connector does not need to use this domain).
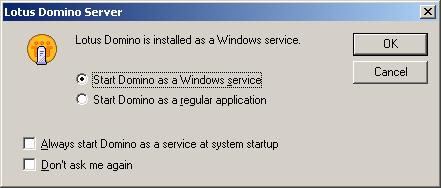
- Domino server must be launched as a service (not as an application) to be able to look up Free / Busy information. You can configure on the window that appears when starting Domino server (Figure 2) by selecting the Start Domino as a Windows Services option .
Figure 2: Launch Domino as a service.
Prepare for Domino system
First we will initialize the Foreign Domain Document on the Domino Fabrikam server using the Domino Administrator application. Follow these steps:
- Run the Domino Administrator application.
- Click the Configuration tab and then expand the Messaging section in the left panel.
- In the options list of Messaging , select Domains (Figure 3).
Figure 3: List of Messaging options.
- Click the Add Domain button, then you will see the New Domain window.
- Basics tab has been selected by default. At this tab, you need to set the Domain type to Foreign Domain and then enter Exchange in the Foreign domain name field . It's best to use Exchange as Foreign Domain Name in Domino or you'll have to run the Set-DominoDirectoryConnector cmdlet with the -ForeignDomain parameter to change the configuration for the Directory Connector (Figure 4).
Figure 4: Foreign Domain Basics tab.
- Next, click the Mail Information tab. Then enter the name of the Domino server running excalcon.exe in the Gateway server name field . Assuming this server is installed and named Domino / Fabrikam , enter this name for the Gateway server name field. In the Gateway mail server field , enter mail.box as shown in Figure 5.
Figure 5: Foreign Domain Mail Information Tab.
- Then, click on the Calendar Information tab. Please re-enter the Domino server name running excalcon.exe named Domino / Fabrikam in the Calendar server name field . Next enter the Calendar System name of Exchange into the Calendar System field, assuming the name of this system on Exchange is ExchFreeBussy (Figure 6).
Figure 6: Foreign Domain Calendar Information Tab.
- After completing the configuration in these tabs, click the Save & Close button to complete the Foreign Domain creation process. If the process is successful, you will see a screen similar to Figure 7 that appears.
Figure 7: The screen appeared after the successful creation of Foreign Domain.
Install Excalcon.exe
While in the Domino configuration area, you can also perform some other Domino configuration steps before installing excalcon.exe. This application needs to be installed on Fabrikam's Domino server by running the transport.msi file (or transporter32.msi file if you are using a 32-bit version) on the Domino server. Follow these steps:
- Ignore the Welcome screen, then accept the License on the Licensing screen.
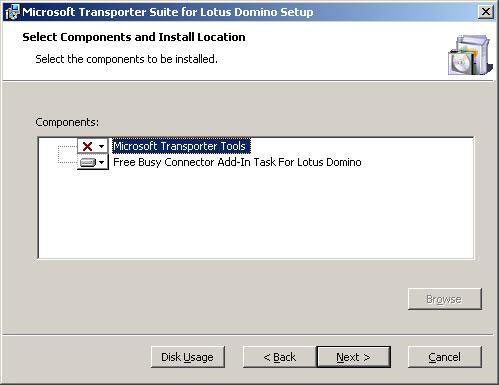
- At the Select Components and Install Location screen , you should not choose to install Microsoft Transporter Tools , instead choose to install Free / Busy Connector Add-In Task for Lotus Domino (Figure 8). This is done to ensure that only excalcon.exe is installed on the Domino server and does not install the rest of the Transporter Suite.
Figure 8: Installing Free / Busy components.
- After choosing it, click the Next button , then click the Install button on the Ready to Install screen.
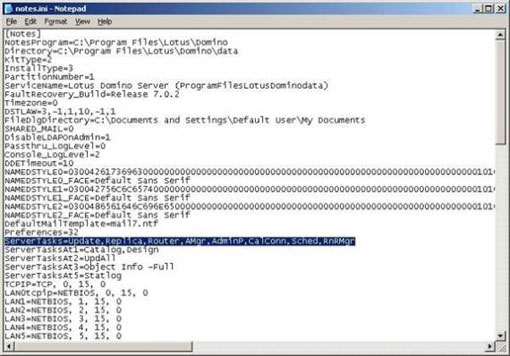
- When the installation process finishes, you should configure the notes.ini file on the Domino server to always load excalcon.exe . By default, notes.ini will be saved in the Program FilesLotusDomino folder on any drive you have installed Domino on.
Figure 9: Default Notes.ini file.
The selected line in notes.ini (Figure 9) needs to be changed to contain the excalcon.exe process. The additional command that needs to be applied to this notes.ini file is in the following format:
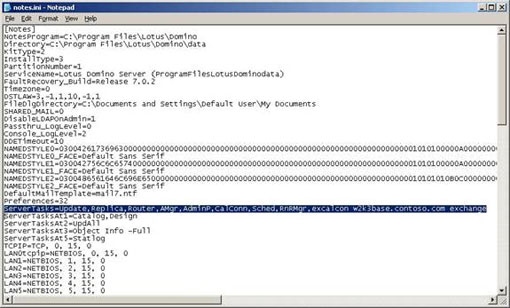
, excalconIn our example scenario, Contoso's Exchange server is named W2K3BASE in the contoso.com domain . Remember, we just created Foreign Domain with Exchange name, so this command becomes:
, excalcon w2k3base.contoso.com exchangeTherefore, the edited notes.ini file will be similar to Figure 10 below.
Figure 10: File Notes.ini has been edited.
After saving the changes to the notes.ini file, you can choose to restart the Domino server application or call the excalcon.exe process without having to restart Domino by entering the command with the following syntax Domino server console:
load excalconIn our example this command will be:
load excalcon w2k3base.contoso.com exchangeHowever, when you run this command you will see an error (Figure 11) when loading excalcon on the Domino server. That's because we haven't created the Connector yet and the necessary service has not been launched on the Exchange server.
Figure 11: Error loading excalcon.exe on Domino server.
Conclude
In this article, we have done the first preparation for the process of creating and configuring a Free / Busy Connector between Exchange 2007 and Lotus Domino. These operations focus on the preparation process on Domino systems. In the next section, we will do some preparation on the Exchange system, and then create and configure the Free / Busy Connector.
Was this article helpful?
Your feedback helps us improve.
Related Articles
 Replace Domino with Exchange 2007 (Part 1)10 minutes read
 Replace Domino with Exchange 2007 (Part 2)13 minutes read
 Replace Domino with Exchange 2007 (P.5)8 minutes read
 Replace Domino with Exchange 2007 (P.4)13 minutes read
 Security features of OWA (Part 2)9 minutes read
 Domino effects and simple ways to build good habits8 minutes read
Reader Comments 0
Sign in with email or Google to join the discussion.