Transfer Exchange 2003 to Exchange 2007 (Part 2)
Network Administration - In part one we set out a hypothetical situation as well as understanding the configuration options that apply to all servers during this transition. And we have also prepared the Active Directory schema to receive the first Exchange Server 2007 server. In this article, we will continue the process to build the Exchange 2007 system starting with the installation of the Hub Transport and Client Access Server.
>> Transfer Exchange 2003 to Exchange 2007 (Part 1)
Hub Transport and Client Access Server settings
Next we will install the first combined server between Client Access Server and Hub Transport. Since these servers must be installed manually, we will have to install the Graphical User Interface (GUI) version and choose to install the option C ustom Exchange Installation . You should select this option to install the Mailbox server as well as the Hub Transport and Client Access Server servers .

When installing the Hub Transport server on an Exchange 2007 server (coexisting with the Exchange 2003 system), you will see a page in the installation wizard asking to select a destination Exchange 2003 server that will be the connection point for Routing. New Group Connector was created during Exchange 2007 installation as shown in Figure 2.

If the Exchange 2003 system only includes a Routing Group containing two auxiliary Mailbox servers, you can choose one of the Exchange 2003 servers in this case.
After the installation process is completed successfully, check the Exchange installation log in C: ExchangeSetupLogs to detect an error message even though the installation has successfully reported.
The Update Rollup update for Exchange 2007 SP1 is now Update Rollup 3 so you should use Update Rollup Patches to update, or download the MSP file directly from the Microsoft Downloads page. If you check the Exchange source media file structure, you will see a folder called Updates containing the readme.txt file. In this file there is the following text:
'Updates thêm vào thư mục này sẽ được cài đặt trong trình lập.' (The updates added to this folder will be installed during the installation process.)
Therefore, to automatically update the relevant Update Rollup when installing Exchange 2007, simply copy the Update Rollup into the Updates folder.
Once you've installed Update Rollup 3, the newly installed Exchange 2007 server will be fully activated by running the Exchange Management Console and entering the Product Key into the Enter Product Key entry in the Actions panel. After that, redo this entire process on the Client Access Server and Hub Transport server Monday.
Prepare Cluster Nodes


Create Cluster

Conclude
>> Transfer Exchange 2003 to Exchange 2007 (Part 1)
Hub Transport and Client Access Server settings
Next we will install the first combined server between Client Access Server and Hub Transport. Since these servers must be installed manually, we will have to install the Graphical User Interface (GUI) version and choose to install the option C ustom Exchange Installation . You should select this option to install the Mailbox server as well as the Hub Transport and Client Access Server servers .

Figure 1: Installing the Hub Transport and Client Access Server settings.
When installing the Hub Transport server on an Exchange 2007 server (coexisting with the Exchange 2003 system), you will see a page in the installation wizard asking to select a destination Exchange 2003 server that will be the connection point for Routing. New Group Connector was created during Exchange 2007 installation as shown in Figure 2.

Figure 2: Select the connection server.
If the Exchange 2003 system only includes a Routing Group containing two auxiliary Mailbox servers, you can choose one of the Exchange 2003 servers in this case.
After the installation process is completed successfully, check the Exchange installation log in C: ExchangeSetupLogs to detect an error message even though the installation has successfully reported.
The Update Rollup update for Exchange 2007 SP1 is now Update Rollup 3 so you should use Update Rollup Patches to update, or download the MSP file directly from the Microsoft Downloads page. If you check the Exchange source media file structure, you will see a folder called Updates containing the readme.txt file. In this file there is the following text:
'Updates thêm vào thư mục này sẽ được cài đặt trong trình lập.' (The updates added to this folder will be installed during the installation process.)
Therefore, to automatically update the relevant Update Rollup when installing Exchange 2007, simply copy the Update Rollup into the Updates folder.
Once you've installed Update Rollup 3, the newly installed Exchange 2007 server will be fully activated by running the Exchange Management Console and entering the Product Key into the Enter Product Key entry in the Actions panel. After that, redo this entire process on the Client Access Server and Hub Transport server Monday.
Prepare Cluster Nodes
Even though the Cluster Nodes CCR has been installed with Windows 2003 operating system and related updates, you still have to do a lot of configuration for the network. Obviously, each Cluster Node contains two standard network cards for each Cluster configuration with additional network cards performing the functions as the internal communication channel of the Cluster. Therefore, for convenience, you should change the default name of the network connection Local Area Connection and Local Area Connection 2 in Public and Private order . In addition, since now this network has been renamed Private only used for Cluster communication, we need to change some configuration for this network connection, including:
- Make sure there are no DNS servers identified in this network connection.
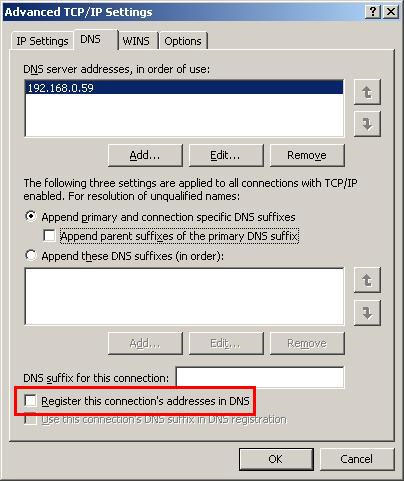
- Remove the check box for Register this connection's addresses in DNS (register the addresses of this connection in DNS) as shown in Figure 3.
- Select the WINS option labeled Disable NetBIOS over TCP / IP .

Figure 3: Private network configuration.
This network connection will not use the DNS server because these servers are configured on the Public network. Furthermore, this network connection does not use NetBIOS instead of TCP / IP for the same reason. Remember, this network connection is used to allow two Cluster Nodes to communicate with each other. However, another important thing to keep in mind is that Microsoft proposes to choose the Client for Microsoft Networks option and File and Printer Sharing for Microsoft Networks for Private connection. Also according to the proposal, network connections should (in this case, Public and Private) choose this option to provide the Fault Tolerance for Majority's Quorum Resource Node Set will be created later, but all However, this depends on many factors such as network configuration.
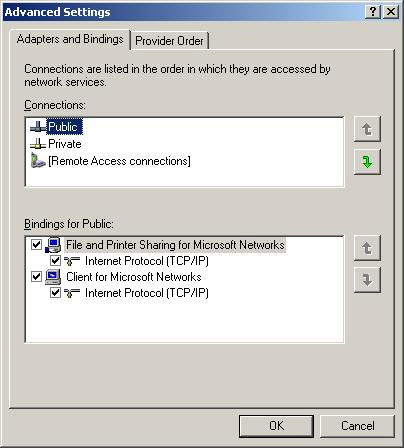
Finally, you need to make sure the network connection order is correct by going to Network Connections in Control Panel then clicking on the Advanced button and selecting Advanced Settings . Then the Advanced Settings window appears as shown in Figure 4. The exact order will be Public , Private and finally Remote Access connections .

Figure 4: Network connection order.
Later Cluster Nodes have been prepared in previous required software including .NET Framework 2.0 SP1 , Windows PowerShell 1.0 , Network COM + Access and World Wide Web Publishing Service .
Create Cluster
The next step is to create the Cluster before deploying Exchange 2007 on each Cluster Node. You can create on the Cluster Administration program or create using the command line using cluster.exe. In this article we will use the Cluster Administration program to create the Cluster. Before running the Cluster creation wizard, we will create a Cluster service account in the domain that we will use in the article, neilhobsonexcluster .
Then do the following steps to create the Cluster:
When launching the Cluster creation wizard, you will first see the Welcome page of the New Server Cluster wizard. Here, click Next to move to the next page.
On the next page you will have to enter the domain name that the Cluster is installed in, then enter the name for the new Cluster. The example to enter the name for this Cluster is CLUSTER1 . Then click Next .
The next page requires adding the first Node for Cluster. For example, specify NODE1 . The wizard will then analyze the configuration of NODE1 to ensure that this Node can be added to the Cluster. You can then continue the Cluster creation process.
Next, you will switch to the IP Address page where you configure the IP address of the cluster you are creating. Note, this is not the IP address of the Clustered Mailbox Server (CMS) that Outlook users will connect to. Now click Next .
The Cluster Service Account page appears, here you enter the service account Cluster created earlier.
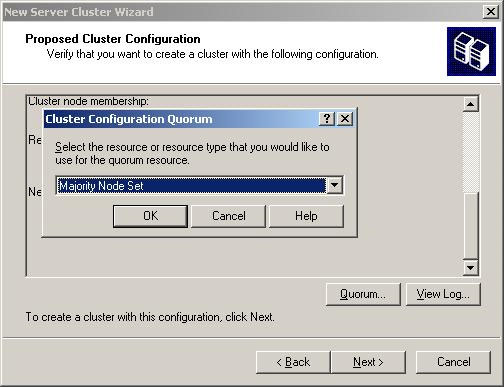
Finally, the Proposed Cluster Configuration page displays all the options and configuration that was performed. However, another important configuration required to do this is to configure the Quorum Resource . In Figure 5, you can see the Quorum button. When you click this button, you will see the Cluster Configuration Quorum window. Here you need to select the Majority Node Set option .

Figure 5: Configuring Quorum Resource.
Conclude
In this section, we have installed the Hub Transport and Client Access Server servers as well as the first Cluster preparation steps. In the next part - part 3 we will configure the Cluster and configure file sharing and install Clustered Mailbox Server.
Share by
Kareem Winters
Update 26 May 2019