Table of Contents
The process for mark locations with marker on iPhone is straightforward once you know where to find the right controls. The steps below explain what to do and what to check.
There are many impressive new features in the new iOS 11 version of the iPhone, the Maps application also received great interest from Apple. This means that you don't need to rely heavily on Google Maps when navigating anymore, Apple Maps has made navigation more accurate and offers even more convenience.
How Mark Locations with Marker on iPhone Works
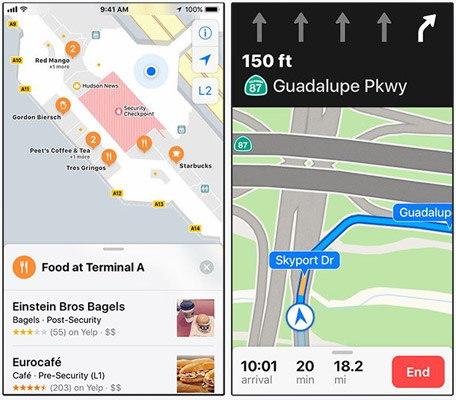
Some of the new Maps features are highly appreciated such as indoor maps, lane guides, speed limit indicator, single-handed zoom, light navigation mode and best of which are driving modes. Safe, it turns off the screen so you only focus on navigation (of course when you know the way).
- Updates on Apple Maps iOS 11 make everyone want to use it
In addition to the above features, Maps also has minor changes that users who are not familiar can be confused. One of them is the Marker.
Marker and Pin are the same thing used to mark locations on a map. If you have used iOS devices in the past and are used to marking places with Pin, always wonder what Marker is, then this is the only note to note. Maps version of iOS 11 tends to use Marker is the default term.
- Open the map showing the location you want to mark with Marker (This can help you find your way there or vice versa).
- When needed, you can enlarge the map to see more clearly the location you want to mark.
- Touch and hold your finger at the point to mark. The marker appears with an information dialog.
- Swipe up the info dialog to display details about the bookmarked location.
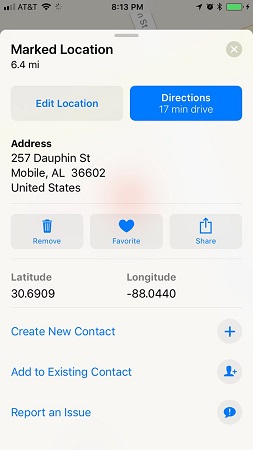
Note: If the review location has a review, for example the restaurant and travel reviews of the Yelp website, you can display the location details and scroll down to read the reviews.
Please refer to more:
- How to use offline Bing Maps on Windows 10
- Tell you 10 simple photography tips that are effective on iPhone
- 6 simple ways to speed up iOS 10 on old iPhones
- 5 steps to set the vibration mode characteristic for callers on iPhone
- Don't skip fast typing tips on the iPhone
FAQ
What should I prepare before I mark locations with marker on iPhone?
Review the requirements in the guide, confirm that your device or software is compatible, and save important work before changing settings related to mark locations with marker on iPhone.
Why might mark locations with marker on iPhone not work as expected?
The most common causes are incompatible versions, missing permissions, incorrect settings, or an interrupted internet connection. Recheck each step and restart the app or device when appropriate.
Can beginners follow these mark locations with marker on iPhone steps?
Yes. Follow the steps in order, avoid skipping confirmation screens, and compare your interface with the screenshots because labels may differ slightly between versions.
Related Articles
 How to Delete Significant Locations (Important Locations) on iPhone4 minutes read
 How to Take a Photo of a Web Page Using the 'Multi-zi-function'10 minutes read
 How to Mark Messages as Read in iPhone3 minutes read
 Please Download Folder Marker (24.95 Usd) -- the Beautiful Folder2 minutes read
 How to View Weather in Multiple Locations on iPhone at the Same Time5 minutes read
 Create Watermark for Word Documents: Complete Guide4 minutes read
Reader Comments 0
Sign in with email or Google to join the discussion.