Instructions on how to align margins in Word in the most detailed way
To present an administrative document, the alignment must also follow a certain standard. Do you know how to align margins when drafting in Word? If you do not know, read the instructions on how to align margins in Word below by HACOM !!
Table of Contents
How to align margins in Word is a basic operation that many people often use when editing text on Word. However, for those of you who do not know how to align correctly, or simply present a single word, do not worry, we can completely learn. The instructions below will explain how to align margins in Word so that they follow the standard rules!
Margin standards in Word
To be able to align margins correctly, you also need to know some regulations on Administrative Documents as well as the terms in the settings of Microsoft Word versions. And according to the regulations of the Ministry of Home Affairs 'Guidelines on the format and techniques of presenting administrative documents':
The font used in administrative documents must be Vietnamese font with Unicode code according to Vietnamese standards.
The normal paper size is A4 (210 mm x 297 mm), in some cases A5 can be used.
Standards for administrative document presentation techniques, specifically standard margins in Word, are as follows:
- Top margin: 20-25mm from the top edge.
- Bottom margin: 20-25mm from the bottom edge.
- Left margin: 30-35mm from the left edge.
- Right margin: 15-20mm from the right edge.
Note: Before formatting the paper size and margins, please check and convert the measurement unit in Word to Centimeters according to the instructions below. If your Word has already been converted, let's go to section 3.
The most detailed way to align Word margins
For Word 2013, 2016 and 2019
For 3 versions of Word 2013, 2016 and 2019, you can apply the following method to align margins in Word to the standard paper size.
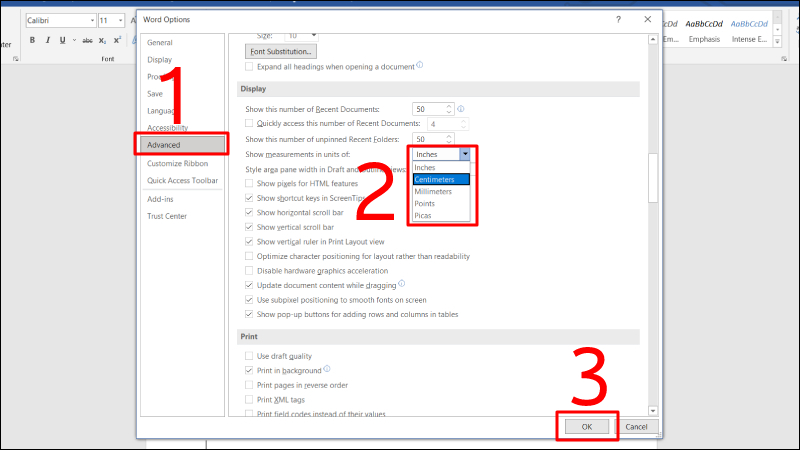
Step 1: To adjust margins in Word, first you need to change the default measurement unit to Centimeters by selecting File in the upper left corner of the Word interface and selecting Option in the next interface.

Step 2: Click on the Advanced tab in the left column and find the Display item in the right block. Change the Show Measurements in unit of value from Inches to Centimeters.
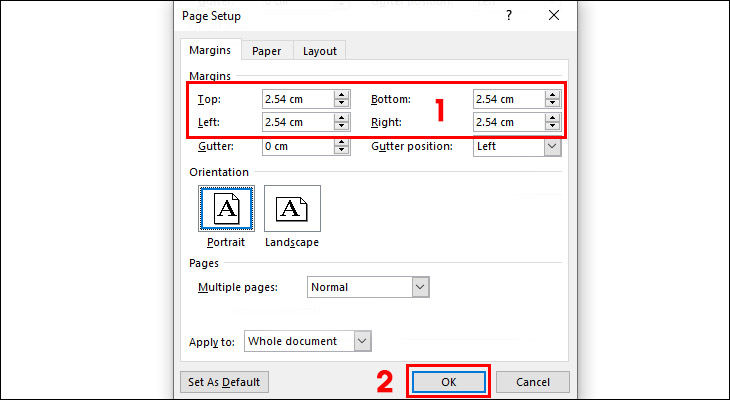
Step 3: Return to the Word interface, click on the Page Layout tab > Margins > Custom Margins
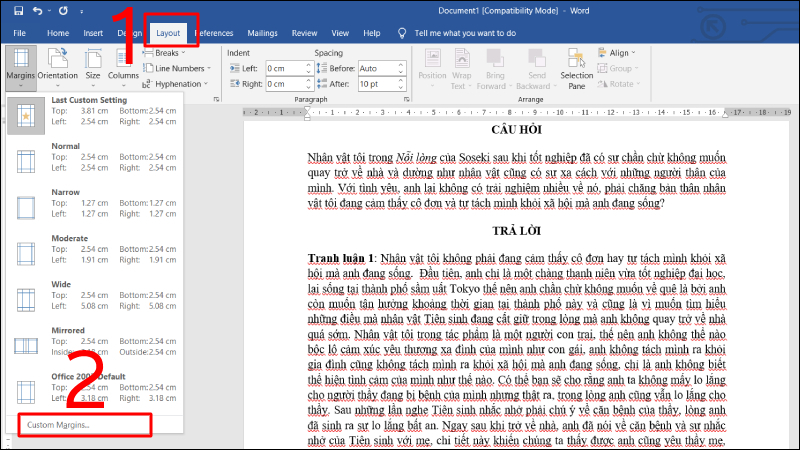
Step 4: The Page Setup dialog box appears, edit the top margin, bottom margin, left margin, right margin as desired and then click OK.
For Word 2007 and 2010
The way to align margins in Word 2010 is quite similar to Word 2007, so you can follow the instructions below, which apply to both versions.
Step 1: Change the default measurement unit to Centimeters first.
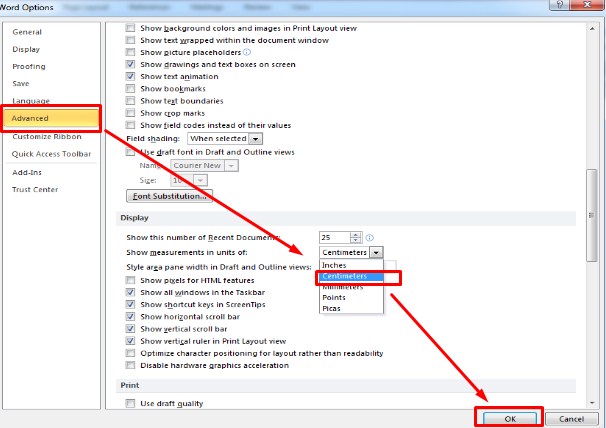
- Click on the Office Button > Word Options
Step 2: Go to the Advance tab > scroll down to the Display option > select Measurement Unit as Centimeters > OK.
Step 3: Click on the Page Layout tab > Margins > Custom Margins
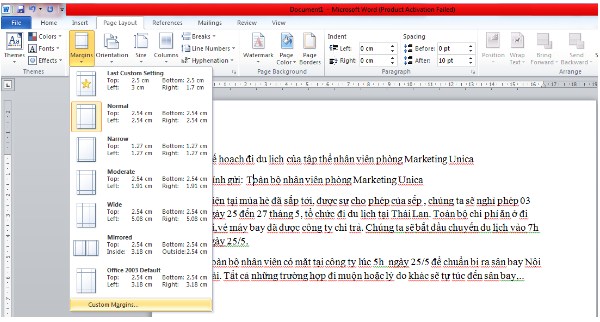
Step 4: You edit the parameters of top margin (Top), bottom margin (Bottom), left margin (Left), right margin (Right) as desired > OK.
For Word 2003
Step 1: First you need to change the default measurement unit in Word 2003 to Centimeter. Go to Tools > Options
Step 2: Click the General tab > select Measurement Units as Centimeter > OK
Step 3: Go to File > Page Setup
Step 4: You edit the parameters of top margin (Top), bottom margin (Bottom), left margin (Left), right margin (Right) as desired > OK.
Set default margins in Word
Setting margins for each new paragraph will take more time, especially for those who write a lot of documents every day. Therefore, TipsMake will guide you through a simple trick to set default margins.
Step 1: After finishing aligning the margins in the above steps, click on the Save As Default option.
Step 2: Finally, select Yes to confirm that you have completed setting the default margins.
How to space lines and paragraphs in Word
First, you highlight the text that needs line spacing, paragraph spacing, or alignment for the entire text, then press Ctrl + A to select all text. Next, in the Paragraph section on the Home tab, you select the icon as shown below.
The Paragraph dialog box will appear, in the Indents and Spacing tab, you select the previous paragraph spacing in the Before section, the spacing with the following paragraph After, the line spacing in the Line spacing section including:
- Single: spacing equal to one normal line.
- 1.5 lines: spacing equal to one and a half lines.
- Double: double the spacing of normal lines.
- At least: least distance.
- Exactly: equal distance.
- Multiple: distance multiple times.
To see the changes in the Preview section to edit accordingly. Then click OK to close the Paragraph dialog box.
Conclude
Above are all the instructions on how to align margins in Word that many people are starting to get acquainted with this popular text typing software. Along with aligning margins in Word, presenting beautiful text is always the top priority of many users. Hopefully the information in this article will help you know how to create text according to standards. For any questions, please contact hotline: 19001903 for the best advice and support.
Was this article helpful?
Your feedback helps us improve.
Related Articles
 Instructions on how to align margins in Word2 minutes read
 How to align correctly in Word3 minutes read
 How to align in Word extremely accurately5 minutes read
 Instructions on how to align beautiful margins for A4 paper size in Word4 minutes read
 Instructions for standard margins in Word in cm3 minutes read
 How to use the Ruler ruler bar in Word7 minutes read
Reader Comments 0
Sign in with email or Google to join the discussion.