How to show the alignment frame in Word

Align frames in Word help us align the Word margins more accurately according to current regulations. The margin frame will show the dotted indents in Word so that you can adjust the amount of text in each border when editing a Word document. However, due to the wrong operation, you may accidentally turn off the alignment frame, making it difficult to adjust the Word margin. To re-enable the alignment frame in Word is also very simple. We just need to change the setting in Word. The following article will guide you how to display borders in Word

1. Show Word alignment frame 2007, 2010, 2016, 2019

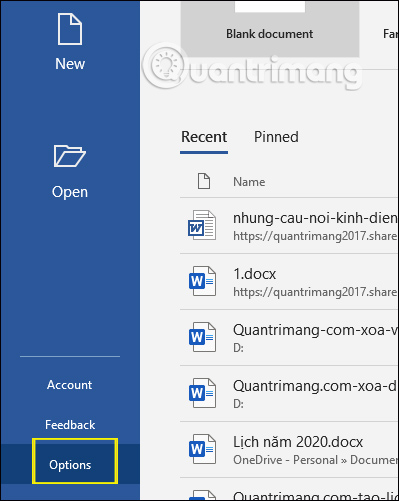
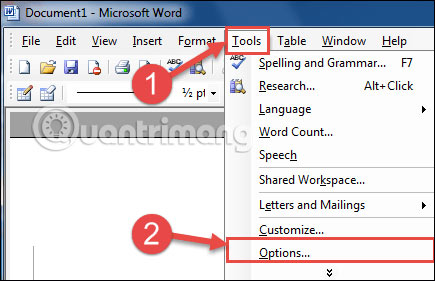
At the interface in Word, we click on File and then click on Options .

How to show the alignment frame in Word Picture 1

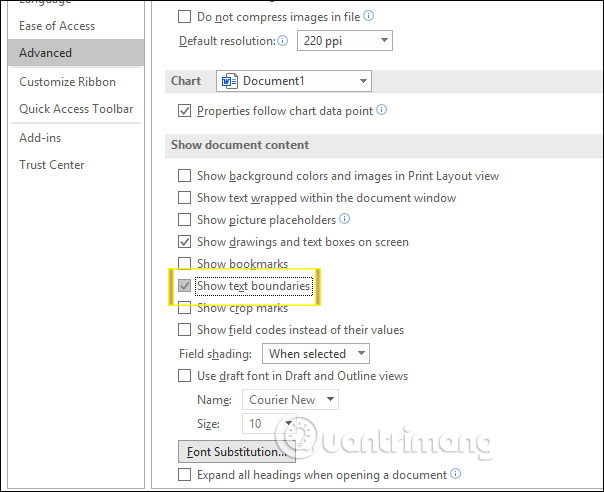
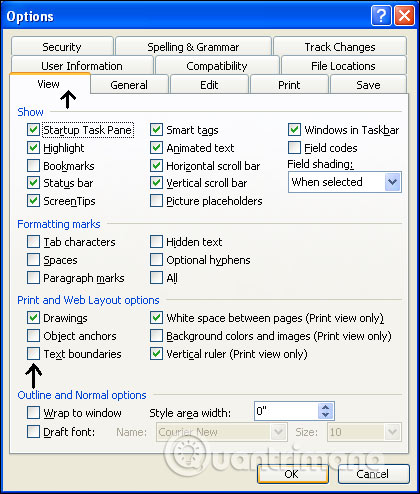
Then display the setting interface, we click on Advanced and then look to the right to find Show text boundaries to select.

How to show the alignment frame in Word Picture 2

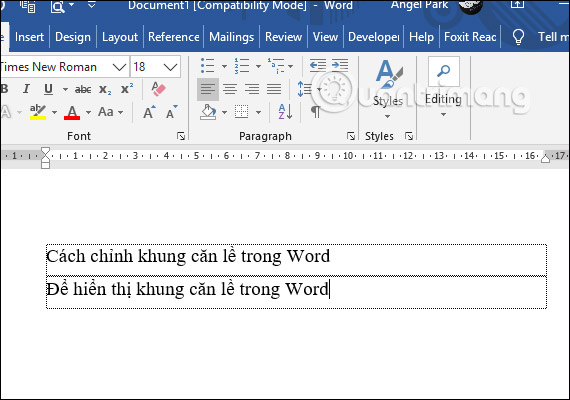
Then in the Word interface displays the border frame as shown below. When you enter what content to use, the alignment frame automatically displays to help you adjust the margin more standard.

How to show the alignment frame in Word Picture 3

With Word 2007 , you do the same, click the Office icon and select Word Options . Switch to the setting interface, click Advanced, and then activate the Show text boundaries option .

How to show the alignment frame in Word Picture 4

2. How to display the alignment frame in Word 2003

At Word 2003 interface, click on Tools and select Options .

How to show the alignment frame in Word Picture 5

Switch to the new interface, click on View and then tick Text Boundaries to activate the alignment frame in Word.

How to show the alignment frame in Word Picture 6

3. Fix alignment error showing multiple lines in Word

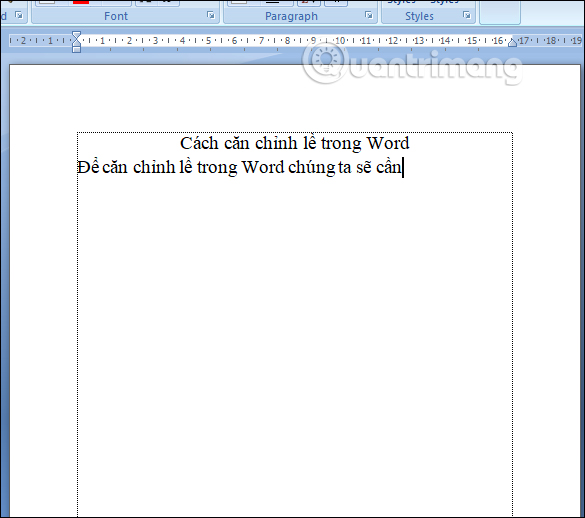
By default, when you activate the alignment frame, it will display each line like this when we press Enter. When displayed like this, it is annoying for users when the interface looks very confusing and also affects the process of editing and importing content. To show only one alignment frame, the border around the text you follow the way below.

Step 1:

First you need to download the file normal.dotm according to the link below.

https://drive.google.com/file/d/0B2QfUdkE56fzMVdXX1FoWVdSYW8/view

Step 2:

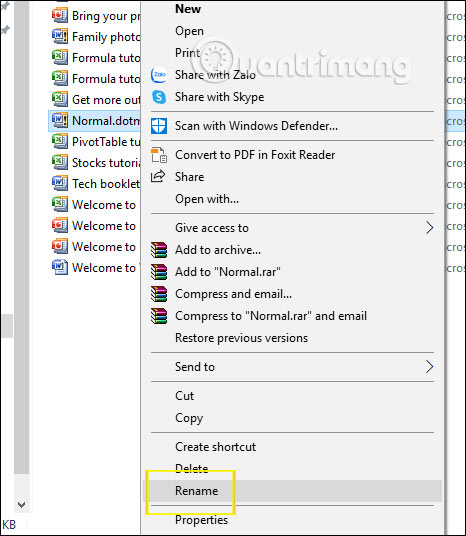
Next, users access the link below to navigate to the normal.dotm file currently in the system.

C:UsersuserAppDataRoamingMicrosoftTemplates

When you find the file normal.dotm , right click and select Rename to rename the file to any name.

How to show the alignment frame in Word Picture 7

Step 3:

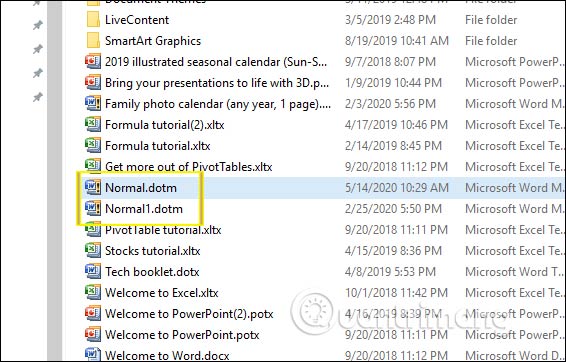
Then you move the newly downloaded normal.dotm file in step 1 into this directory to replace the normal.dotm file of Windows.

How to show the alignment frame in Word Picture 8

Finally, turn off the Text Boundaries option , turn off Windows, and then re-enable the alignment bracket from the start so that the changes are applied. The resulting alignment frame displays as shown below, no more lines as before.

How to show the alignment frame in Word Picture 9

4.1 ★ | 13 Vote

May be interested

  • How to frame text in WordHow to frame text in Word
    how to frame text in word in this article, you can frame the cover page, the whole document or just framed a paragraph in word.
  • Guidance on how to align Excel correctlyGuidance on how to align Excel correctly
    many acquaintances manually align excel margins, adjust alignment margins, and forget how to set alignment in excel. in this article, network administrator will show you how to align standard in excel.
  • How to merge 2 images into 1 frame in WordHow to merge 2 images into 1 frame in Word
    you wonder how to combine two images into a frame in word? there is actually more than one way to stitch two images into one frame in word. to learn about those methods, please come to the tutorial table how to combine 2 images into 1 frame in word of tipsmake.com.
  • Beautiful border frames on WordBeautiful border frames on Word
    border frames on word are often used when designing lesson book cover, report book cover, dissertation cover, etc. when adding border frames, the document will be professional.
  • How to make a border frame in WordHow to make a border frame in Word
    how to make a border frame in word to increase the professionalism when designing report covers and books, we often add borders to the cover page. in this article, tipsmake.com will guide you how to make a border for the cover.
  • How to display the Ruler (alignment bar) in WordHow to display the Ruler (alignment bar) in Word
    to present the first work document and force you to align the text. in some cases the ruler is hidden so you don't know where to align.
  • How to create a frame in Word - Instructions on how to create a frame in Word 2007, 2010, 2013, 2016How to create a frame in Word - Instructions on how to create a frame in Word 2007, 2010, 2013, 2016
    how to create frames in word - instructions on how to create frames in word 2007, 2010, 2013, 2016. creating frames in word is how to make your text more beautiful and more scientific. the following article introduces you in detail how to create frames in word
  • Nested frames and effects for images in WordNested frames and effects for images in Word
    introduce how to nest frames and visual effects in word. 1. how to frame the image. there are many ways to frame images in text. - click on the image - go to the format tab - quick styles select the fast frame style available for the picture
  • Default print margins in ExcelDefault print margins in Excel
    this article will guide you how to align the default alignment in excel, a little-known excel trick.
  • Instructions for standard margins in Word in cmInstructions for standard margins in Word in cm
    standard margins in word help you create clear and professional documents. depending on the version of word used, margin alignment may vary, but the basic steps remain the same.