Table of Contents
This updated guide explains how to Align Margins in Word through clear steps, practical examples, and important checks that help prevent common errors.
If, if your Word is in Inches, you should convert Centimeters to facilitate alignment.
1. Convert Units to Centimeters
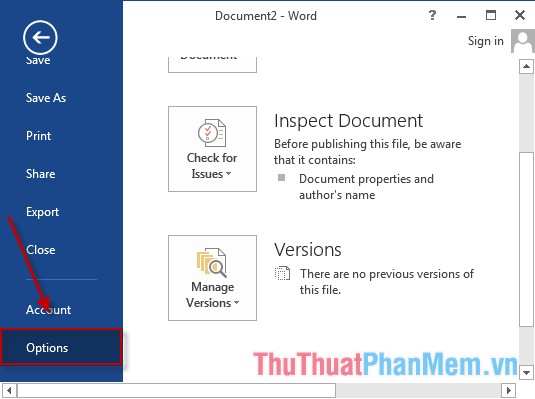
Step 1: Go to File -> Options .
Step 2: A dialog box appears select Advanced -> move the mouse to Display -> in the Show measurements in units of section choose Centimeters -> OK .
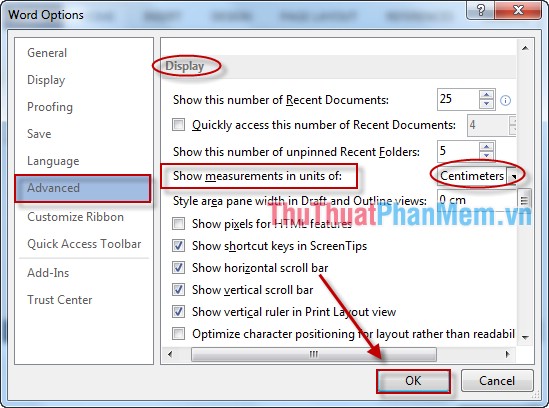
If your Word is using Centimeters, then proceed to align the following:
2. Align the Margins
Step 1: Select the PAGE LAYOUT tab -> click the arrow in Page Setup .

Step 2: The Page Setup dialog box appears, select the Margin tab -> align the margins as follows:
- Top: normal upper margin of the upper margin to 2cm.
- Bottom: lower margin usually to 2cm.
- Left: left margin, usually left margin 2.5 cm, left margin is usually wider than the other margins.
- Right: right margin to 2cm.
After aligning the alignment, click OK to finish.
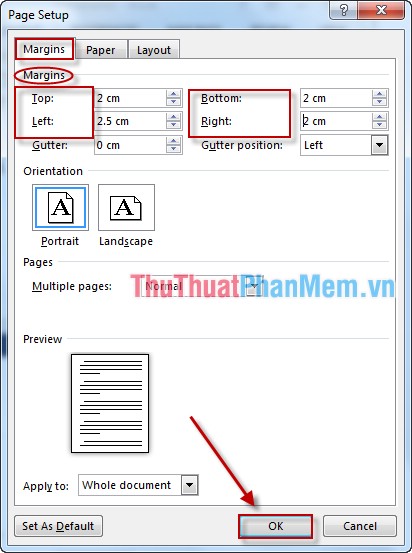
If you do not want to edit the alignment every time you create a new file, click Set As Default to set the default alignment for all pages.
FAQ
What is the easiest way to Align Margins in Word?
Start with the requirements in this guide, then follow each step in order. Check the result after every major change so problems are easier to identify.
Can beginners follow these instructions?
Yes. The process is organized into practical steps, and you can repeat any step before moving forward.
What should I check if the method does not work?
Confirm your software or device version, permissions, settings, file format, and internet connection when the task depends on online services.
Related Articles
 How to Align Margins in Word7 minutes read
 How to Align Correctly in Word: Step-by-Step Guide3 minutes read
 How to Align in Word Extremely Accurately: Clear Instructions7 minutes read
 Instructions on How to Align Beautiful Margins for A4 Paper Size in Word4 minutes read
 How to Standard Margins in Word in Cm4 minutes read
 How to Use the Ruler Ruler Bar in Word: How to Use Word Ruler8 minutes read
Reader Comments 0
Sign in with email or Google to join the discussion.